M15A-FKS ENGINE CONTROL CRANKSHAFT POSITION SENSOR INSTALLATION
CAUTION / NOTICE / HINT
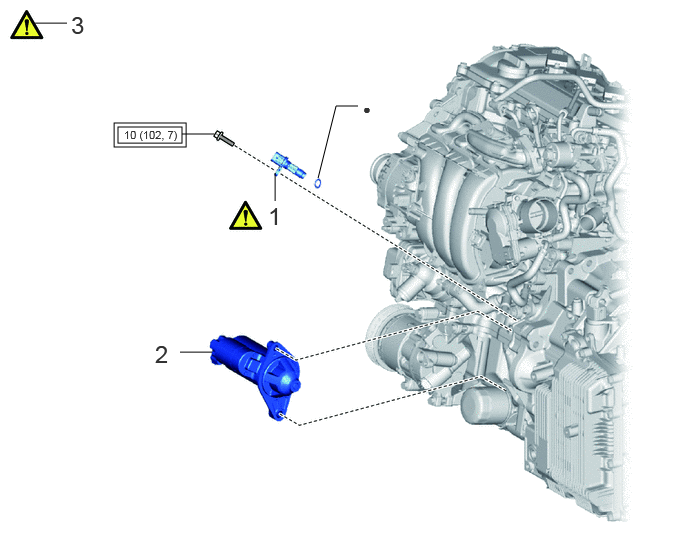
| Procedure | Part Name Code | 
|

|

|
|
|---|---|---|---|---|---|
| 1 | CRANKSHAFT POSITION SENSOR | 11401G | ( ) |
- | - |
| 2 | STARTER ASSEMBLY | 28100 | - | - | - |
| 3 | INSPECT FOR ENGINE OIL LEAK | - | ()
|
- | - |

|
Tightening torque for "Major areas involving basic vehicle performance such as moving/turning/stopping" : N*m (kgf*cm, ft.*lbf) | ● | Non-reusable part |
CAUTION / NOTICE / HINT
- NOTICE:
-
This procedure includes the installation of small-head bolts. Refer to Small-Head Bolts of Basic Repair Hint to identify the small-head bolts.
-
Click hereGeneral>INTRODUCTION>REPAIR INSTRUCTION>PRECAUTION
PROCEDURE

 11401G
1.INSTALL CRANKSHAFT POSITION SENSOR
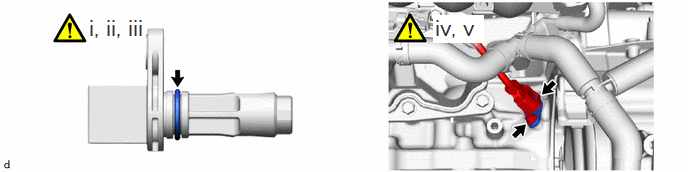
Clean the O-ring groove of the crankshaft position sensor.
- NOTICE:
-
Make sure the O-ring groove is free of foreign matter.
Install a new O-ring to the crankshaft position sensor.
- NOTICE:
-
Set the O-ring on the tip of the crankshaft position sensor and roll it into the O-ring groove with bare hands to install it.
Check if the O-ring is twisted.
Using an 8 mm socket wrench, install the crankshaft position sensor to the cylinder block sub-assembly with the bolt.
- Torque:
- 10 N*m (102 kgf*cm, 7 ft.*lbf)
- NOTICE:
- ·
If the crankshaft position sensor has been struck or dropped, replace it.
·Make sure that the O-ring is not cracked or does not move out of place during installation.
Connect the crankshaft position sensor connector.
28100
2.INSTALL STARTER ASSEMBLY
3.INSPECT FOR ENGINE OIL LEAK