CLUTCH CLUTCH STROKE SENSOR(for RHD) INSTALLATION
CAUTION / NOTICE / HINT
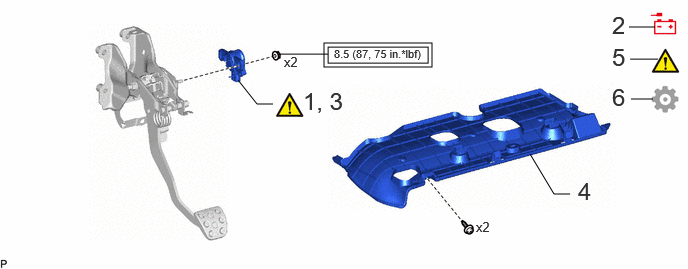
| Procedure | Part Name Code | 
|

|

|
|
|---|---|---|---|---|---|
| 1 | INSTALL CLUTCH PEDAL STROKE SENSOR ASSEMBLY | 89280 | ( ) |
- | - |
| 2 | CONNECT CABLE TO NEGATIVE AUXILIARY BATTERY TERMINAL | - | - | - | - |
| 3 | ADJUST CLUTCH PEDAL STROKE SENSOR ASSEMBLY | 89280 | ()
|
- | - |
| 4 | NO. 1 INSTRUMENT PANEL UNDER COVER SUB-ASSEMBLY | 55606 | - | - | - |
| 5 | CHECK AND CLEAR DTC | - | ()
|
- | - |
| 6 | INITIALIZATION AFTER RECONNECTING AUXILIARY BATTERY TERMINAL | - | - | - | ()
|

|
Tightening torque for "Major areas involving basic vehicle performance such as moving/turning/stopping" : N*m (kgf*cm, ft.*lbf) | - | - |
PROCEDURE

 89280
1.INSTALL CLUTCH PEDAL STROKE SENSOR ASSEMBLY
When installing a new clutch pedal stroke sensor assembly:
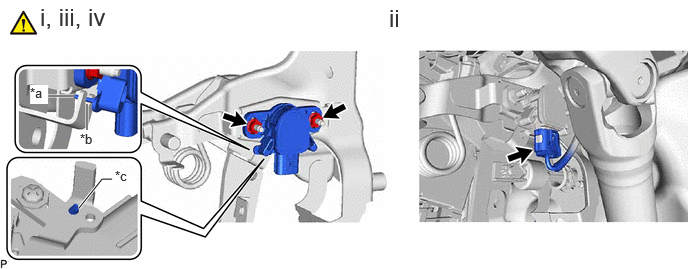
| *a | Clutch Pedal Stroke Sensor Assembly Lever | *b | Clutch Pedal Groove |
| *c | Clutch Pedal Stroke Sensor Assembly Lever Set Pin | - | - |
- NOTICE:
-
Do not break the clutch pedal stroke sensor assembly lever set pin before being instructed to do so.
Install a new clutch pedal stroke sensor assembly to the clutch pedal support assembly with the 2 nuts.
- Torque:
- 8.5 N*m (87 kgf*cm, 75 in.*lbf)
- NOTICE:
- ·
Engage the clutch pedal stroke sensor assembly lever with the clutch pedal groove.
·Check that there is no foreign matter attached to the contact surface of the clutch pedal stroke sensor assembly.
·Check that the tip of the clutch pedal stroke sensor assembly lever is protruding from the clutch pedal groove.
·Do not drop the clutch pedal stroke sensor assembly.
·If the clutch pedal stroke sensor assembly has been dropped, replace the clutch pedal stroke sensor assembly with a new one.
·Do not subject the clutch pedal stroke sensor assembly to shock during installation.
·Make sure to confirm that the clutch pedal fully returns to its original position.
Connect the clutch pedal stroke sensor assembly connector.
Firmly depress the clutch pedal sub-assembly to break the clutch pedal stroke sensor assembly lever set pin.
Remove the broken clutch pedal stroke sensor assembly lever set pin.
When reusing the clutch pedal stroke sensor assembly:
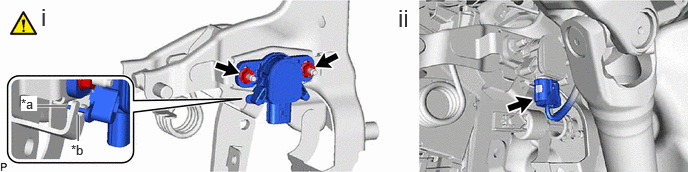
| *a | Clutch Pedal Stroke Sensor Assembly Lever | *b | Clutch Pedal Groove |
Install the clutch pedal stroke sensor assembly to the clutch pedal support assembly and temporarily tighten the 2 nuts.
- NOTICE:
- ·
Engage the clutch pedal stroke sensor assembly lever with the clutch pedal groove.
·Check that there is no foreign matter attached to the contact surface of the clutch pedal stroke sensor assembly.
·Check that the tip of the clutch pedal stroke sensor assembly lever is protruding from the clutch pedal groove.
·Do not drop the clutch pedal stroke sensor assembly.
·If the clutch pedal stroke sensor assembly has been dropped, replace the clutch pedal stroke sensor assembly with a new one.
·Do not subject the clutch pedal stroke sensor assembly to shock during installation.
·Make sure to confirm that the clutch pedal fully returns to its original position.
- HINT:
-
When fully tightening the nuts, perform adjust clutch pedal stroke sensor assembly first.
Connect the clutch pedal stroke sensor assembly connector.
2.CONNECT CABLE TO NEGATIVE AUXILIARY BATTERY TERMINAL
89280
3.ADJUST CLUTCH PEDAL STROKE SENSOR ASSEMBLY
|
|
|
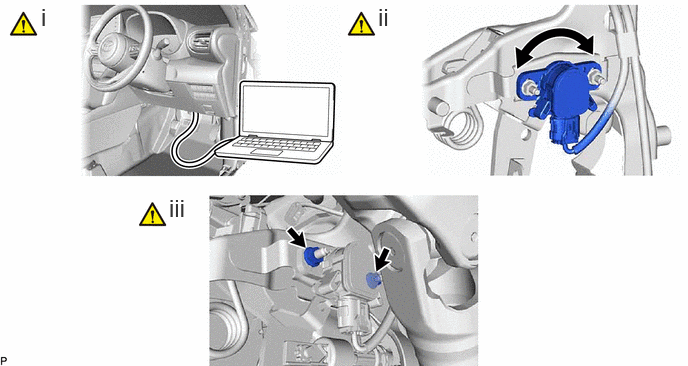
Read the Data List according to the display on the GTS.
- Powertrain > Engine > Data List
-
Tester Display Clutch Stroke Sensor Voltage - 50003 372 607
Read the clutch stroke sensor voltage value in the Data List, and turn the clutch pedal stroke sensor assembly slowly to the right or left to adjust the output voltage so that it is within the following range.
- Standard Voltage (clutch pedal fully released):
0.96 to 1.04 V
Tighten the 2 nuts.
- Torque:
- 8.5 N*m (87 kgf*cm, 75 in.*lbf)
- NOTICE:
-
After turning the ignition switch to ON, do not depress the clutch pedal sub-assembly until the nuts have been tightened.
55606
4.INSTALL NO. 1 INSTRUMENT PANEL UNDER COVER SUB-ASSEMBLY
5.CHECK AND CLEAR DTC
6. INITIALIZATION AFTER RECONNECTING AUXILIARY BATTERY TERMINAL
- HINT:
-
When disconnecting and reconnecting the auxiliary battery, there is an automatic learning function that completes learning when the respective system is used.
-
Click hereGeneral>SETUP>WHEN DISCONNECTING OR RECONNECTING BATTERY TERMINAL>AUTOMATIC LEARNING CHART