SEAT BELT SEAT BELT WARNING SYSTEM Driver Side Seat Belt Warning Light does not Operate
DESCRIPTION
The combination meter assembly blinks or turns off the seat belt warning light on the combination meter assembly in accordance with the state of the front seat inner belt assembly (for driver side).
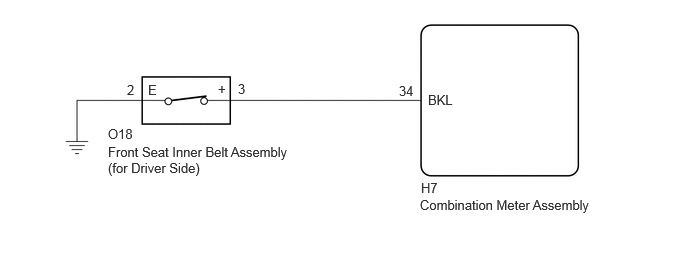
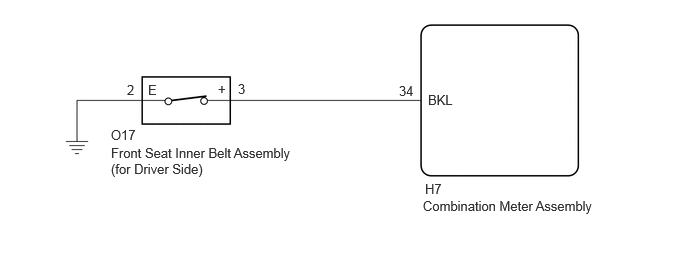
WIRING DIAGRAM
for LHD
for RHD
CAUTION / NOTICE / HINT
- NOTICE:
- ·
The seat belt warning system uses the CAN communication system and CXPI communication system. First, confirm that there is no malfunction in the CAN communication system and CXPI communication system. Refer to the How to Proceed with Troubleshooting procedure.
Click hereVehicle Interior>SEAT BELT>SEAT BELT WARNING SYSTEM>HOW TO PROCEED WITH TROUBLESHOOTING
·Before replacing the main body ECU (multiplex network body ECU), refer to Service Bulletin.
·When replacing the combination meter assembly, always replace it with a new one. If a combination meter assembly which was installed to another vehicle is used, the information stored in it will not match the information from the vehicle and a DTC may be stored.
- HINT:
- ·
The seat belt warning light on the combination meter assembly is used for both the driver seat and front passenger seat. Check that the operation of the seat belt warning light is normal first.
Click hereVehicle Interior>SEAT BELT>SEAT BELT WARNING SYSTEM>ON-VEHICLE INSPECTION
·If the seat belt warning light does not operate for both the driver seat and front passenger seat, replace the combination meter assembly.
Click hereVehicle Interior>METER / GAUGE / DISPLAY>COMBINATION METER>REMOVAL
PROCEDURE
Perform the Active Test according to the display on the GTS.
- Body Electrical > Combination Meter > Active Test
-
Tester Display Measurement Item Control Range Diagnostic Note Driver Side Seat Belt Warning Front seat belt warning light ON or OFF -
- OK:
The GTS display changes correctly in response to the warning light condition.
- Result:
Proceed to OK NG
OK
NG
Read the Data List according to the display on the GTS.
- Body Electrical > Combination Meter > Data List
-
Tester Display Measurement Item Range Normal Condition Diagnostic Note Driver Buckle Switch Driver side seat belt buckle switch status Fastened or Not Fastened Fastened: Driver side seat belt fastened
Not Fastened: Driver side seat belt not fastened-
- Body Electrical > Combination Meter > Data List
-
Tester Display Driver Buckle Switch - 50003 409 26
- OK:
The GTS display changes correctly in response to the driver seat belt condition.
- Result:
Proceed to OK NG
OK
NG
Click hereVehicle Interior>SEAT BELT>FRONT SEAT INNER BELT ASSEMBLY>INSPECTION
- Result:
Proceed to OK NG
OK
NG
Measure the resistance according to the value(s) in the table below.
- Standard Resistance:
for LHD Tester Connection Condition Specified Condition Click Location & Routing(O18,H7)Location & Routingewd_type=routing;type=c,c;code=O18,H7
Click Connector(O18)Seat>Floor Wire>Front Seat Inner Belt Assembly LHewd_type=component;type=c;code=O18;pinno=3,2
Click Connector(H7)Instrument Panel>Instrument Panel Wire / Speaker Wire>Combination Meter Assemblyewd_type=component;type=c;code=H7;pinno=34
O18-3 (+) - H7-34 (BKL) Always Below 1 Ω O18-3 (+) or H7-34 (BKL) - Body ground Always 10 kΩ or higher O18-2 (E) - Body ground Always Below 1 Ω
for RHD Tester Connection Condition Specified Condition Click Location & Routing(O17,H7)Location & Routingewd_type=routing;type=c,c;code=O17,H7
Click Connector(O17)Seat>Floor Wire>Front Seat Inner Belt Assembly RHewd_type=component;type=c;code=O17;pinno=3,2
Click Connector(H7)Instrument Panel>Instrument Panel Wire / Speaker Wire>Combination Meter Assemblyewd_type=component;type=c;code=H7;pinno=34
O17-3 (+) - H7-34 (BKL) Always Below 1 Ω O17-3 (+) or H7-34 (BKL) - Body ground Always 10 kΩ or higher O17-2 (E) - Body ground Always Below 1 Ω
- Result:
Proceed to OK NG
OK
NG