BRAKE CONTROL / DYNAMIC CONTROL SYSTEMS ELECTRONICALLY CONTROLLED BRAKE SYSTEM(for HV Model TMC Made) Brake Warning Light Remains ON
DESCRIPTION
The skid control ECU (brake booster with master cylinder assembly) is connected to the combination meter assembly via CAN communication.
If any of the following is detected, the brake system warning light (red indicator) remains on:
The skid control ECU (brake booster with master cylinder assembly) connector is disconnected from the brake booster with master cylinder assembly.
The brake fluid level is insufficient.
EBD operation has been disabled.
WIRING DIAGRAM
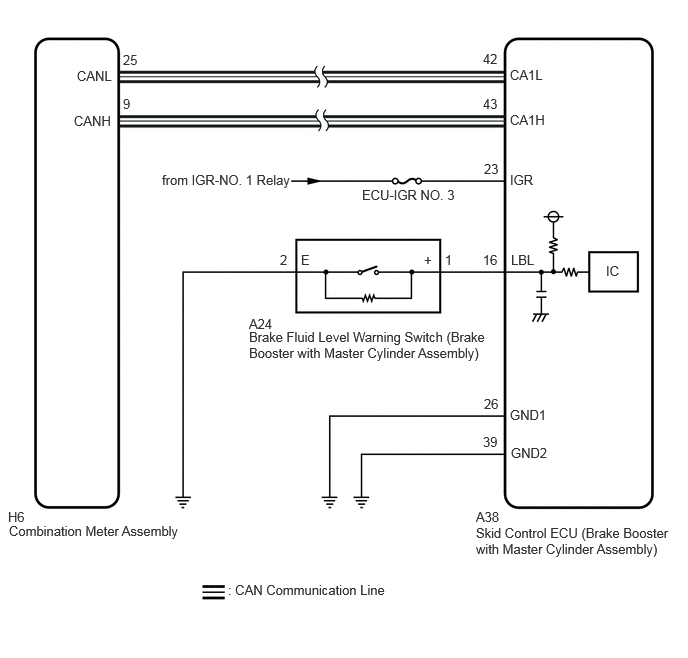
CAUTION / NOTICE / HINT
- NOTICE:
- ·
After replacing the skid control ECU (brake booster with master cylinder assembly), perform linear solenoid valve offset learning, ABS holding solenoid valve learning, yaw rate and acceleration sensor zero point calibration and system information memorization after performing "Reset Memory".
·Inspect the fuses for circuits related to this system before performing the following procedure.
·Before performing this procedure, depress the brake pedal and confirm that the stop lights illuminate.
PROCEDURE
Check that all of the following conditions required for the brake system warning light (red indicator) to turn off are met:
The brake system warning light (yellow indicator) and ABS warning light are not illuminated.
- HINT:
-
If the brake system warning light (yellow indicator) or ABS warning light remains illuminated, make sure that the conditions required for the brake system warning light (yellow indicator) and ABS warning light to turn off are met.
The brake fluid level in the brake master cylinder reservoir assembly (brake booster with master cylinder assembly) is not low.
- Result:
Proceed to NEXT
NEXT
Check if ABS, VSC and/or electronically controlled brake system DTCs are output.
- Chassis > Brake/EPB > Trouble Codes
- 50001 435
- Result:
Result Proceed to DTCs are not output A DTCs are output B
A
B
Check if CAN communication system DTCs are output.
- Result:
Result Proceed to DTCs are not output A DTCs are output B
A
B
Check if the skid control ECU (brake booster with master cylinder assembly) connector is securely connected.
- OK:
The connector is securely connected.
- Result:
Proceed to OK NG
OK
NG
Check the auxiliary battery voltage.
- Standard Voltage:
Tester Connection Switch Condition Specified Condition Auxiliary battery Ignition switch ON 11 to 14 V Auxiliary battery Ignition switch ON (READY) 11 to 15.5 V
- Result:
Proceed to OK NG
OK
NG
Turn the ignition switch off.
Make sure that there is no looseness at the locking part and the connecting part of the connector.
- OK:
The connector is securely connected.
Disconnect the A38 skid control ECU (brake booster with master cylinder assembly) connector.
Check both the connector case and the terminals for deformation and corrosion.
- OK:
No deformation or corrosion.
Turn the ignition switch to ON.
Measure the voltage according to the value(s) in the table below.
- Standard Voltage:
Tester Connection Switch Condition Specified Condition Click Location & Routing(A38)Location & Routingewd_type=routing;type=c;code=A38
Click Connector(A38)Engine Compartment>Engine Room Main Wire>Brake Booster with Master Cylinder Assemblyewd_type=component;type=c;code=A38;pinno=23
A38-23 (IGR) - Body ground Ignition switch ON 11 to 14 V
- Result:
Proceed to OK NG
OK
NG
Turn the ignition switch off.
Measure the resistance according to the value(s) in the table below.
- Standard Resistance:
Tester Connection Condition Specified Condition Click Location & Routing(A38)Location & Routingewd_type=routing;type=c;code=A38
Click Connector(A38)Engine Compartment>Engine Room Main Wire>Brake Booster with Master Cylinder Assemblyewd_type=component;type=c;code=A38;pinno=26,39
A38-26 (GND1) - Body ground Always Below 1 Ω A38-39 (GND2) - Body ground Always Below 1 Ω
- Result:
Proceed to OK NG
OK
NG
Perform the Active Test of the combination meter assembly using the GTS.
- Body Electrical > Combination Meter > Active Test
-
Tester Display Brake Warning - 50004 409 107
Check the combination meter assembly.
- OK:
The brake system warning light (red indicator) turns on or off in accordance with GTS operation.
- Result:
Proceed to OK NG
OK
NG
Click hereVehicle Interior>METER / GAUGE / DISPLAY>METER / GAUGE SYSTEM>HOW TO PROCEED WITH TROUBLESHOOTING