DOOR / HATCH REAR DOOR OPENING TRIM WEATHERSTRIP INSTALLATION
CAUTION / NOTICE / HINT
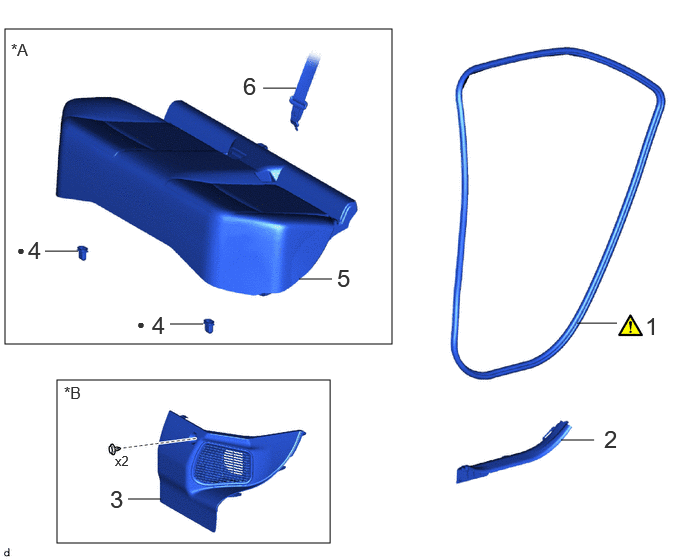
| Procedure | Part Name Code | 
|

|

|
|
|---|---|---|---|---|---|
| 1 | REAR DOOR OPENING TRIM WEATHERSTRIP | 62332A | ( ) |
- | - |
| 2 | REAR DOOR SCUFF PLATE INSIDE | 67918F | - | - | - |
| 3 | REAR UNDER SIDE COVER (for HV Model) | 76974F | - | - | - |
| 4 | REAR SEAT CUSHION LOCK HOOK (for Gasoline Model) | 72693 | - | - | - |
| 5 | BENCH TYPE REAR SEAT CUSHION ASSEMBLY (for Gasoline Model) | 71075B | - | - | - |
| 6 | REAR CENTER SEAT OUTER BELT ASSEMBLY (for Gasoline Model) | 73350C | - | - | - |
| *A | for Gasoline Model | *B | for HV Model |
| ● | Non-reusable part | - | - |
CAUTION / NOTICE / HINT
- HINT:
- ·
Use the same procedure for the LH side and RH side.
·The following procedure is for the RH side.
PROCEDURE

 62332A
1.INSTALL REAR DOOR OPENING TRIM WEATHERSTRIP
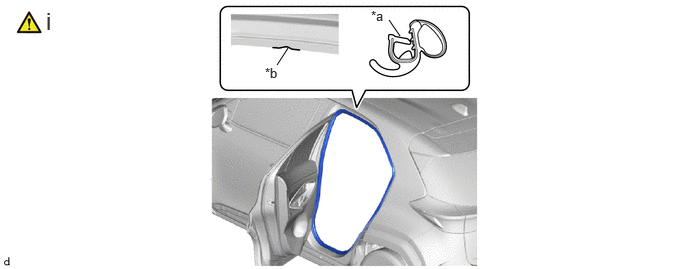
| *a | Paint Mark | *b | Mark Position |
Align the paint mark on the rear door opening trim weatherstrip with the mark position on the vehicle and install the rear door opening trim weatherstrip as shown in the illustration.
- Paint Mark:
Location Color RH Side White LH Side Yellow
- NOTICE:
- ·
Always align the alignment mark with the flange when installing the part. If the alignment mark is not aligned, water ingress may occur.
·After installation, check that the corners fit correctly.
- HINT:
-
To easily install the weatherstrip, first install the area with the paint mark as shown in the illustration. Then install the part toward the corners and push any excess length into the corners.
67918F
2.INSTALL REAR DOOR SCUFF PLATE INSIDE
76974F
3.INSTALL REAR UNDER SIDE COVER (for HV Model)
72693
4.INSTALL REAR SEAT CUSHION LOCK HOOK (for Gasoline Model)
for 60/40 Split Seat Type:
Click hereVehicle Interior>SEAT>REAR SEAT ASSEMBLY (for 60/40 Split Seat Type)>INSTALLATION
for 40/20/40 Split Seat Type:
Click hereVehicle Interior>SEAT>REAR SEAT ASSEMBLY (for 40/20/40 Split Seat Type)>INSTALLATION
71075B
5.INSTALL BENCH TYPE REAR SEAT CUSHION ASSEMBLY (for Gasoline Model)
for 60/40 Split Seat Type:
Click hereVehicle Interior>SEAT>REAR SEAT ASSEMBLY (for 60/40 Split Seat Type)>INSTALLATION
for 40/20/40 Split Seat Type:
Click hereVehicle Interior>SEAT>REAR SEAT ASSEMBLY (for 40/20/40 Split Seat Type)>INSTALLATION
73350C
6.CONNECT REAR CENTER SEAT OUTER BELT ASSEMBLY (for Gasoline Model)
for 60/40 Split Seat Type:
Click hereVehicle Interior>SEAT>REAR SEAT ASSEMBLY (for 60/40 Split Seat Type)>INSTALLATION
for 40/20/40 Split Seat Type:
Click hereVehicle Interior>SEAT>REAR SEAT ASSEMBLY (for 40/20/40 Split Seat Type)>INSTALLATION