PARKING BRAKE FORCED RELEASE OPERATION METHOD
PROCEDURE

 1. PRECAUTION
76973F
2.REMOVE REAR UNDER SIDE COVER RH
67914B
3.REMOVE FRONT DOOR SCUFF PLATE LH
67913B
4.REMOVE FRONT DOOR SCUFF PLATE RH
- HINT:
-
Use the same procedure as for the LH side.
62112
5.REMOVE COWL SIDE TRIM BOARD LH
62111C
6.REMOVE COWL SIDE TRIM BOARD RH
- HINT:
-
Use the same procedure as for the LH side.
7. PARKING BRAKE FORCED RELEASE
- CAUTION:
-
Work on a level surface to ensure safety.
- NOTICE:
- ·
To release the parking brake, follow the procedure for when using SST.
·If the parking brake cannot be released, follow the procedure for when not using SST.
·When moving the vehicle after releasing the parking brake, install all parts and do not connect the 2 connectors shown in the illustration.
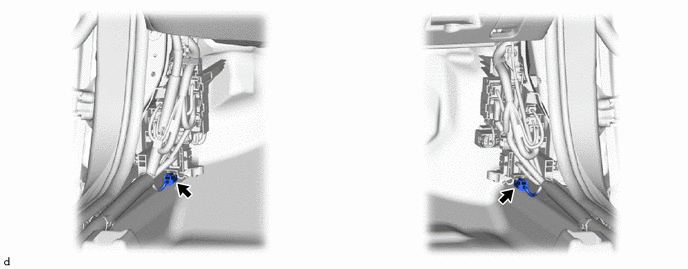
·If the power switch is on (IG) or the engine is started with the 2 connectors disconnected, a DTC may be stored. Clear any DTCs after performing work.
-for HV Model:
Click hereBrake>PARKING BRAKE>ELECTRIC PARKING BRAKE SYSTEM (for HV Model TMMF Made)>DTC CHECK / CLEAR
-for Gasoline Model:
Click hereBrake>PARKING BRAKE>ELECTRIC PARKING BRAKE SYSTEM (for Gasoline Model TMMF Made)>DTC CHECK / CLEAR
When using SST:
Park the vehicle on a level surface and move the shift lever to P.
Turn the power switch off and chock the wheels.
Disconnect the 2 connectors shown in the illustration.
Connect SST (09756-48020) to SST (09756-48070).
- SST
- 09756-48020 09756-48070
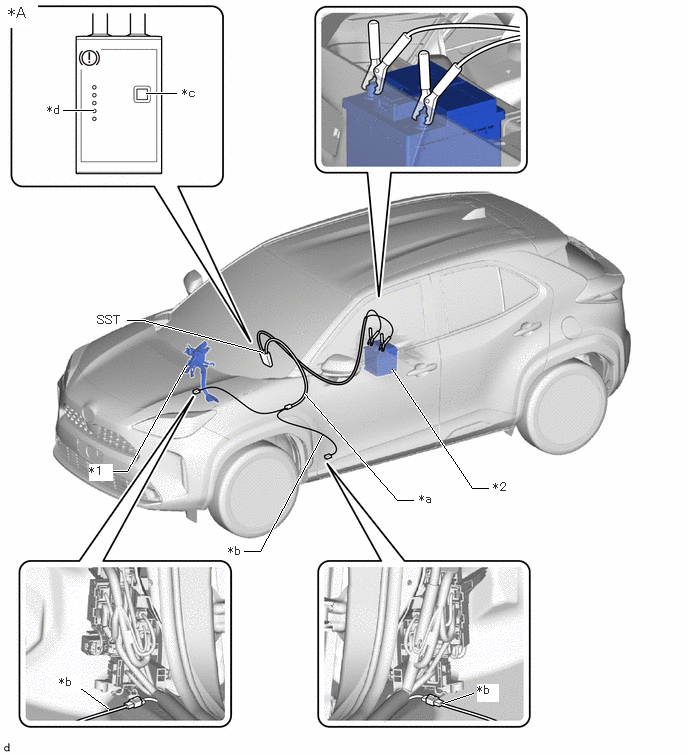
| *A | HV Model | - | - |
| *1 | Brake Pedal | *2 | Auxiliary Battery |
| *a | SST (09756-48020) | *b | SST (09756-48070) |
| *c | Release Button | *d | Finished Light |

|
Connector | - | - |
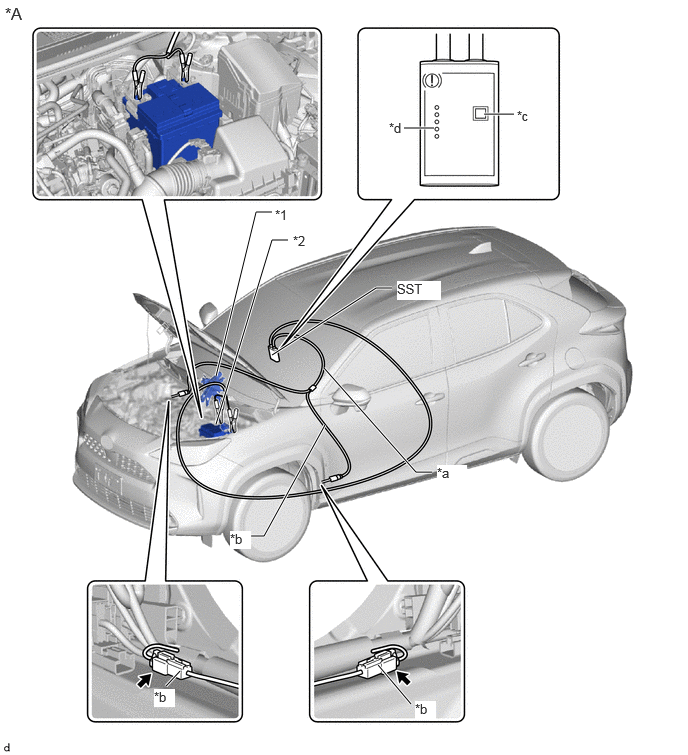
| *A | Gasoline Model | - | - |
| *1 | Brake Pedal | *2 | Auxiliary Battery |
| *a | SST (09756-48020) | *b | SST (09756-48070) |
| *c | Release Button | *d | Finished Light |
|
|
Connector | - | - |
Connect SST (09756-48070) to the 2 connectors inside of the vehicle.
Connect SST (09756-48020) to the auxiliary battery from the outside of the vehicle.
Push the release button on SST (09756-48020) with the brake pedal depressed.
- CAUTION:
-
The vehicle may suddenly move when the parking brake is released. Make sure to perform the release operation with the brake pedal depressed.
- HINT:
- ·
Confirm that the parking brake is operating by listening for operation sounds.
·If no operation sounds are heard, push the release button on SST (09756-48020) with the brake pedal depressed.
·The parking brake may not release if the auxiliary battery voltage is too low. In this case, perform the release operation again using a fully charged or new auxiliary battery.
When the finished light of SST (09756-48020) illuminates, release the brake pedal.
Move the vehicle forward and rearward to check that the parking brake is released.
- CAUTION:
-
Be careful when performing this operation. The vehicle may suddenly move.
- NOTICE:
- ·
When moving the vehicle after releasing the parking brake, check that the 2 connectors are disconnected.
·The brake warning light (yellow) will illuminate when the vehicle is moved after releasing the parking brake.
When not using SST:
- NOTICE:
-
Perform the following procedure only when the parking brake cannot be released using SST.
- HINT:
- ·
Use the same procedure for the RH side and LH side.
·The following procedure is for the LH side.
Park the vehicle on a level surface and check that the shift lever is in P.
Turn the power switch off and check that the wheels are chocked.
Check that the 2 connectors shown in the illustration have been disconnected.
Remove the rear wheel.
Click hereGeneral>MAINTENANCE>TIRE AND WHEEL>REMOVAL
- CAUTION:
-
When using a jack to lift the vehicle, make sure to support the vehicle using safety stands. Do not work on the vehicle with it supported only by a jack.
-
Click hereGeneral>INTRODUCTION>REPAIR INSTRUCTION>VEHICLE LIFT AND SUPPORT LOCATIONS
Disconnect the No. 2 parking brake wire assembly connector from the parking brake actuator assembly.
for TMC Made 2WD:
Click hereBrake>PARKING BRAKE>ELECTRIC PARKING BRAKE ACTUATOR (for TMC Made 2WD)>REMOVAL
for TMMF Made 2WD:
Click hereBrake>PARKING BRAKE>ELECTRIC PARKING BRAKE ACTUATOR (for TMMF Made 2WD)>REMOVAL
for AWD:
Click hereBrake>PARKING BRAKE>ELECTRIC PARKING BRAKE ACTUATOR (for AWD)>REMOVAL
Remove the parking brake actuator assembly from the rear disc brake cylinder assembly. (for 2WD)
Using long ball hexagon socket wrench 5 mm, remove the parking brake actuator assembly. (for AWD)
Click hereBrake>PARKING BRAKE>ELECTRIC PARKING BRAKE ACTUATOR (for AWD)>REMOVAL
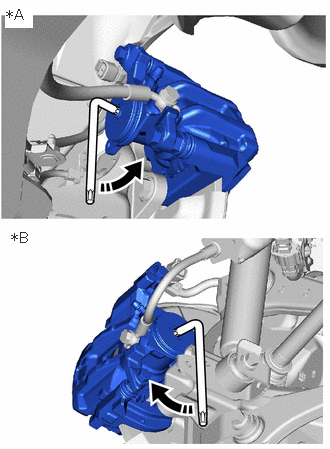
| *A | for 2WD |
| *B | for AWD |
Insert an L-shaped T45 "TORX" wrench into the rear disc brake cylinder assembly.
Turn the L-shaped T45 "TORX" wrench 2 full rotations clockwise to release the parking brake lock.
- NOTICE:
- ·
When moving the vehicle after releasing the parking brake, install all parts and do not connect the 2 connectors shown in the illustration.
·The brake warning light (yellow) will illuminate when the vehicle is moved after releasing the parking brake.
62112
8.INSTALL COWL SIDE TRIM BOARD LH
62111C
9.INSTALL COWL SIDE TRIM BOARD RH
- HINT:
-
Use the same procedure as for the LH side.
67914B
10.INSTALL FRONT DOOR SCUFF PLATE LH
67913B
11.INSTALL FRONT DOOR SCUFF PLATE RH
- HINT:
-
Use the same procedure as for the LH side.
76973F
12.INSTALL REAR UNDER SIDE COVER RH