LIGHTING (EXT) LIGHTING SYSTEM(w/ Adaptive High Beam System) B242E14 IG Circuit Short to Ground or Open
DESCRIPTION
The headlight ECU sub-assembly operates using the power source voltage input from the IGR terminal and ECUB terminal.
The IGR terminal power source voltage is supplied by turning the IGR NO. 1 relay to ON.
The headlight ECU sub-assembly receives ignition switch ON signals from the main body ECU (multiplex network body ECU) via CAN communication, compares the ignition switch ON signal and the power source voltage supply condition of the IGR terminal and monitors the result.
| DTC No. | Detection Item | DTC Detection Condition | Trouble Area | DTC Output from | Priority |
|---|---|---|---|---|---|
| B242E14 | IG Circuit Short to Ground or Open | Detection condition:
The ignition switch is ON. Malfunction status:
When the IGR terminal power source voltage is 0 V (ignition switch off), IG ON signals from the main body ECU (multiplex network body ECU) via CAN communication are continuously received Malfunction duration:
10 seconds or more |
·
Headlight ECU sub-assembly LH ·
Harness or connector |
Headlight Control | A |
| DTC No. | Detection Item | DTC Detection Condition | Trouble Area | DTC Output from | Priority |
|---|---|---|---|---|---|
| B242E14 | IG Circuit Short to Ground or Open | Detection condition:
The ignition switch is ON. Malfunction status:
When the IGR terminal power source voltage is 0 V (ignition switch off), IG ON signals from the main body ECU (multiplex network body ECU) via CAN communication are continuously received Malfunction duration:
10 seconds or more |
·
Headlight ECU sub-assembly RH ·
Harness or connector |
Headlight Control (Sub) | A |
WIRING DIAGRAM
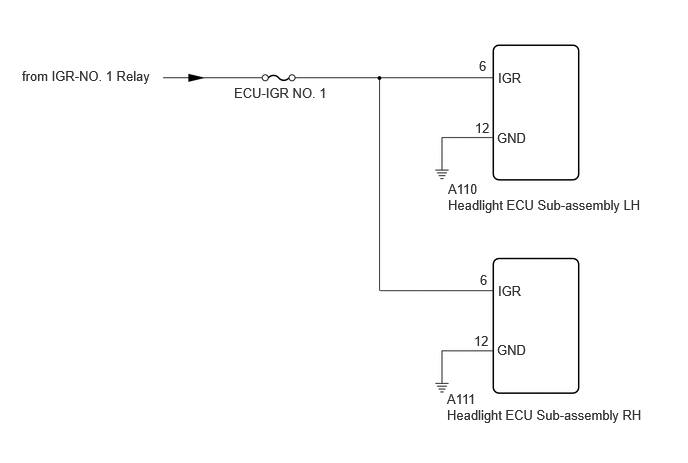
CAUTION / NOTICE / HINT
- NOTICE:
- ·
Inspect the fuses for circuits related to this system before performing the following procedure.
·If the headlight ECU sub-assembly LH has been replaced, it is necessary to synchronize the vehicle information and initialize the headlight ECU sub-assembly LH.
Click hereVehicle Exterior>LIGHTING (EXT)>LIGHTING SYSTEM (w/ Adaptive High Beam System)>INITIALIZATION
·When replacing the headlight ECU sub-assembly LH, always replace it with a new one. If a headlight ECU sub-assembly LH which was installed to another vehicle is used, the information stored in it will not match the information from the vehicle and a DTC may be stored.
PROCEDURE
Clear the DTCs.
- Body Electrical > Headlight Control > Clear DTCs
- 50002 462
- Result:
Proceed to NEXT
NEXT
Pre-procedure1
Turn ignition switch to ON.
Wait 10 seconds or more.
Procedure1
Check for DTCs.
- Body Electrical > Headlight Control > Trouble Codes
- 50001 462
- Result:
Result Proceed to B242E14 is not output A B242E14 is output B
Post-procedure1
None
A
B
Clear the DTCs.
- Body Electrical > Headlight Control (Sub) > Clear DTCs
- 50002 463
- Result:
Proceed to NEXT
NEXT
Pre-procedure1
Turn ignition switch to ON.
Wait 10 seconds or more.
Procedure1
Check for DTCs.
- Body Electrical > Headlight Control (Sub) > Trouble Codes
- 50001 463
- Result:
Result Proceed to B242E14 is not output A B242E14 is output B
Post-procedure1
None
A
Click hereGeneral>INTRODUCTION>HOW TO TROUBLESHOOT ECU CONTROLLED SYSTEMS>HOW TO PROCEED WITH TROUBLESHOOTING
B
Pre-procedure1
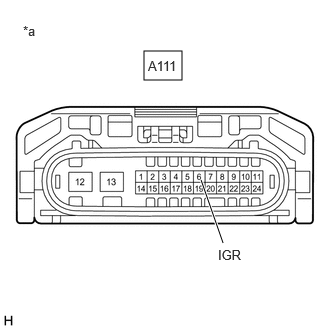
| *a | Front view of wire harness connector
(to Headlight ECU Sub-assembly RH) |
Disconnect the A111 headlight ECU sub-assembly RH connector.
Procedure1
Measure the voltage according to the value(s) in the table below.
- Standard Voltage:
Tester Connection Condition Specified Condition Click Location & Routing(A111)Location & Routingewd_type=routing;type=c;code=A111
Click Connector(A111)Engine Compartment>Engine Room Main Wire>Headlight ECU Sub-Assembly RHewd_type=component;type=c;code=A111;pinno=6
A111-6 (IGR) - Body ground Ignition switch ON 11 to 14 V
- Result:
Proceed to OK NG
Post-procedure1
None
OK
NG
Measure the resistance according to the value(s) in the table below.
- Standard Resistance:
Tester Connection Condition Specified Condition Click Location & Routing(A111)Location & Routingewd_type=routing;type=c;code=A111
Click Connector(A111)Engine Compartment>Engine Room Main Wire>Headlight ECU Sub-Assembly RHewd_type=component;type=c;code=A111;pinno=12
A111-12 (GND) - Body ground Always Below 1 Ω
- Result:
Proceed to OK NG
OK
NG
Pre-procedure1
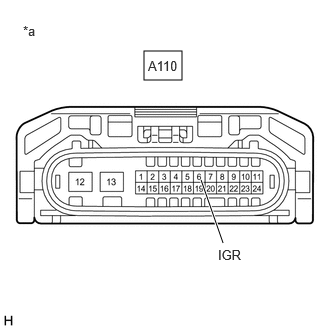
| *a | Front view of wire harness connector
(to Headlight ECU Sub-assembly LH) |
Disconnect the A110 headlight ECU sub-assembly LH connector.
Procedure1
Measure the voltage according to the value(s) in the table below.
- Standard Voltage:
Tester Connection Condition Specified Condition Click Location & Routing(A110)Location & Routingewd_type=routing;type=c;code=A110
Click Connector(A110)Engine Compartment>Engine Room Main Wire>Headlight ECU Sub-Assembly LHewd_type=component;type=c;code=A110;pinno=6
A110-6 (IGR) - Body ground Ignition switch ON 11 to 14 V
- Result:
Proceed to OK NG
Post-procedure1
None
OK
NG
Measure the resistance according to the value(s) in the table below.
- Standard Resistance:
Tester Connection Condition Specified Condition Click Location & Routing(A110)Location & Routingewd_type=routing;type=c;code=A110
Click Connector(A110)Engine Compartment>Engine Room Main Wire>Headlight ECU Sub-Assembly LHewd_type=component;type=c;code=A110;pinno=12
A110-12 (GND) - Body ground Always Below 1 Ω
- Result:
Proceed to OK NG
OK
NG