1NZ-FE ENGINE MECHANICAL ENGINE UNIT DISASSEMBLY
PROCEDURE

 19100P
1.REMOVE SPARK PLUG
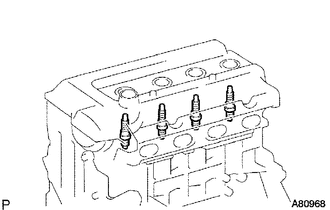
Using a 16 mm spark plug wrench, remove the 4 spark plugs.
89615
2.REMOVE KNOCK SENSOR
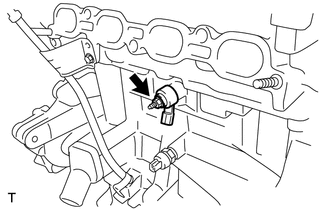
Remove the nut and the knock sensor.
83530
3.REMOVE ENGINE OIL PRESSURE SWITCH ASSEMBLY
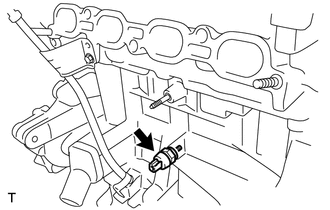
Using a 24 mm deep socket wrench, remove the engine oil pressure switch.
89422
4.REMOVE ENGINE COOLANT TEMPERATURE SENSOR
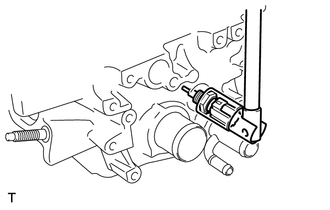
Using a 19 mm deep socket wrench, remove the engine coolant temperature sensor.
16321
5.REMOVE WATER INLET
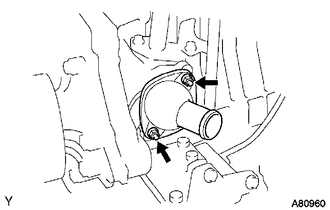
Remove the 2 nuts and the water inlet.
16331A
6.REMOVE THERMOSTAT
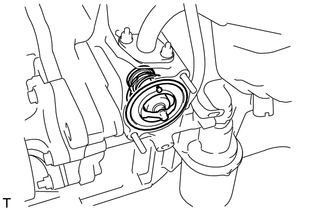
Remove the thermostat.
Remove the gasket from the thermostat.
12108
7.REMOVE OIL FILLER CAP SUB-ASSEMBLY
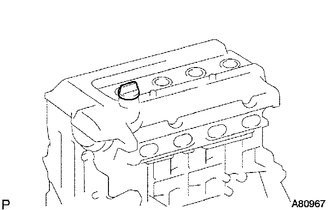
Remove the oil filler cap from the cylinder head cover.
12108A
8.REMOVE OIL FILLER CAP GASKET
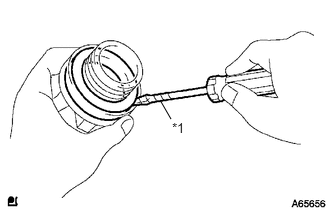
Using a screwdriver with its tip wrapped in protective tape, remove the oil filler gasket from the oil filler cap.
| *1 | Protective Tape |
15100Q
9.REMOVE CRANKSHAFT POSITION SENSOR
Remove the bolt and the crankshaft position sensor.
12204
10.REMOVE VENTILATION VALVE SUB-ASSEMBLY
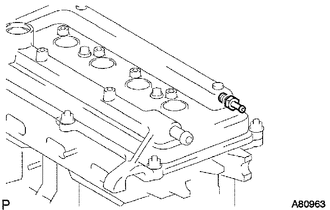
Remove the ventilation valve from the cylinder head cover.
11201
11.REMOVE CYLINDER HEAD COVER SUB-ASSEMBLY
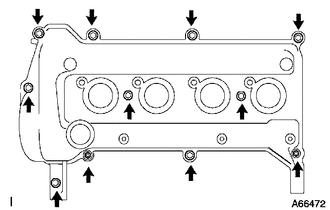
Remove the 9 bolts, 2 nuts and 2 seal washers and then remove the cylinder head cover.
Remove the gasket from the cylinder head cover.
11101J
12.REMOVE CAMSHAFT TIMING OIL CONTROL VALVE ASSEMBLY
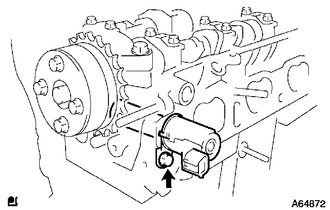
Remove the bolt and the camshaft timing oil control valve.
11452
13.REMOVE OIL LEVEL DIPSTICK GUIDE
Remove the bolt and the oil level dipstick guide.
Remove the O-ring from the oil level dipstick guide.
16173
14.REMOVE WATER PUMP PULLEY
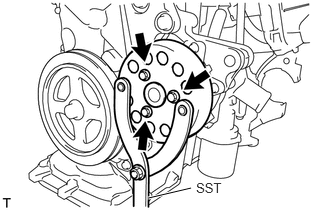
Using SST, hold the water pump pulley.
- SST
- 09960-10010 (09962-01000, 09963-00700)
Remove the 3 bolts and the water pump pulley.
13407
15.REMOVE CRANKSHAFT DAMPER SUB-ASSEMBLY
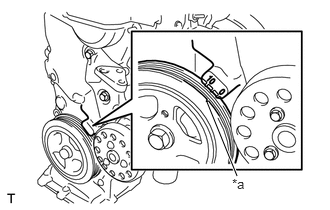
Set the No. 1 cylinder to TDC/compression.
Turn the crankshaft damper sub-assembly, and align its timing notch with timing mark "0" of the oil pump.
| *a | Timing Notch |
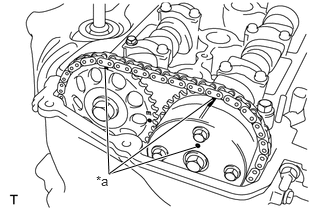
Check that the timing marks on the camshaft timing sprocket and the camshaft timing gear are all facing upward, as shown in the illustration.
| *a | Timing Marks |
If not, turn the crankshaft 1 complete revolution (360°) and align the marks as above.
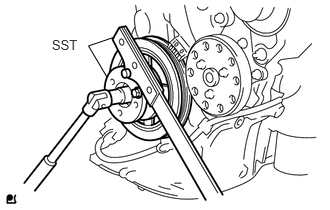
Using SST, loosen the bolt while holding the crankshaft damper.
- SST
- 09213-14010 (91651-60865)
09330-00021
- NOTICE:
-
Check the SST installation positions when installing them, to avoid the SST fixing bolts from coming into contact with the oil pump assembly.
Remove the SST.
Remove the bolt and the crankshaft damper.
12315A
16.REMOVE TRANSVERSE ENGINE ENGINE MOUNTING BRACKET
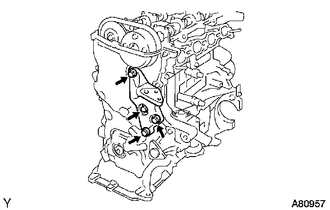
Remove the 4 bolts and the transverse engine engine mounting bracket.
16100
17.REMOVE ENGINE WATER PUMP ASSEMBLY
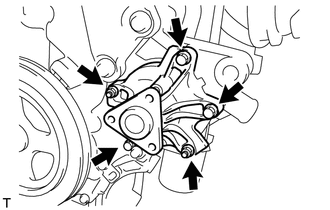
Remove the 3 bolts, 2 nuts and the engine water pump and gasket.
15100
18.REMOVE OIL PUMP ASSEMBLY (for Oil Pump Type A)
- HINT:
-
The oil pump type A and oil pump type B listed in this section are differentiated based on the number of installation bolts for the oil pump assembly.
Oil Pump Type Number of Oil Pump Assembly Installation Bolts A 15 bolts B 16 bolts
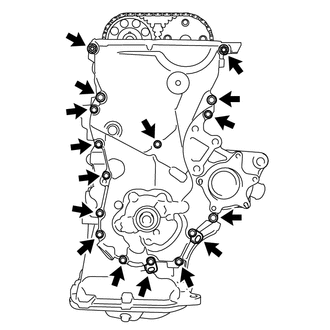
Remove the 15 bolts, nut and 2 wire harness clamp brackets from the oil pump assembly.
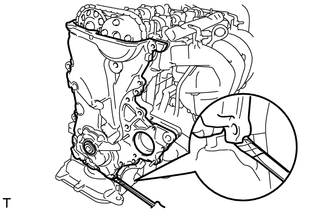
Using a screwdriver with its tip wrapped in protective tape, remove the oil pump assembly by prying between the oil pump assembly, cylinder head sub-assembly, cylinder block sub-assembly and oil pan sub-assembly.
- NOTICE:
-
Do not damage the contact surfaces of the oil pump assembly, cylinder head sub-assembly, cylinder block sub-assembly and oil pan sub-assembly.
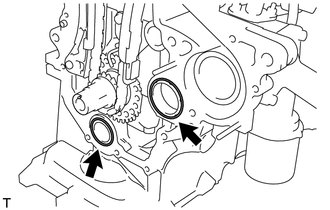
Remove the 2 O-rings from the cylinder block sub-assembly and oil pan sub-assembly.
15100
19.REMOVE OIL PUMP ASSEMBLY (for Oil Pump Type B)
- HINT:
-
The oil pump type A and oil pump type B listed in this section are differentiated based on the number of installation bolts for the oil pump assembly.
Oil Pump Type Number of Oil Pump Assembly Installation Bolts A 15 bolts B 16 bolts
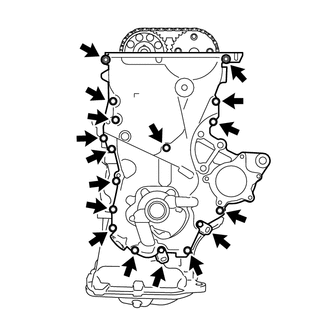
Remove the 16 bolts, nut and 2 wire harness clamp brackets from the oil pump assembly.
Using a screwdriver with its tip wrapped in protective tape, remove the oil pump assembly by prying between the oil pump assembly, cylinder head sub-assembly, cylinder block sub-assembly and oil pan sub-assembly.
- NOTICE:
-
Do not damage the contact surfaces of the oil pump assembly, cylinder head sub-assembly, cylinder block sub-assembly and oil pan sub-assembly.
Remove the 2 O-rings from the cylinder block sub-assembly and oil pan sub-assembly.
15100C
20.REMOVE OIL PUMP SEAL
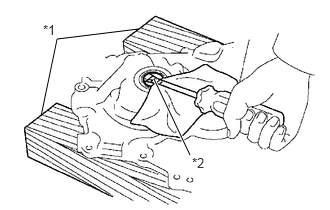
Using a screwdriver with its tip wrapped in protective tape, remove the oil pump seal.
| *1 | Wooden Blocks |
| *2 | Protective Tape |
13540
21.REMOVE NO. 1 CHAIN TENSIONER ASSEMBLY
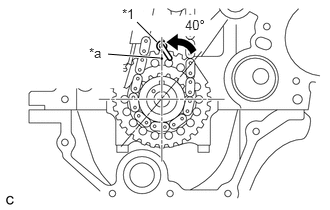
- NOTICE:
- ·
Do not rotate the crankshaft with the chain tensioner removed.
·When rotating the camshaft with the timing chain removed, rotate the crankshaft counterclockwise 40° from the TDC first, and align the oil jet hole with the paint mark. This prevents the pistons from coming into contact with the valves.
Text in Illustration *1 Oil Jet *a Timing Mark (1 dot)
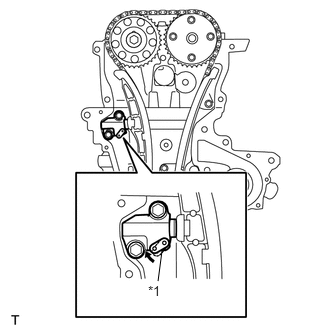
Pull up the stopper plate and hold it with its lock released.
| *1 | Stopper Plate |
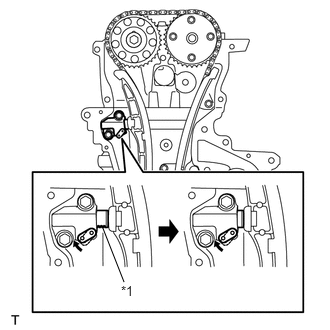
Unlock the plunger of the tensioner and push it in to the end.
| *1 | Plunger |
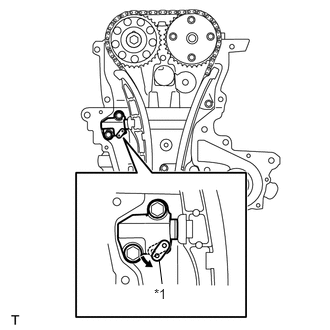
Pull down the stopper plate with the plunger pushed to the end and lock the plunger.
| *1 | Stopper Plate |
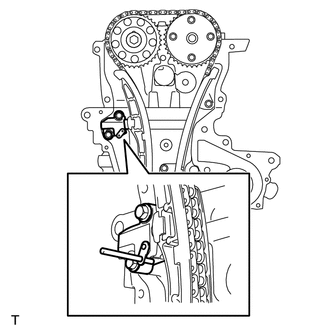
Insert a 3 mm (0.12 in.) diameter bar into the hole in the stopper plate and lock the plunger.
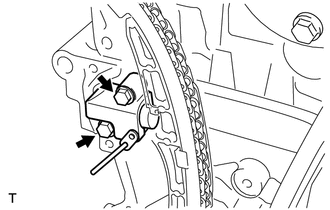
Remove the 2 bolts and the No. 1 chain tensioner assembly.
13559
22.REMOVE CHAIN TENSIONER SLIPPER
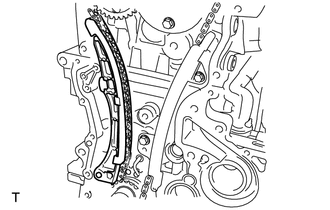
Remove the chain tensioner slipper.
13561
23.REMOVE NO. 1 CHAIN VIBRATION DAMPER
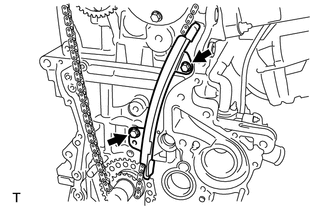
Remove the 2 bolts and the No. 1 chain vibration damper.
13506
24.REMOVE CHAIN SUB-ASSEMBLY
23807
25.REMOVE FUEL DELIVERY PIPE SUB-ASSEMBLY
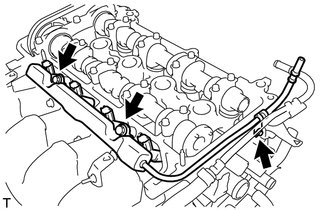
Remove the 3 bolts and remove the fuel delivery pipe together with the 4 fuel injectors.
- NOTICE:
-
Do not drop the fuel injectors when removing the fuel delivery pipe.
23807V
26.REMOVE NO. 1 DELIVERY PIPE SPACER
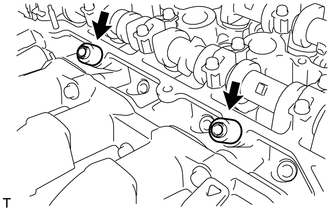
Remove the 2 No. 1 delivery pipe spacers.
23291
27.REMOVE INJECTOR VIBRATION INSULATOR
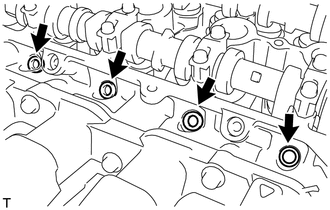
Remove the 4 injector vibration insulators.
23250
28.REMOVE FUEL INJECTOR ASSEMBLY
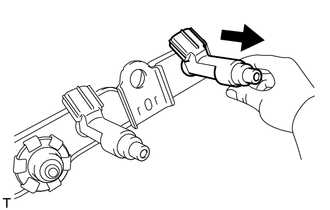

|
Pull |
Pull the 4 fuel injector assemblies out of the fuel delivery pipe sub-assembly.
11101E
29.REMOVE CAMSHAFT POSITION SENSOR
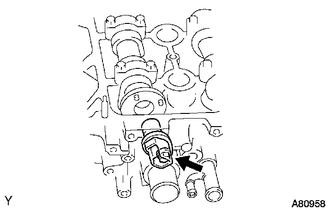
Remove the bolt and the camshaft position sensor.
13512
30.REMOVE NO. 2 CAMSHAFT
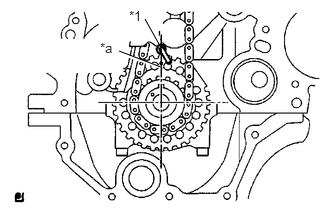
- NOTICE:
- ·
Do not rotate the crankshaft with the chain tensioner removed.
·When rotating the camshaft with the timing chain removed, rotate the crankshaft counterclockwise 40° from the TDC first, and align the oil jet hole with the paint mark. This prevents the pistons from coming into contact with the valves.
Text in Illustration *1 Oil Jet *a Timing Mark (1 dot)
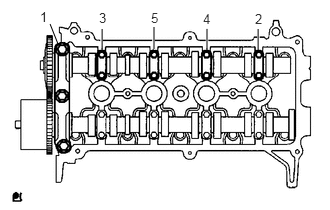
Using several steps, loosen and remove the 11 bearing cap bolts uniformly in the sequence shown in the illustration, then remove the No. 1 camshaft bearing cap, No. 2 camshaft bearing cap and No. 2 camshaft.
- NOTICE:
-
Loosen each bolt uniformly while keeping the camshaft level.
13523
31.REMOVE CAMSHAFT TIMING SPROCKET
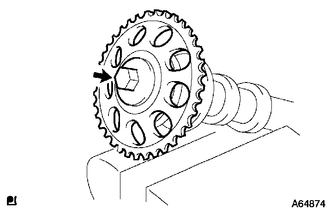
Clamp the camshaft in a vise, and confirm that it is locked.
- NOTICE:
-
Do not damage the camshaft.
Remove the bolt and the camshaft timing sprocket.
13511
32.REMOVE CAMSHAFT
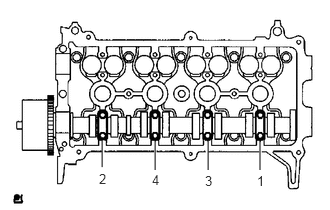
Using several steps, loosen and remove the 8 bearing cap bolts uniformly in the sequence shown in the illustration, then remove the No. 2 camshaft bearing cap and the camshaft.
- NOTICE:
-
Loosen each bolt uniformly keeping the camshaft level.
13050
33.REMOVE CAMSHAFT TIMING GEAR ASSEMBLY
Clamp the camshaft in a vise, and confirm that it is locked.
- NOTICE:
-
Do not damage the camshaft.
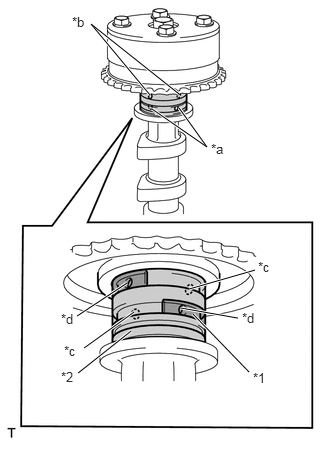
Cover the 4 oil paths of the cam journal with tape as shown in the illustration.
| *1 | Rubber Piece |
| *2 | Vinyl Tape |
| *a | Advance Side Paths |
| *b | Retard Side Paths |
| *c | Open |
| *d | Closed |
- HINT:
-
One of the 2 grooves located on the cam journal is for retarding cam timing (upper) and the other is for advancing cam timing (lower). Each groove has 2 oil paths. Plug one of the oil paths for each groove with a piece rubber before wrapping the cam journal with the tape.
Puncture the tape covering the advance oil path and the retard oil path on the opposite side from the advance oil path.
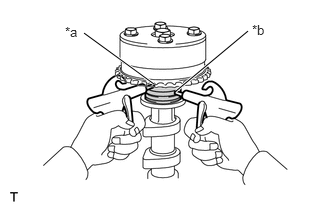
Apply compressed air at about 150 kPa (1.5 kgf/cm2) pressure into the 2 broken paths (the advance side path and the retard side path).
| *a | Retard Side Paths |
| *b | Advance Side Paths |
- NOTICE:
-
Cover the paths with a piece of cloth to prevent oil splashes.
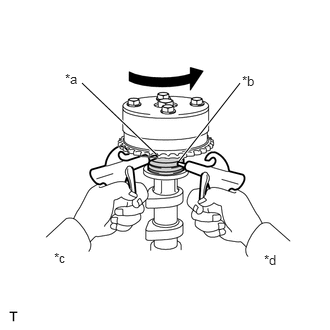
Confirm that the camshaft timing gear revolves in the timing advance direction when the air pressure on the timing retard path is reduced.
| *a | Retard Side Paths |
| *b | Advance Side Paths |
| *c | Decompress |
| *d | Hold Pressure |
- HINT:
-
The lock pin is released and the camshaft timing gear revolves in the advance direction.
When the camshaft timing gear reaches the most advanced position, release the air pressure on the timing retard side path, and then release the air pressure on the timing advance side path.
- NOTICE:
-
Camshaft timing gear assembly occasionally shifts to the retard side abruptly if the air pressure on the advance side path is released first. It often results in the breakage of the lock pin.
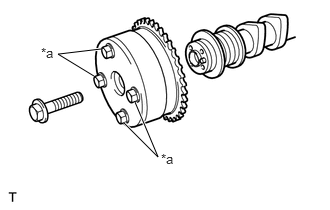
Remove the bolt and the camshaft timing gear assembly.
| *a | Do not remove |
- NOTICE:
- ·
Do not remove the other 4 bolts.
·When reusing the camshaft timing gear, unlock the lock pin inside the camshaft timing gear first.
11101
34.REMOVE CYLINDER HEAD SUB-ASSEMBLY
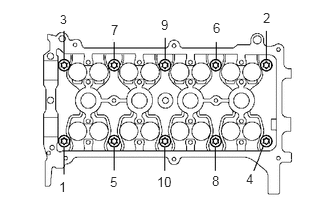
Using several steps, loosen and remove the 10 cylinder head bolts uniformly with an 8 mm (0.31 in.) bi-hexagon wrench in the sequence shown in the illustration. Remove the 10 cylinder head bolts and the plate washers.
- NOTICE:
- ·
Do not drop the washers into the cylinder head.
·Head warpage or cracking could result from removing bolts in the wrong order.
11115
35.REMOVE CYLINDER HEAD GASKET
15601
36.REMOVE OIL FILTER SUB-ASSEMBLY
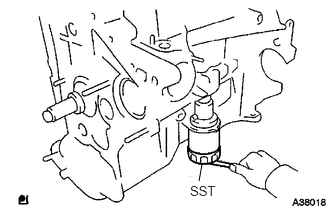
Using SST, remove the oil filter.
- SST
- 09228-06501
15600A
37.REMOVE OIL FILTER UNION
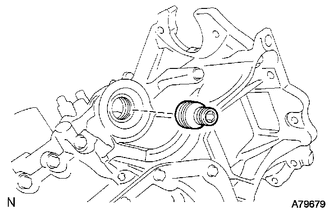
Using a 12 mm hexagon wrench, remove the oil filter union.
11401L
38.REMOVE ENGINE REAR OIL SEAL
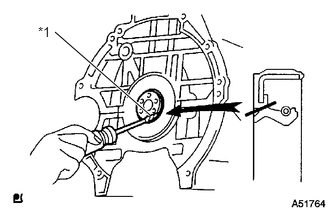
Using a knife, cut off the oil seal lip.
| *1 | Protective Tape |
Using a screwdriver with its tip wrapped in protective tape, pry out the oil seal.
- NOTICE:
-
After removal, check the crankshaft for any damage. If damaged, smooth the surface with 400-grit sandpaper.
12102A
39.REMOVE NO. 2 OIL PAN SUB-ASSEMBLY
Remove the oil pan drain plug and gasket.
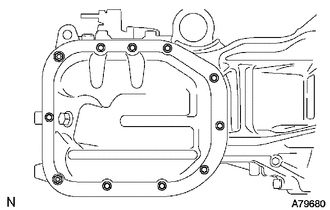
Remove the 9 bolts and 2 nuts.
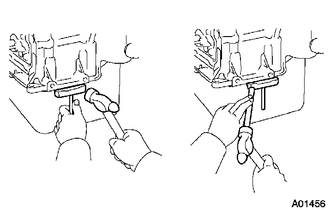
Insert the blade of oil pan seal cutter between the No. 1 oil pan and No. 2 oil pan, and cut off the applied sealer and remove No. 2 oil pan.
- NOTICE:
-
Be careful not to damage the contact surfaces of the oil pan.
15104
40.REMOVE OIL STRAINER SUB-ASSEMBLY
Remove the bolt and 2 nuts.
Remove the oil strainer and the gasket.
12101
41.REMOVE OIL PAN SUB-ASSEMBLY
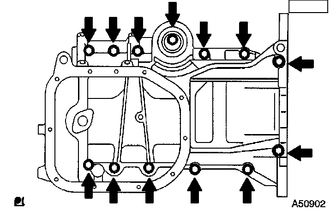
Loosen and remove the 13 bolts uniformly in several steps.
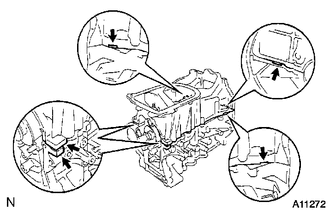
Using a screwdriver, remove the No. 1 oil pan by prying between the cylinder block and No. 1 oil pan.
- NOTICE:
-
Be careful not to damage the contact surfaces of the oil pan.
Remove the 2 O-rings from the cylinder block.
15104E
42.REMOVE STUD BOLT
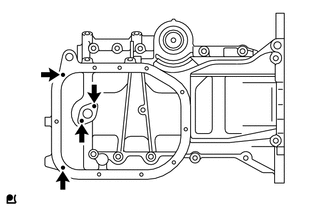
Using "TORX" socket wrench E5, remove the 4 stud bolts.