STEERING GEAR / LINKAGE STEERING GEAR REASSEMBLY
PROCEDURE

 45536
1.INSTALL NO. 2 STEERING RACK BOOT
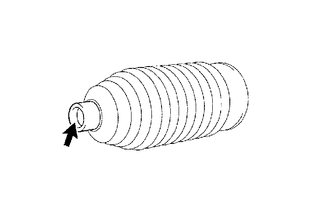
Apply lithium soap base glycol grease to the inside of the small opening of a new No. 2 steering rack boot.

|
Lithium soap base glycol grease |
Install the No. 2 steering rack boot to the groove on the rack housing.
- NOTICE:
- ·
Be careful not to damage or twist the boot.
·Make sure that the boot is free of rust and foreign matter.
45535
2.INSTALL NO. 1 STEERING RACK BOOT
- HINT:
-
Use the same procedure for the RH side as for the LH side.
45536A
3.INSTALL NO. 2 STEERING RACK BOOT CLAMP
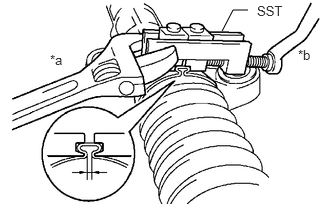
Using SST, tighten a new steering rack boot clamp as shown in the illustration.
| *a | Hold |
| *b | Turn |
- SST
- 09521-24010
- Clearance:
3.0 mm (0.118 in.) or less
- NOTICE:
-
Be careful not to damage or twist the boot.
45535D
4.INSTALL NO. 1 STEERING RACK BOOT CLAMP
- HINT:
-
Use the same procedure for the RH side as for the LH side.
45535B
5.INSTALL STEERING RACK BOOT CLIP (for LH Side)
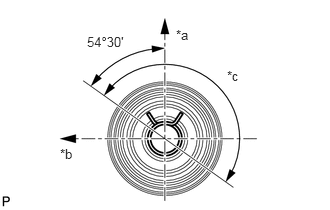
Using pliers, install the rack boot clips as shown in the illustration.
| *a | Upper Side |
| *b | Front Side |
| *c | 180° (Clip installation range) |
- NOTICE:
- ·
Install the clip so that its claws are within the clip installation range.
·Make sure that the rack boots are not twisted.
45535B
6.INSTALL STEERING RACK BOOT CLIP (for RH Side)
- HINT:
-
Use the same procedure for the RH side as for the LH side.
45047
7.INSTALL TIE ROD END SUB-ASSEMBLY LH
Install the lock nut and the tie rod end sub-assembly LH onto the steering gear until the matchmarks are aligned.
- HINT:
-
After adjusting toe-in, tighten the lock nut.
- Torque:
- 75 N*m (765 kgf*cm, 55 ft.*lbf)
45046
8.INSTALL TIE ROD END SUB-ASSEMBLY RH
- HINT:
-
Use the same procedure for the RH side as for the LH side.
9.INSPECT STEERING GEAR ASSEMBLY
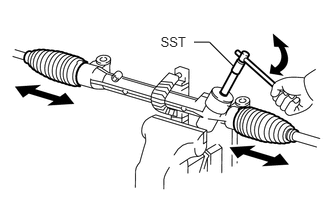
Using SST, rotate the pinion shaft to see if both the left and the right steering rack boots expand and contract smoothly.
- SST
- 09616-00011
If the operation cannot be done as specified, use a new steering rack boot clamp and reinstall the steering rack boots.