EXTERIOR PANELS / TRIM FRONT BUMPER(for Sport Package) REASSEMBLY
PROCEDURE

 52601
1.INSTALL FRONT BUMPER ENERGY ABSORBER SUB-ASSEMBLY (w/ Front Bumper Lower Absorber)
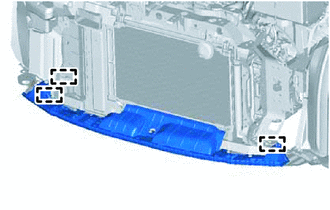
Engage the 3 hooks and install the front bumper energy absorber.
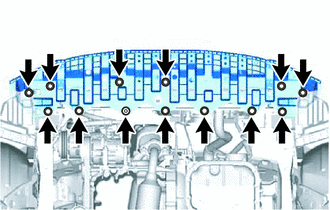
Install the 6 screws, the 6 clips and grommet.
51441C
2.INSTALL ENGINE UNDER COVER RH (w/ Front Bumper Lower Absorber)
51442C
3.INSTALL ENGINE UNDER COVER LH (w/ Front Bumper Lower Absorber)
57014A
4.INSTALL FRONT SIDE MEMBER BRACKET SUB-ASSEMBLY LH
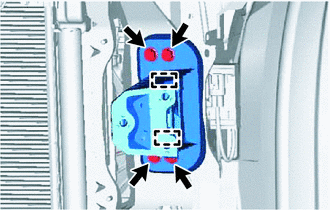
Engage the 2 guides and install the front side member bracket.
Tighten the 4 bolts.
- Torque:
- 40 N*m (408 kgf*cm, 30 ft.*lbf)
57013C
5.INSTALL FRONT SIDE MEMBER BRACKET SUB-ASSEMBLY RH
- HINT:
-
Use the same procedure as for the LH side.
85330
6.INSTALL WINDSHIELD WASHER JAR ASSEMBLY
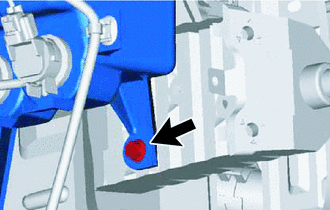
Install the windshield washer jar with the bolt.
- Torque:
- 5.5 N*m (56 kgf*cm, 49 in.*lbf)
53165A
7.INSTALL FRONT NO. 1 BUMPER STONE DEFLECTOR BRACKET
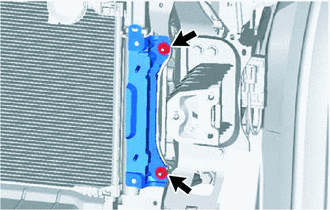
Install the front No. 1 bumper stone deflector bracket with the 2 nuts.
- Torque:
- 5.5 N*m (56 kgf*cm, 49 in.*lbf)
- HINT:
-
Use the same procedure as for the opposite side.
52131A
8.INSTALL FRONT BUMPER REINFORCEMENT
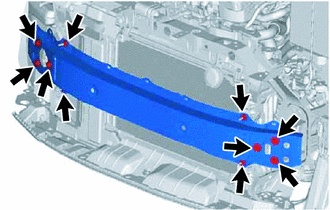
Install the front bumper reinforcement with the 4 nuts.
- Torque:
- 5.5 N*m (56 kgf*cm, 49 in.*lbf)
Tighten the 6 bolts.
- Torque:
- 40 N*m (408 kgf*cm, 30 ft.*lbf)
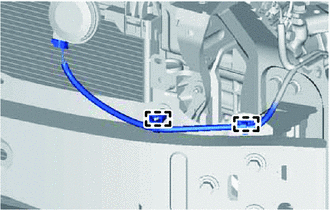
Engage the 2 clamps and install the wire harness.
52611
9.INSTALL FRONT BUMPER ENERGY ABSORBER (w/ Energy Absorber)
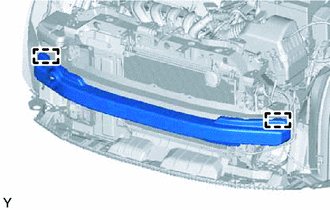
Engage the 2 guides and install the front bumper energy absorber.
53286B
10.INSTALL NO. 2 RADIATOR SIDE AIR SEAL
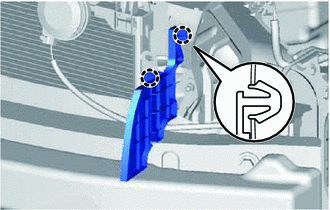
Engage the 2 claws and install the radiator side air seal.
53285B
11.INSTALL NO. 1 RADIATOR SIDE AIR SEAL
- HINT:
-
Use the same procedure as for the No. 2 side.
53288B
12.INSTALL RADIATOR SUPPORT EXTENSION LH
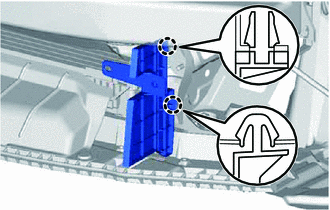
Engage the 2 claws and install the radiator support extension.
53287B
13.INSTALL RADIATOR SUPPORT EXTENSION RH
- HINT:
-
Use the same procedure as for the LH side.
88790B
14.INSTALL THERMISTOR ASSEMBLY
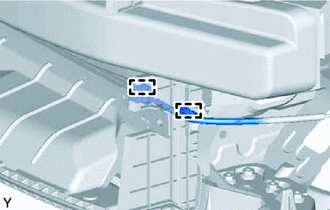
Engage the 2 clamps and install the thermistor.
52536
15.INSTALL FRONT BUMPER SIDE RETAINER LH
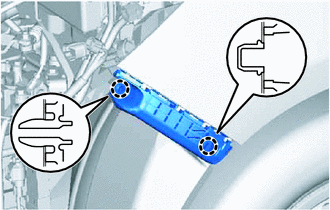
Engage the 2 claws and install the front bumper side retainer.
52535
16.INSTALL FRONT BUMPER SIDE RETAINER RH
- HINT:
-
Use the same procedure as for the LH side.
81150
17.INSTALL HEADLIGHT ASSEMBLY LH
81110
18.INSTALL HEADLIGHT ASSEMBLY RH
- HINT:
-
Use the same procedure as for the LH side.
81482C
19.INSTALL FOG LIGHT COVER LH
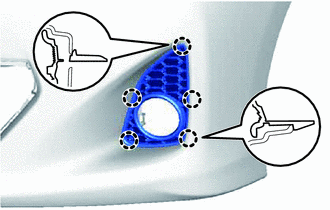
Engage the 5 claws and install the fog light cover.
81481E
20.INSTALL FOG LIGHT COVER RH
- HINT:
-
Use the same procedure as for the LH side.
81220
21.INSTALL FOG LIGHT ASSEMBLY LH
81210A
22.INSTALL FOG LIGHT ASSEMBLY RH
- HINT:
-
Use the same procedure as for the LH side.
53122E
23.INSTALL RADIATOR GRILLE LOWER MOULDING
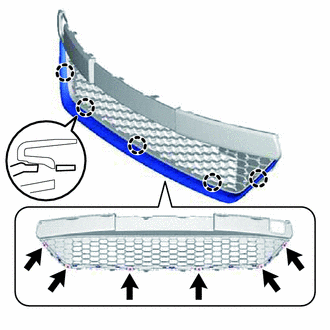
Engage the 5 claws and install the radiator grille lower moulding.
Tighten the 6 screws.
53112E
24.INSTALL LOWER NO. 1 RADIATOR GRILLE
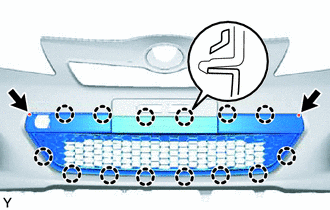
Engage the 14 claws and install the lower No. 1 radiator grille.
Tighten the 2 screws.
52129B
25.INSTALL FRONT BUMPER LOWER COVER
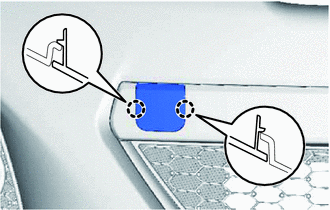
Engage the 2 claws and install the front bumper lower cover.
75311
26.INSTALL RADIATOR GRILLE (OR FRONT PANEL) EMBLEM
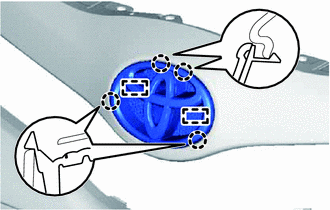
Engage the 2 guides, 4 claws and install the radiator grille (or front panel) emblem.
53111
27.INSTALL RADIATOR GRILLE
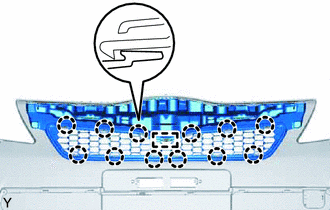
Engage the guide, 12 claws and install the radiator grille.
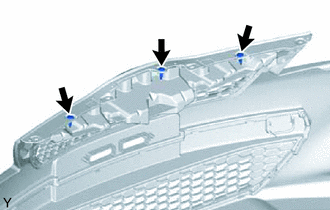
Install the 3 clips.
53395E
28.INSTALL HOOD TO FRONT END PANEL SEAL
Clean the attachment surface.
Using an infrared light, heat the double-sided adhesive tape remaining on the front bumper cover.
- HINT:
-
Heat at 40 to 60°C (104 to 140°F) for 1 to 2 minutes.
Using a piece of cloth, rub the remaining double-sided adhesive tape off the front bumper cover while it is hot from the infrared light.
- NOTICE:
-
Installing the hood to front end panel seal with any double-sided tape remaining on the front bumper cover may cause adhesion failure. Therefore, completely remove the double-sided tape.
Using a non-residue solvent, clean the attachment surface.
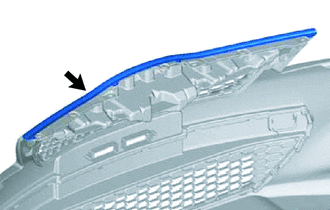
Install a new hood to front end panel seal onto the front bumper cover, as shown in the illustration.
- NOTICE:
-
Thoroughly press the hood to front end panel seal to ensure that it adheres.
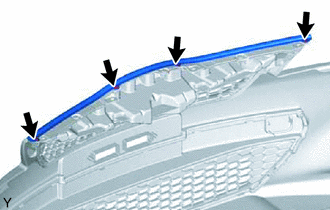
Install the 4 clips.