EXTERIOR PANELS / TRIM FRONT BUMPER REASSEMBLY
PROCEDURE

 52601
1.INSTALL FRONT BUMPER ENERGY ABSORBER SUB-ASSEMBLY
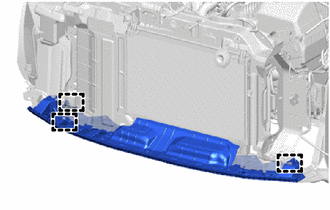
Engage the 3 hooks to install the front bumper energy absorber sub-assembly.
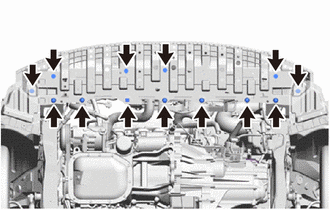
Install the 6 screws, 6 clips and grommet.
51441C
2.INSTALL ENGINE UNDER COVER RH
51442C
3.INSTALL ENGINE UNDER COVER LH
57014A
4.INSTALL FRONT SIDE MEMBER BRACKET SUB-ASSEMBLY LH
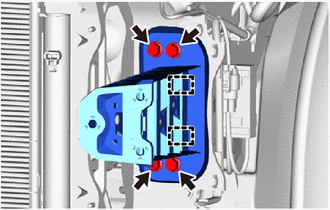
Engage the 2 guides to install the front side member bracket sub-assembly LH.
Tighten the 4 bolts.
- Torque:
- 40 N*m (408 kgf*cm, 30 ft.*lbf)
57013C
5.INSTALL FRONT SIDE MEMBER BRACKET SUB-ASSEMBLY RH
- HINT:
-
Use the same procedure as for the LH side.
85330
6.INSTALL WINDSHIELD WASHER JAR ASSEMBLY
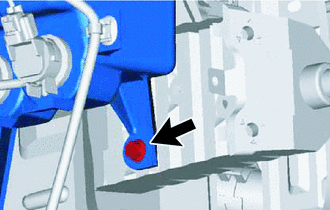
Install the windshield washer jar assembly with the bolt.
- Torque:
- 5.5 N*m (56 kgf*cm, 49 in.*lbf)
53165A
7.INSTALL FRONT NO. 1 BUMPER STONE DEFLECTOR BRACKET
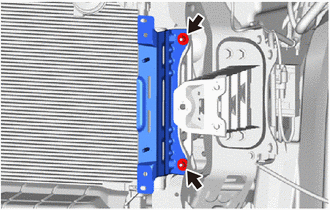
Install the front No. 1 bumper stone deflector bracket with the 2 nuts.
- Torque:
- 5.5 N*m (56 kgf*cm, 49 in.*lbf)
- HINT:
-
Use the same procedure as for the opposite side.
52131A
8.INSTALL FRONT BUMPER REINFORCEMENT
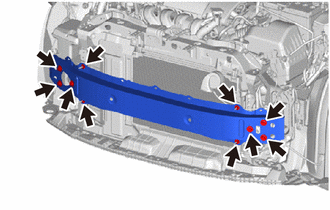
Install the front bumper reinforcement with the 4 nuts.
- Torque:
- 5.5 N*m (56 kgf*cm, 49 in.*lbf)
Tighten the 6 bolts.
- Torque:
- 40 N*m (408 kgf*cm, 30 ft.*lbf)
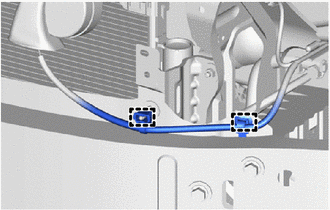
Engage the 2 clamps to install the wire harness.
52611
9.INSTALL FRONT BUMPER ENERGY ABSORBER
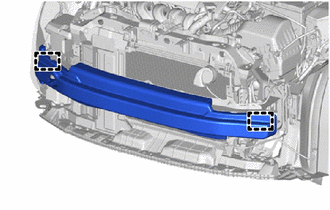
Engage the 2 guides to install the front bumper energy absorber.
53286B
10.INSTALL NO. 2 RADIATOR SIDE AIR SEAL
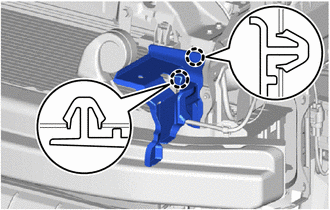
Engage the 2 claws to install the No. 2 radiator side air seal.
53285B
11.INSTALL NO. 1 RADIATOR SIDE AIR SEAL
- HINT:
-
Use the same procedure as for the No. 2 radiator side air seal side.
53292A
12.INSTALL UPPER RADIATOR SUPPORT SEAL
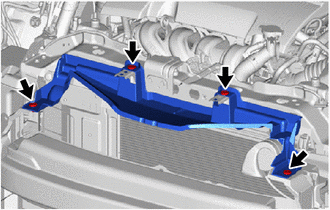
Install the 4 clips and install the upper radiator support seal.
53288B
13.INSTALL RADIATOR SUPPORT EXTENSION LH
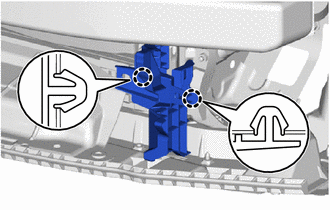
Engage the 2 claws to install the radiator support extension LH.
53287B
14.INSTALL RADIATOR SUPPORT EXTENSION RH
- HINT:
-
Use the same procedure as for the LH side.
88790B
15.INSTALL THERMISTOR ASSEMBLY
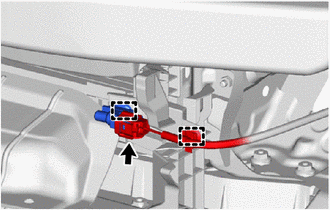
Engage the clamp to install the thermistor assembly.
Connect the connector.
Engage the clamp to install the wire harness.
52536
16.INSTALL FRONT BUMPER SIDE RETAINER LH
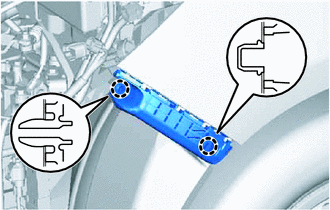
Engage the 2 claws to install the front bumper side retainer LH.
52535
17.INSTALL FRONT BUMPER SIDE RETAINER RH
- HINT:
-
Use the same procedure as for the LH side.
81150
18.INSTALL HEADLIGHT ASSEMBLY LH
81110
19.INSTALL HEADLIGHT ASSEMBLY RH
- HINT:
-
Use the same procedure as for the LH side.
52722
20.INSTALL FRONT BUMPER EXTENSION MOULDING LH (w/ Fog Light)
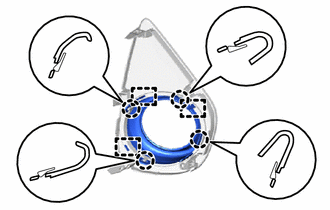
Engage the 3 guides and 4 claws to install the front bumper extension moulding LH.
52721
21.INSTALL FRONT BUMPER EXTENSION MOULDING RH (w/ Fog Light)
- HINT:
-
Use the same procedure as for the LH side.
81482C
22.INSTALL FOG LIGHT COVER LH (w/ Fog Light)
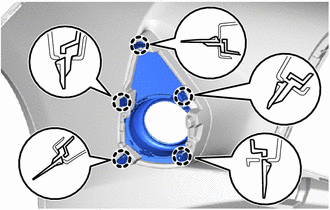
Engage the 5 claws to install the fog light cover LH.
81481E
23.INSTALL FOG LIGHT COVER RH (w/ Fog Light)
- HINT:
-
Use the same procedure as for the LH side.
81482C
24.INSTALL FOG LIGHT COVER LH (w/o Fog Light)
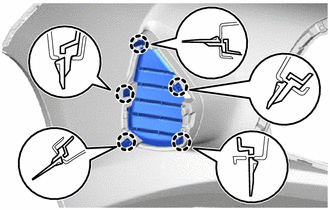
Engage the 5 claws to install the fog light cover LH.
81481E
25.INSTALL FOG LIGHT COVER RH (w/o Fog Light)
- HINT:
-
Use the same procedure as for the LH side.
81220
26.INSTALL FOG LIGHT ASSEMBLY LH (w/ Fog Light)
81210A
27.INSTALL FOG LIGHT ASSEMBLY RH (w/ Fog Light)
- HINT:
-
Use the same procedure as for the LH side.
53122A
28.INSTALL RADIATOR GRILLE LOWER MOULDING
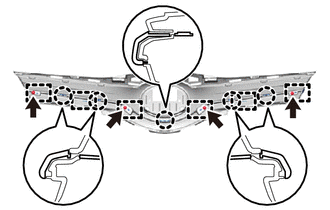
Engage the 6 guides and 5 claws to install the radiator grille lower moulding.
Install the 4 screws.
53121B
29.INSTALL RADIATOR GRILLE UPPER MOULDING
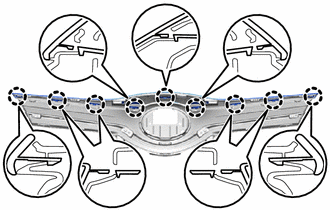
Engage the 9 claws to install the radiator grille upper moulding.
75311
30.INSTALL RADIATOR GRILLE (OR FRONT PANEL) EMBLEM
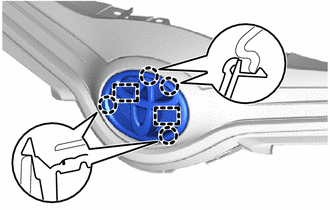
Engage the 2 guides and 4 claws to install the radiator grille (or front panel) emblem.
53111
31.INSTALL RADIATOR GRILLE
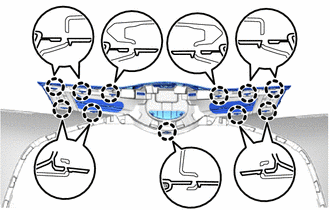
Engage the 11 claws to install the radiator grille.
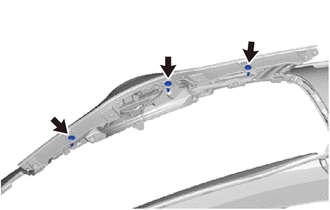
Install the 3 clips.
53124D
32.INSTALL RADIATOR GRILLE LOWER MOULDING LH
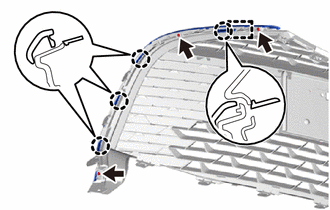
Engage the guide and 4 claws to install the radiator grille lower moulding LH.
Install the 3 screws.
53123C
33.INSTALL RADIATOR GRILLE LOWER MOULDING RH
- HINT:
-
Use the same procedure as for the LH side.
53112E
34.INSTALL LOWER NO. 1 RADIATOR GRILLE
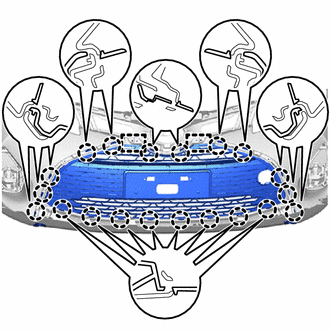
Engage the 2 guides and 20 claws to install the lower No. 1 radiator grille.
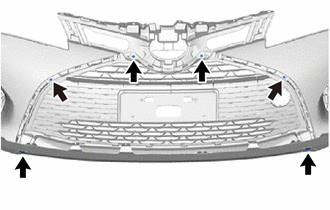
Install the 4 screws.
Install the 2 clips.
52129B
35.INSTALL FRONT BUMPER LOWER COVER
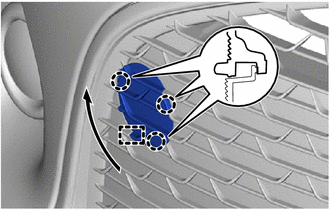
Engage the hook.
Turn the front bumper lower cover and engage the 3 claws to install the front bumper lower cover.
53395E
36.INSTALL HOOD TO FRONT END PANEL SEAL
Clean the attachment surface.
Using an infrared light, heat the double-sided tape remaining on the front bumper cover.
- HINT:
-
Heat at 40 to 60°C (104 to 140°F) for 1 to 2 minutes.
Using a piece of cloth, rub the remaining double-sided tape off the front bumper cover while it is hot from the infrared light.
- NOTICE:
-
Installing the hood to front end panel seal with any double-sided tape remaining on the front bumper cover may cause adhesion failure. Therefore, completely remove the double-sided tape.
Using a non-residue solvent, clean the attachment surface.
Install a new hood to front end panel seal onto the front bumper cover.
- NOTICE:
-
Thoroughly press the hood to front end panel seal to ensure that it adheres.
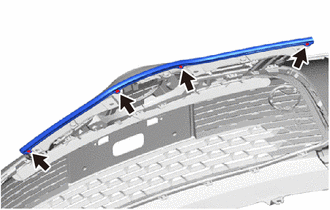
Install the 4 clips.