INTERIOR PANELS / TRIM UPPER INSTRUMENT PANEL INSTALLATION
PROCEDURE

 55302A
1.INSTALL UPPER INSTRUMENT PANEL SUB-ASSEMBLY
Engage the 5 guides at the front side of the upper instrument panel subassembly.
- NOTICE:
-
Be careful not to damage the upper instrument panel sub-assembly and steering wheel when installing it.
Engage the 6 clips at the rear side of the upper instrument panel subassembly.
Install the <C> screw.
Install the 2 clips.
Connect the connectors.
Engage the clamps.
Install the <B> bolt.
- Torque:
- 20 N*m (204 kgf*cm, 15 ft.*lbf)
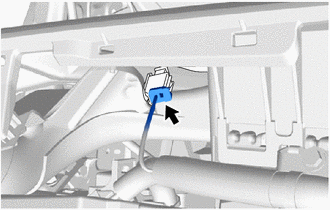
Connect the passenger airbag connector.
83100
2.INSTALL COMBINATION METER ASSEMBLY
55660
3.INSTALL NO. 4 INSTRUMENT PANEL REGISTER ASSEMBLY
Engage the 4 guides and 4 claws to install the No. 4 instrument panel register assembly.
55041B
4.INSTALL NO. 1 INSTRUMENT PANEL BOX DOOR SUB-ASSEMBLY
Engage the 9 clips and 2 claws to install the No. 1 instrument panel box door sub-assembly.
55445C
5.INSTALL INSTRUMENT PANEL BOX PLATE
Install the instrument panel box plate.
55405B
6.INSTALL INSTRUMENT CLUSTER FINISH CENTER PANEL SUB-ASSEMBLY (w/o Audio)
Connect the connector.
Engage the 6 clips to install the instrument cluster finish center panel sub-assembly.
55475B
7.INSTALL INSTRUMENT CLUSTER FINISH PANEL GARNISH CENTER
Engage the 9 clips to install the center instrument cluster finish panel garnish.
Close the No. 1 instrument panel box door sub-assembly.
55411G
8.INSTALL NO. 1 INSTRUMENT CLUSTER FINISH PANEL
Engage the 6 clips to install the No. 1 instrument cluster finish panel.
Remove the protective tape.
62211
9.INSTALL FRONT PILLAR GARNISH RH
62212
10.INSTALL FRONT PILLAR GARNISH LH
- HINT:
-
Use the same procedure as for the RH side.
62311B
11.INSTALL FRONT DOOR OPENING TRIM WEATHERSTRIP RH
Install the front door opening trim weatherstrip RH.
62312B
12.INSTALL FRONT DOOR OPENING TRIM WEATHERSTRIP LH
Install the front door opening trim weatherstrip LH.
13.CONNECT CABLE TO NEGATIVE BATTERY TERMINAL
- Torque:
- 5.4 N*m (55 kgf*cm, 48 in.*lbf)
- NOTICE:
-
When disconnecting the cable, some systems need to be initialized after the cable is reconnected.
-
Click hereGeneral>INTRODUCTION>REPAIR INSTRUCTION>INITIALIZATION
14.INSPECT SRS WARNING LIGHT