PRE-CRASH SAFETY FRONT SENSOR ADJUSTMENT (ONE TIME RECOGNITION)
CAUTION / NOTICE / HINT
- NOTICE:
-
Make sure to read Before Starting Adjustment before proceeding with work.
-
Click hereVehicle Interior>PRE-CRASH SAFETY>FRONT SENSOR>BEFORE STARTING ADJUSTMENT
PROCEDURE

 1. SECURE APPROPRIATE AREA FOR PERFORMING LEARNING
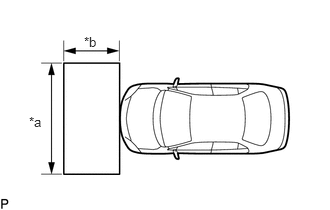
| *a | 2 m (6.56 ft.) |
| *b | 1 m (3.28 ft.) |
Park the vehicle on a level surface.
- HINT:
- ·
Make sure that the target recognition area of the pre-crash safety city sensor is free of objects which may be misrecognized as a target, such as overhead lights, windows, reflective objects, etc.
·If there are any objects which may be misrecognized as a target behind the area where a target will be placed, prepare an appropriate object to block the background.
Check the levelness of the ground.
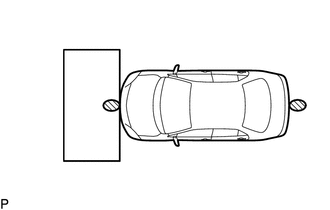

|
Levelness Check Point |
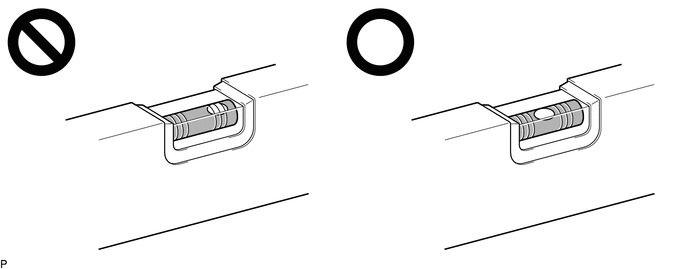
Check the levelness of the ground at the 2 points shown in the illustration.
Place the level on each levelness check point and check that the air bubble of the level is centered.
Adjust the tire inflation pressure to the specified pressure.
Click hereSuspension>TIRE / WHEEL>TIRE AND WHEEL SYSTEM>INSPECTION
Clean the windshield glass.
2. CREATE TARGET
- NOTICE:
-
Do not laminate the target or attach reflective materials, such as clear adhesive tape, to its surface. If there are reflective areas on the surface of the target, they will appear white to the pre-crash safety city sensor and the target may not be recognized.
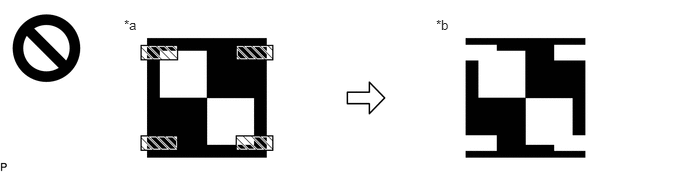 4.542,0.177 4.917,0.417 0.375,0.24 10 false *b 1.292,0.177 1.667,0.417 0.375,0.24 10 false *a
*a Actual Target *b Target as Seen by Pre-crash Safety City Sensor
Reflective Object or Surface - -
Print 3 copies of the illustration.

Check that the dimensions are within the values shown in the illustration.
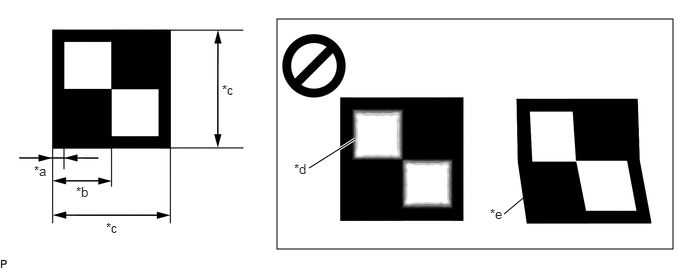
| *a | 12 mm (0.472 in.) | *b | 60 mm (2.36 in.) |
| *c | 120 mm (4.72 in.) | *d | Blurry |
| *e | Distorted | - | - |
- NOTICE:
- ·
Make sure that the black areas of the target sheet are not glossy.
·Make sure that the borders of the black and white areas on the target sheet are straight, and are not warped or blurry.
- HINT:
-
If the dimensions of the created target sheet are not within +/- 5 mm (0.197 in.) of the specified values, adjust the printer settings and reprint the target sheet so that the dimensions are as specified.
Prepare a piece of cardboard and draw lines on it as shown in the illustration.
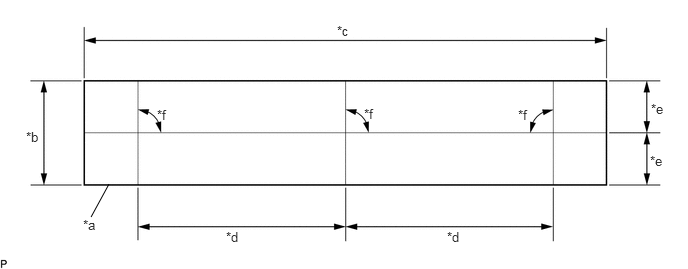
| *a | Cardboard | *b | 130 mm (5.12 in.) or more |
| *c | 730 mm (2.39 ft.) or more | *d | 297 mm (11.69 in.) |
| *e | 65 mm (2.56 in.) or more | *f | 90° |
Place the 3 target sheets on the cardboard with the black area of each at the top right and align the borders of the black and white areas with the lines as shown in the illustration.
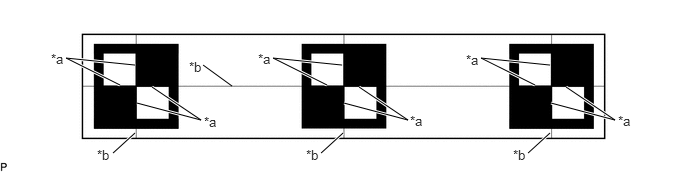
| *a | Border of Black and White Area | *b | Line |
Securely attach the target sheets to the cardboard using double-sided tape.
- NOTICE:
-
Do not attach reflective materials, such as clear adhesive tape, to the target sheet surface as this may affect target recognition.
Remove SST (reflector) from SST (base stand).
- SST
- 09870-60000 (09870-60010, 09870-60020)
Align the center of the center target sheet with SST (reflector) and attach the target to SST (reflector) with double-sided tape.
Install SST (reflector) to SST (base stand).
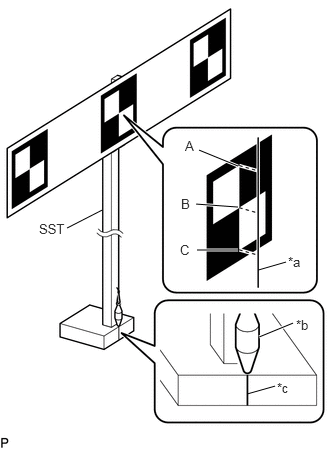
| *a | String |
| *b | Weight |
| *c | Mark-off Line |
Hang a weight with a pointed tip from the top center of the center target sheet and align it with the mark-off line of SST (base stand) as shown in the illustration.
- HINT:
- ·
Make sure that the points (A), (B) and (C) of the target sheet are aligned with the string.
·As SST may fall forward, make sure to place a weight on the base of SST.
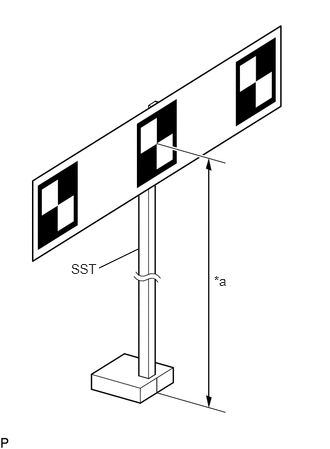
| *a | 1270 mm (50.0 in.) |
Move SST (reflector) up or down so that the center of the target sheet is at the height shown in the illustration, and secure SST (reflector) in place.
- HINT:
-
If the center of the target sheet is not within +/- 6 mm (0.236 in.) of the height specified, adjust the position of SST (reflector) so that the height is as specified.
Prepare an object to block the area behind the target. (If there are any objects which may be misrecognized as a target behind the area where a target will be placed.)
When blocking the background by holding cardboard behind the target:
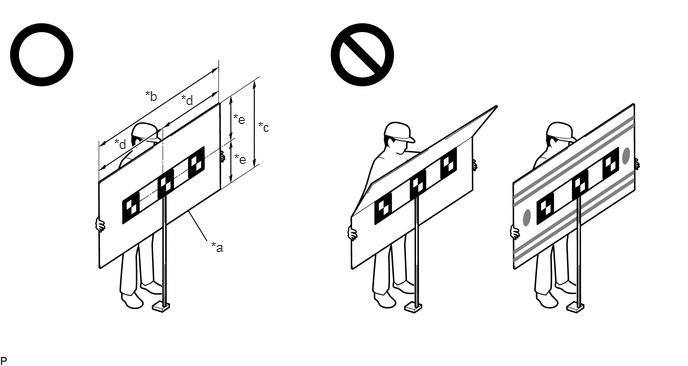
| *a | Cardboard | *b | 1160 mm (3.80 ft.) or more |
| *c | 560 mm (1.84 ft.) or more | *d | 580 mm (1.90 ft.) or more |
| *e | 280 mm (0.918 ft.) or more | - | - |
Prepare a piece of cardboard with the dimensions shown in the illustration.
- HINT:
- ·
Do not use cardboard that is bent or has a pattern or image on it.
·Do not use cardboard which has a reflective surface or reflective objects attached to it.
·Make sure to hold the cardboard in such a way that fingers are not within the target recognition area.
When blocking the background using a light colored plain cloth:
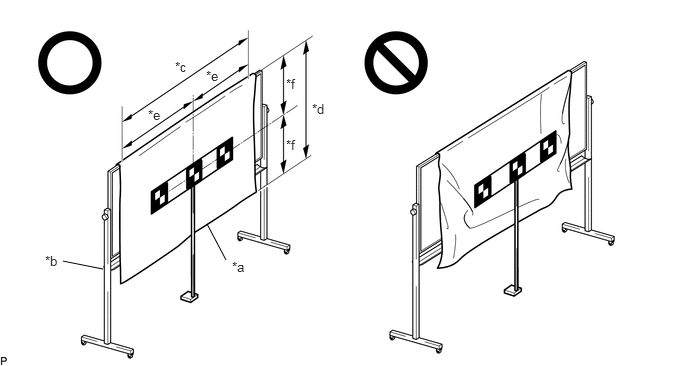
| *a | Light Colored Plain Cloth | *b | Whiteboard or Equivalent |
| *c | 1160 mm (3.80 ft.) or more | *d | 560 mm (1.84 ft.) or more |
| *e | 580 mm (1.90 ft.) or more | *f | 280 mm (0.918 ft.) or more |
Cover a whiteboard or equivalent with light colored plain cloth and secure it.
- HINT:
- ·
Make sure to stretch the cloth to remove wrinkles before securing it.
·Make sure that the target recognition area is free of clear adhesive tape, reflective surfaces and reflective objects.
3. DETERMINE TARGET PLACEMENT POSITION
Hang a weight with a pointed tip from the center of the rear emblem, and mark the rear center point of the vehicle (point A) on the ground.
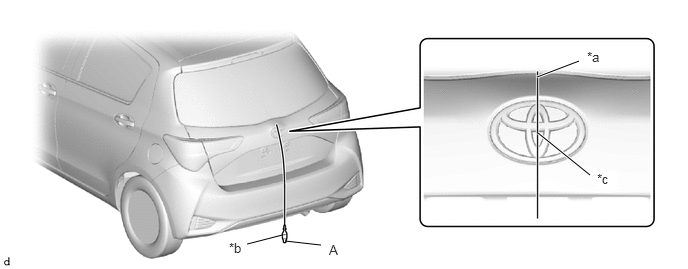
| *a | String | *b | Weight |
| *c | Center | - | - |
- HINT:
-
Lightly flick the string with your fingers several times to confirm that the string is perpendicular to the ground.
Hang a weight with a pointed tip from the center of the front emblem, and mark the front center point of the vehicle (point B) on the ground (placement position).
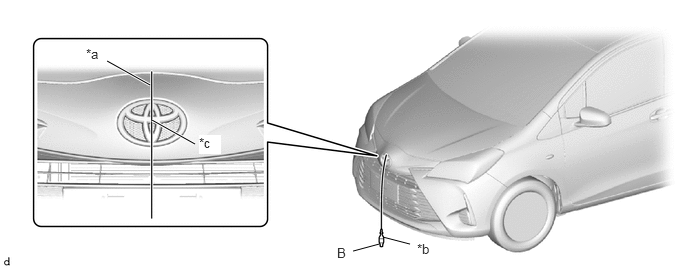
| *a | String | *b | Weight |
| *c | Center | - | - |
- HINT:
-
Lightly flick the string with your fingers several times to confirm that the string is perpendicular to the ground.
Using tape and a string, create a line that connects point B to point A and extends at least 200 mm (7.87 in.) beyond the front center point of the vehicle (target position line).
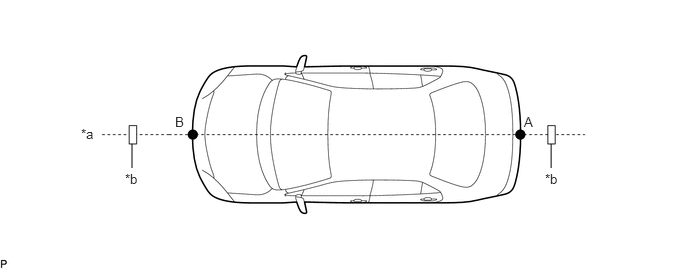
| *a | String | *b | Tape |
- HINT:
- ·
Make sure the string is taut when securing it with tape.
·Lightly flick the string with your fingers several times to confirm that the string is aligned with point B.
4. PERFORM PRE-CRASH SAFETY CITY SENSOR OPTICAL AXIS LEARNING
- CAUTION:
-
Do not look into the pre-crash safety city sensor from a close distance.
- NOTICE:
- ·
Close all of the doors.
·Make sure that no one is inside the vehicle.
·Do not lean on the vehicle.
·Make sure that the headlights are turned off.
Perform Recognition Camera/Target Position Memory.
Connect the GTS to the DLC3.
Turn the ignition switch to ON.
Turn the GTS on.
Enter the following menus: Chassis / PCS/LDA/RSA/LVN / Utility / Recognition Camera/Target Position Memory.
- Chassis > PCS/LDA/RSA/LVN > Utility
-
Tester Display Recognition Camera/Target Position Memory - 50005 376 2394
Press "Next".*1
Confirm the conditions displayed on the screen and then press "Next".
According to the display on the GTS, enter the following values for each respective item.
| Item | Value |
|---|---|
| Recognition Camera Height | 1345 mm (52.95 in.) |
| Recognition Camera Lateral Position | 3 mm (0.118 in.) |
| Recognition Camera Installation Yaw Angle | 0 deg. |
| Recognition Camera Installation Pitch Angle | -1.75 deg. |
| Target Height | 1270 mm (50.00 in.) |
| Target Distance | 1502 mm (59.13 in.) |
| Distance between Targets | 297 mm (11.69 in.) |
| Target Size | 120 mm (4.72 in.) |
| Vehicle Width | 1695 mm (66.73 in.) |
| Distance from Recognition Camera and Front Tire | 692 mm (27.24 in.) |
| Pitch Offset Angle | 0 deg. |
| Distance between Recognition Camera and Radar | 0 mm (0 in.) |
If "Recognition Camera/Target Position Memory has failed." is displayed on the GTS screen, confirm the conditions displayed on the screen, then press "Yes" and repeat the procedure from *1.
Press "Exit" to exit the Recognition Camera/Target Position Memory utility.
Perform Recognition Camera Axis Adjust (target positioning).
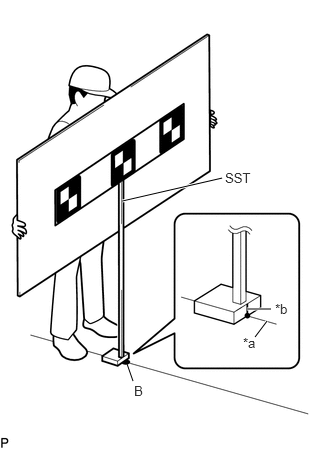
| *a | Target Position Line |
| *b | Mark-off Line |
Position SST so that it is aligned with the target position line and the mark-off line is aligned with point B (placement position) as shown in the illustration.
Enter the following menus: Chassis / PCS/LDA/RSA/LVN / Utility / Recognition Camera Axis Adjust.
- Chassis > PCS/LDA/RSA/LVN > Utility
-
Tester Display Recognition Camera Axis Adjust - 50005 376 4409
Press "Next".*2
Check that the values stored in the ECU are correct and then press "Next".
If "Failed to read axis adjustment data" is displayed, perform Recognition Camera/Target Position Memory, and repeat the procedure from *1.
Confirm the conditions displayed on the screen and then press "Next".
Select "One time recognition" and then press "Next".
Check that the target is placed at point B (placement position) and then press "Next".
- HINT:
-
If there are any objects which may be misrecognized as a target behind the area where a target will be placed, block the area behind the target with an appropriate object before pressing "Next".
If "Recognition Camera Axis Adjust has failed." is displayed on the screen.
Confirm that the following conditions are met and then press "YES".
The height of the target is correct.
The surfaces of the target and object used to block the background are not reflective and do not have reflective objects attached.
The orientation of the target sheet is correct (black area positioned at the top right).
The target is not backlit.
The windshield glass is clean.
The center of the target is at the correct height and the target placement position is correct.
Repeat the procedure from *2.
If "Set the headlight type in the next screen." is displayed:
Press "Next".
Select the type of high beam headlights the vehicle is equipped with and then press "Next".*3
If "Headlight Type Setting has failed." is displayed on the GTS screen, confirm the conditions, then press "Yes" and repeat the procedure from *3.
Confirm the high beam headlight type selected and then press "Exit" to exit the Recognition Camera Axis Adjust utility.
If "Set the headlight type in the next screen." is not displayed:
Press "Exit" to exit the Recognition Camera Axis Adjust utility.
Turn the ignition switch off.
Disconnect the GTS from the DLC3.
Pre-crash safety city sensor optical axis learning is complete.