WINDSHIELD GLASS (for Sedan) > INSTALLATION |
| 1. CLEAN WINDSHIELD GLASS |
|
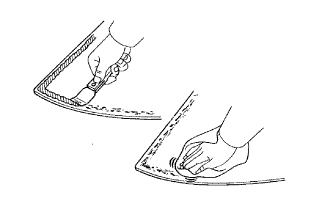
Using a scraper, remove the stoppers, window glass adhesive dam and adhesive from the windshield glass.
Clean the outer circumference of the windshield glass with a non-residue solvent.
| 2. CLEAN VEHICLE BODY |
Clean and shape the contact surface of the vehicle body.
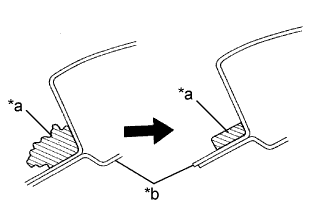 |
Using a knife, cut away any rough adhesive on the contact surface of the vehicle body to ensure the appropriate surface shape.
| *a | Adhesive |
| *b | Vehicle Body |
Clean the contact surface of the vehicle body with a piece of cloth saturated with cleaner.
| 3. INSTALL WINDSHIELD GLASS STOPPER NO. 1 |
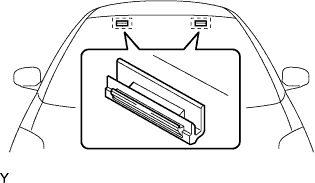 |
Install 2 new windshield glass stoppers onto the vehicle body, as shown in the illustration.
| 4. INSTALL WINDSHIELD GLASS STOPPER NO. 2 |
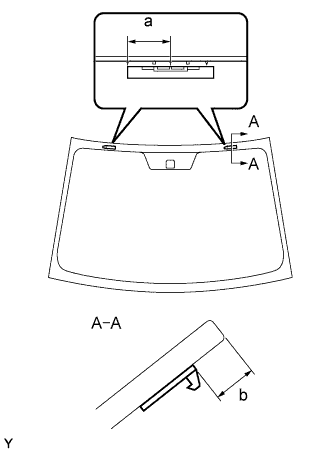 |
Apply Primer G to the installation parts of the windshield glass stoppers.
Install 2 new windshield glass stoppers onto the windshield glass, as shown in the illustration.
| Area | Measurement |
| a | 40 mm (1.57 in.) |
| b | 14.5 mm (0.571 in.) |
| 5. INSTALL WINDOW GLASS ADHESIVE DAM |
Apply Primer G to the installation part of a new window glass adhesive dam, as shown in the illustration.
Install the new window glass adhesive dam with double-sided tape as shown in the illustration.
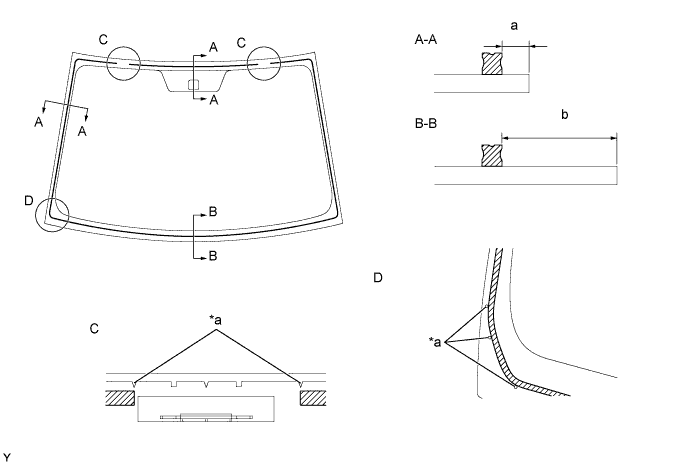
| *a | Ceramic Notch | - | - |
| Area | Measurement |
| a | 7.0 mm (0.276 in.) |
| b | 29.4 mm (1.157 in.) |
| 6. INSTALL WINDSHIELD GLASS |
Position the windshield glass.
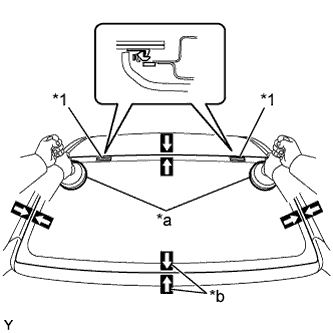 |
Using suction cups, place the windshield glass in the correct position.
| *1 | Windshield Glass Stopper |
| *a | Suction Cup |
| *b | Matchmarks |
Check that the entire contact surface of the windshield glass rim is perfectly even.
Place matchmarks on the windshield glass and vehicle body.
Using suction cups, remove the windshield glass.
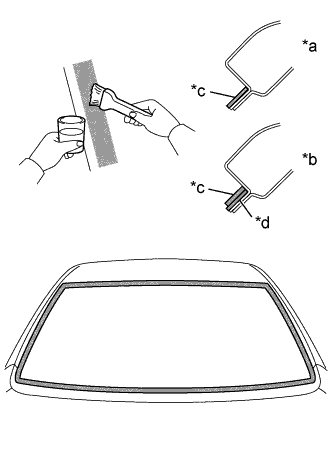 |
Using a brush, apply Primer M to the exposed part of the vehicle body.
| *a | CORRECT |
| *b | INCORRECT |
| *c | Primer M |
| *d | Adhesive |
Using a brush or sponge, apply Primer G to the edge of the windshield glass and the contact surface.
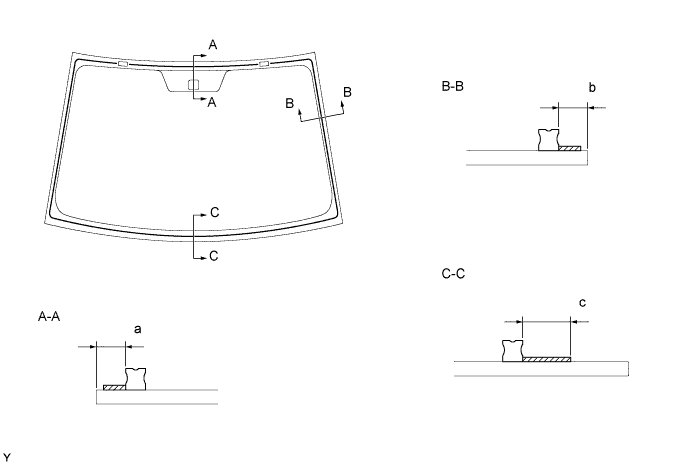
| Area | Measurement |
| a | 7.0 mm (0.276 in.) |
| b | 7.0 mm (0.276 in.) |
| c | 16 mm (0.630 in.) |
Apply adhesive.
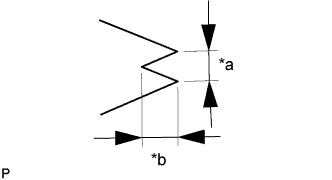 |
Cut the tip off the cartridge nozzle, as shown in the illustration.
| *a | 8.0 mm (0.315 in.) |
| *b | 12.0 mm (0.472 in.) |
| Temperature | Usage Time Frame |
| 35°C (95°F) | 15 minutes |
| 20°C (68°F) | 1 hour 40 minutes |
| 5°C (41°F) | 8 hours |
Load the sealer gun with the cartridge.
Apply adhesive to the windshield glass, as shown in the illustration.
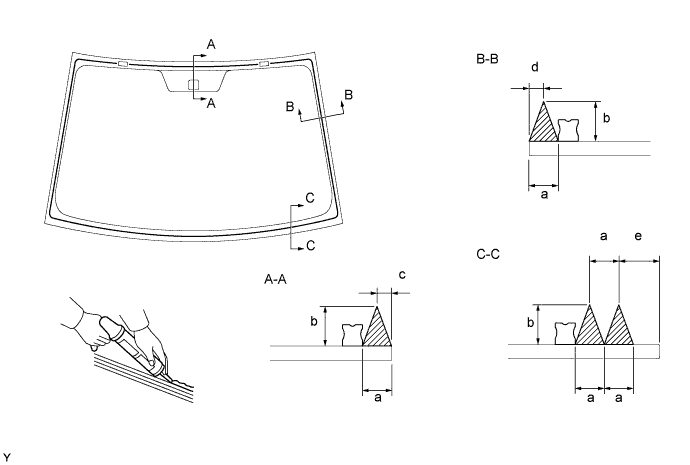
| Area | Measurement |
| a | 8 mm (0.315 in.) |
| b | 12 mm (0.472 in.) |
| c | 4 mm (0.157 in.) |
| d | 4 mm (0.157 in.) |
| e | 17.4 mm (0.685 in.) |
Install the windshield glass onto the vehicle body.
|
Using suction cups, position the windshield glass so that the matchmarks are aligned. Gently press it in along the rim.
| *1 | Windshield Glass Stopper |
| *a | Suction Cup |
| *b | Matchmarks |
Gently press the front surface of the windshield glass to ensure that the windshield glass is securely fitted to the vehicle body.
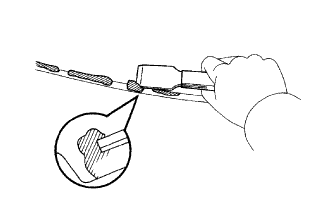 |
Using a scraper, remove any excessive or protruding adhesive.
| Temperature | Minimum time prior to driving vehicle |
| 35°C (95°F) | 1 hour 30 minutes |
| 20°C (68°F) | 5 hours |
| 5°C (41°F) | 24 hours |
| 7. INSTALL WINDSHIELD OUTSIDE MOULDING |
 |
Using a brush or sponge, coat the edge of the windshield glass and the contact surface with Primer G.
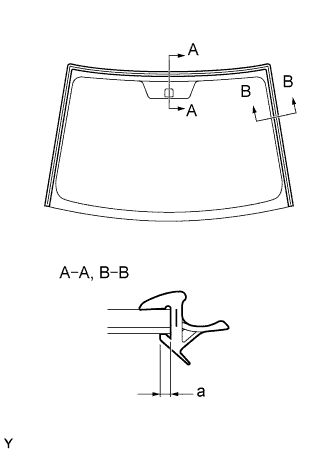
Install a new windshield outside moulding onto the windshield glass, as shown in the illustration.
| Area | Measurement |
| a | 2 mm (0.0787 in.) |
| 8. CHECK FOR LEAKAGE AND REPAIR |
Conduct a leak test by applying water to the adhesive portions after the adhesive has completely hardened.
Seal any leaks with auto glass sealer.
| 9. INSTALL ROOF HEADLINING ASSEMBLY |
| 10. INSTALL INNER REAR VIEW MIRROR |
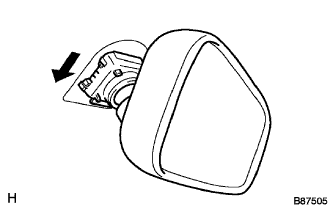 |
Slide and install the inner rear view mirror.
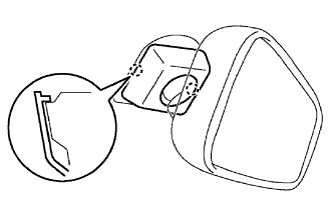 |
Engage the 2 claws and install the cover.
| 11. INSTALL MAP LIGHT ASSEMBLY |
Connect the map light connector.
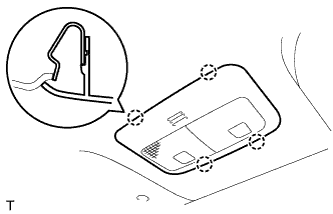 |
Engage the 4 claws and install the map light.
| 12. INSTALL ROOM LIGHT ASSEMBLY |
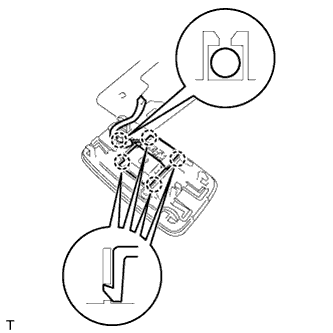 |
Engage the 4 claws and install the room light switch base.
Install the roof wire into the claw of the room light holder.
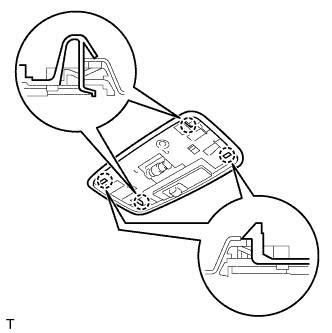 |
Engage the 4 claws and install the room light holder.
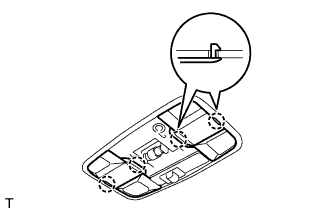 |
Engage the 2 claws and install the cover.
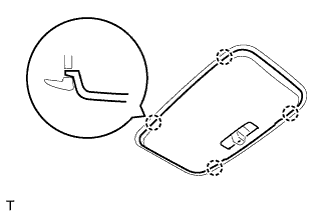 |
Engage the 4 claws and install the room light lens.
| 13. INSTALL VISOR HOLDER RH |
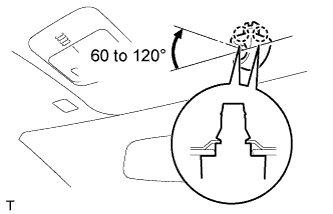 |
Engage the 2 claws by turning the visor holder clockwise between 60 to 120° and install the visor holder.
| 14. INSTALL VISOR HOLDER LH |
| 15. INSTALL VISOR ASSEMBLY RH |
Engage the 2 clips and install the visor.
Install the visor shaft into the visor holder.
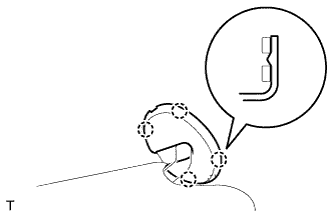 |
Engage the 4 claws and install a new visor bracket cover.
| 16. INSTALL VISOR ASSEMBLY LH |
| 17. INSTALL ASSIST GRIP SUB-ASSEMBLY |
Engage the 2 clips and install the assist grip.
| 18. INSTALL ASSIST GRIP COVER |
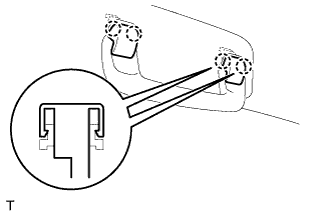 |
Engage the 2 claws and install the assist grip cover.
| 19. INSTALL FRONT PILLAR GARNISH RH |
Install the 3 clamps.
Connect the antenna connector.
Engage the 2 clips and the 2 claws and install the front pillar garnish.
| 20. INSTALL FRONT PILLAR GARNISH LH |
Install the 4 clamps.
Engage the 2 clips and the 2 claws and install the front pillar garnish.
| 21. INSTALL FRONT DOOR OPENING TRIM WEATHERSTRIP RH |
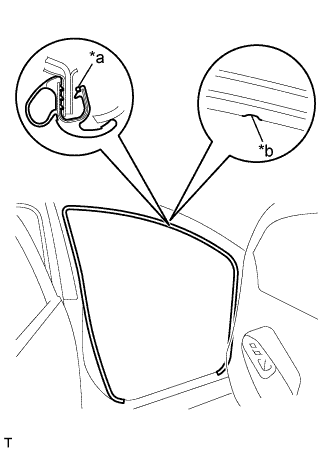 |
Align the location mark with the paint mark first, and install the front door opening trim weatherstrip, as shown in the illustration.
| *a | Paint Mark |
| *b | Location Mark |
| Area | Color |
| RH side | Blue |
| LH side | Pink |
| 22. INSTALL FRONT DOOR OPENING TRIM WEATHERSTRIP LH |
| 23. INSTALL COWL SIDE TRIM BOARD RH |
Engage the stud bolt and the claw and install the cowl side trim board.
| 24. INSTALL COWL SIDE TRIM BOARD LH |
| 25. INSTALL FRONT DOOR SCUFF PLATE RH |
Engage the 11 claws and install the front door scuff plate.
| 26. INSTALL FRONT DOOR SCUFF PLATE LH |
| 27. INSTALL COWL TOP VENTILATOR LOUVER SUB-ASSEMBLY |