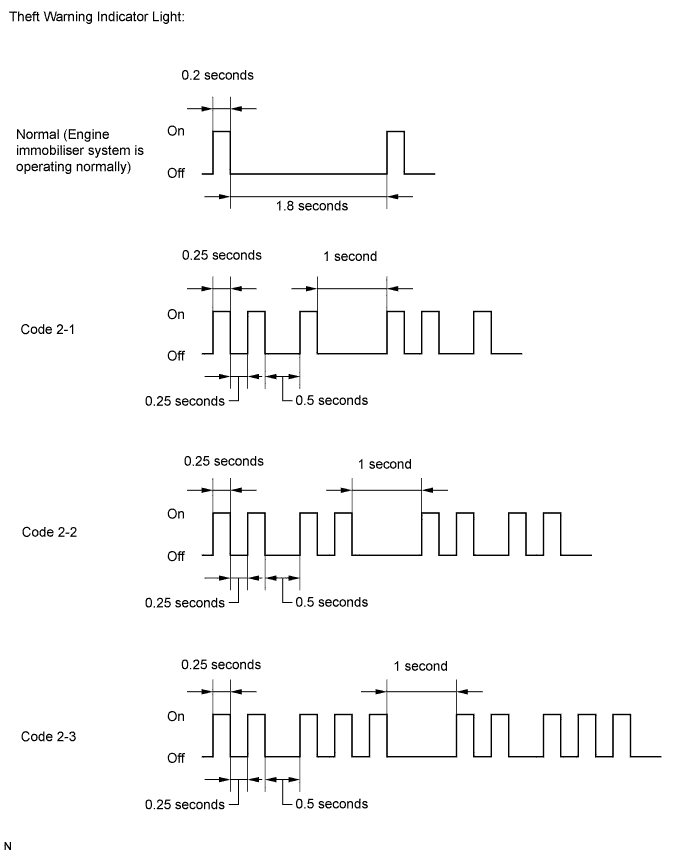
ENGINE IMMOBILISER SYSTEM (for Hatchback) > REGISTRATION |
| 1. DESCRIPTION OF CODE REGISTRATION |
w/ Wireless Door Lock Control System:
The key has 2 codes: the key code (immobiliser code) and the wireless code. Both of these codes need to be registered. For the wireless code registration procedures, refer to Wireless Door Lock Control System (Click here).
| 2. KEY REGISTRATION PROCEDURES WHEN ADDING OR REPLACING KEY OR WHEN KEY IS LOST |
| Customer Request/Condition | Registration Procedure Condition | Procedure | Refer to |
| Registering additional key | Customer must bring at least 1 key. | 1. Register additional keys as necessary (additional key code registration). | PROCEDURE "B" |
| Customer must bring at least 1 key. | 1. Using remaining key, clear all registered keys except one (key code erasure). | PROCEDURE "C" |
| 2. Register additional keys as necessary (additional key code registration). | PROCEDURE "B" | ||
| All keys are lost | - | 1. Reset all keys (all keys ID erasure (key code reset)). | PROCEDURE "D" |
| 2. Register all keys new key ID registration. | PROCEDURE "A" |
| 3. PART REPLACEMENT AND KEY REGISTRATION PROCEDURES |
The following table shows ECU replacement and key registration procedures for cases in which an ECU has been determined to be malfunctioning during troubleshooting of the engine immobiliser system.
| Malfunctioning ECU | Procedure | Refer to |
| Transponder key ECU assembly | 1. Replace transponder key ECU assembly. |
Click here
|
| 2. Reregister all keys. | PROCEDURE "A" | |
| 3. Register ECU communication ID. | PROCEDURE "E" | |
| ECM | 1. Replace ECM. |
Click here
|
| 2. Register ECU communication ID. | PROCEDURE "F" | |
| Transponder key ECU assembly and ECM | 1. Replace transponder key ECU assembly. |
Click here
|
| 2. Replace ECM. |
Click here
| |
| 3. Reregister all keys. | PROCEDURE "A" | |
| 3. Register ECU communication ID. | PROCEDURE "F" |
| 4. KEY REGISTRATION (PROCEDURE "A") |
New key code registration (Procedure "A"):
| Procedure | Theft Warning Indicator Light Assembly Condition |
| 1. Start | Blinking
|
| 2. Insert the master key into the ignition key cylinder. | Blinking |
| 3. Techstream operation Enter the following menus: Body Electrical / Immobiliser / Utility / Key Registration
| OFF for 1 second and then ON |
| 4. Remove the key and then select Next on the Techstream. | ON |
| 5. Insert the master key to be registered and then select Next on the Techstream. | OFF for 1 second and then ON for 0.5 seconds and then OFF |
| 6. Remove the key and then select Next on the Techstream. | Blinking |
| 9. End | |
| Procedure | Theft Warning Indicator Light Assembly Condition |
| 1. Start | Blinking
|
| 2. Insert the master key into the ignition key cylinder. | Blinking |
| 3. Techstream operation Enter the following menus: Body Electrical / Immobiliser / Utility / Key Registration
| OFF for 1 second and then ON |
| 4. Remove the key and then select Next on the Techstream. | ON |
| 5. Insert the master key to be registered and then select Next on the Techstream. | OFF for 1 second and then ON |
| 6. Remove the key and then select Next on the Techstream. | ON |
| 7. Insert the sub key to be registered and then select Next on the Techstream. | OFF for 1 second and then ON for 0.5 seconds and then OFF |
| 8. Remove the key. | Blinking |
| 9. End | |

End automatic key code registration mode:
Automatic key code registration mode can be forced to end when at least 1 key code (immobiliser code) has been registered as the master key.
| 5. KEY REGISTRATION (PROCEDURE "B") |
Additional registration (Procedure "B"):
| Procedure | Time to Complete Operation | Theft Warning Indicator Light Assembly Condition |
| 1. Start | - | Blinking
|
| 2. Insert the previous registered master key into the ignition key cylinder and turn the ignition switch to ON. | - | OFF |
| 3. Techstream operation Enter the following menus: Body Electrical / Immobiliser / Utility / Key Registration
| Within 120 seconds | ON |
| 4. Remove the master key. | Within 20 seconds
| ON |
| 5. Insert the key to be registered in the ignition key cylinder. | Within 10 seconds | Blinking |
6. Wait for 60 seconds after the key is registered.
| - | OFF |
| 7. Remove the key. | - | Blinking |
| 8. End | ||
| 6. KEY REGISTRATION (PROCEDURE "C") |
Key code erasure (Procedure "C"):
| Procedure | Time to Complete Operation | Theft Warning Indicator Light Assembly Condition |
| 1. Start | - | Blinking
|
| 2. Insert the previous registered master key in the ignition key cylinder and turn the ignition switch to ON. | - | OFF |
| 3. Techstream operation Enter the following menus: Body Electrical / Immobiliser / Utility / Transponder Code Erasure
| Within 120 seconds | ON for 1 second and then OFF |
| 4. Remove the master key. | Within 10 seconds
| Blinking |
| 5. End | ||
| 7. KEY REGISTRATION (PROCEDURE "D") |
All key code erasure (Procedure "D"):
| Procedure | Time to Complete Operation | Theft Warning Indicator Light Assembly Condition |
| 1. Start | - | Blinking |
| 2. Insert the previous registered master key or unregistered key into ignition key cylinder and turn the ignition switch to ON. | Within 10 minutes | ON or OFF |
| 3. Using TIS, confirm that user and vehicle match. | ||
| 4. Techstream operation Enter the following menus: Body Electrical / Immobiliser / Utility / Immobiliser Code Reset
| Within 15 minutes | ON for 1 second and then OFF |
| 5. Completion of erasure of all key codes is displayed. | Within 10 seconds
| ON |
| 6. End | ||
| 8. KEY REGISTRATION (PROCEDURE "E") |
ECU communication ID registration (Procedure "E"):
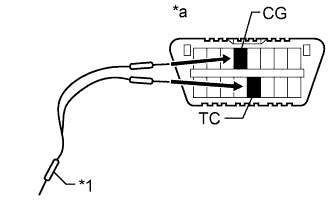
![]() |
Using SST, connect terminals TC and CG of the DLC3.
| *1 | SST |
| *a | Front view of DLC3 |
Turn the ignition switch to ON and leave the vehicle as is for 30 minutes.
Check that the engine starts.
| 9. KEY REGISTRATION (PROCEDURE "F") |
ECU communication ID registration (Procedure "F"):
| Procedure | Theft Warning Indicator Light Assembly Condition |
| 1. Start | OFF |
| 2. Insert an already registered key into the ignition key cylinder. | |
| 3. Start the engine. | |
| 4. Check that the engine starts and stays on for more than 3 seconds. | |
| 5. End | |