 |
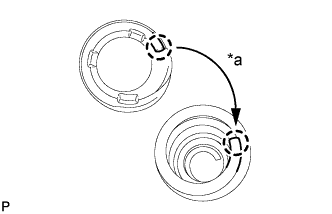
Install the rear upper coil spring insulator LH so that its gap fits to the end of the rear coil spring LH.
| *a | Fit |
REAR COIL SPRING (for Sedan) > INSTALLATION |
| 1. INSTALL REAR COIL SPRING LH |
Support the spring seat of the rear axle beam with an engine lifter using 2 wooden blocks.
Remove the 2 bolts while holding the 2 nuts and separate the rear axle beam from the rear shock absorber assemblies LH and RH.
Slowly lower the rear axle beam with an engine lifter and 2 wooden blocks.
Install the rear lower coil spring insulator LH to the rear axle beam.
|
Install the rear upper coil spring insulator LH so that its gap fits to the end of the rear coil spring LH.
| *a | Fit |
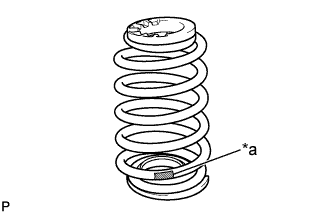 |
Install the rear coil spring LH to the rear axle beam.
| *a | Paint Mark |
Slowly jack up the rear axle beam with an engine lifter using 2 wooden blocks, and temporarily tighten the rear axle beam to the rear shock absorber assemblies LH and RH with the 2 bolts and 2 nuts.
| 2. INSTALL REAR COIL SPRING RH |
| 3. INSTALL REAR FLEXIBLE HOSE LH |
Install the rear flexible hose LH to the rear axle beam with a new clip.
Using a 10 mm union nut wrench, connect the rear No. 4 brake tube to the rear flexible hose LH while holding the rear flexible hose LH with a wrench.
| 4. INSTALL REAR FLEXIBLE HOSE RH |
| 5. INSTALL SKID CONTROL SENSOR WIRE (w/ ABS) |
Install the skid control sensor wire to the rear axle beam with the nut.
Connect the skid control sensor wire connector.
| 6. INSTALL REAR WHEEL |
| 7. STABILIZE SUSPENSION |
Lower the vehicle from the engine lifter.
Bounce the vehicle up and down several times to stabilize the suspension.
| 8. FULLY TIGHTEN REAR AXLE BEAM |
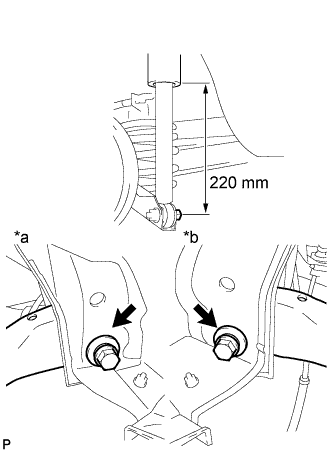 |
Suspend the jack on the rear axle spring seat and adjust the length of the rear shock absorber to the reference value.
| *a | RH Side |
| *b | LH Side |
Fully tighten the 2 bolts.
| 9. FULLY TIGHTEN REAR SHOCK ABSORBER LH |
Fully tighten the rear shock absorber (lower side) with the bolt.
| 10. FULLY TIGHTEN REAR SHOCK ABSORBER RH |
| 11. FILL RESERVOIR WITH BRAKE FLUID |
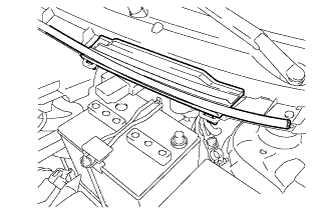 |
Disengage the 3 clips and separate the hood to cowl top seal.
Remove the cowl top ventilator louver.
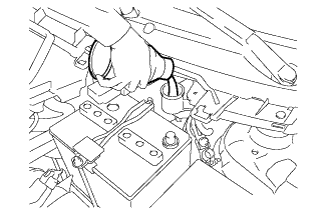 |
Set the brake fluid can upside down on the reservoir.
| 12. BLEED MASTER CYLINDER |
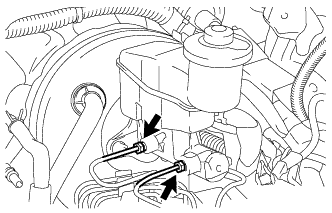 |
Using a 10 mm union nut wrench, disconnect the 2 brake tubes from the master cylinder.
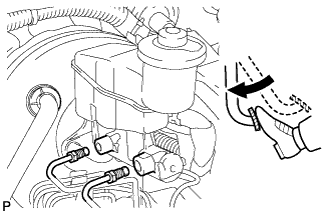 |
Slowly depress the brake pedal and hold it there (Step A).
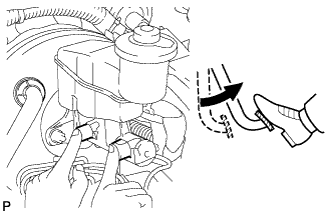 |
Block the outer holes with your fingers, and release the brake pedal (Step B).
Repeat step A and B 3 or 4 times.
|
Using a 10 mm union nut wrench, connect the 2 brake tubes to the master cylinder.
| 13. BLEED BRAKE LINE |
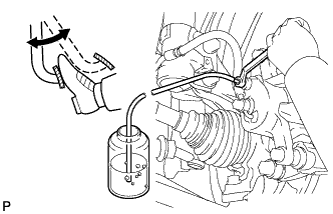 |
Connect the vinyl tube to the bleeder plug.
Depress the brake pedal several times, then loosen the bleeder plug with the pedal depressed (Step C).
At the point where the fluid stops coming out, tighten the bleeder plug, then release the brake pedal (Step D).
Repeat step C and D until all the air in the fluid is completely bled out.
Tighten the bleeder plug.
Repeat the above procedure to bleed the air out of the brake line for each wheel.
| 14. INSPECT FLUID LEVEL IN RESERVOIR |
Check the fluid level and add fluid if necessary.
| 15. INSPECT FOR BRAKE FLUID LEAK |
| 16. INSPECT REAR WHEEL ALIGNMENT |
| 17. CHECK ABS SENSOR SIGNAL (w/ ABS) |