Home › Suspension › REAR SUSPENSION › REAR AXLE BEAM (for Sedan)

REAR AXLE BEAM (for Sedan) > INSTALLATION

for Preparation Click here


1. INSTALL REAR AXLE CARRIER BUSH LH


    C107559E07
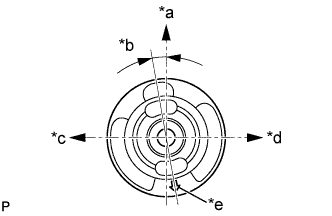
  1. Align the matchmarks on a new rear axle carrier bush LH and the rear axle beam and temporarily install the rear axle carrier bush LH to the rear axle beam, as shown in the illustration.
    Text in Illustration 
    *a
    Upper Side
    *b
    7 to 13°
    *c
    Front Side
    *d
    Rear Side
    *e
    Alignment Mark

    NOTICE:
    Install the rear axle carrier bush LH in the same orientation as the old one was prior to removal because they are directional.
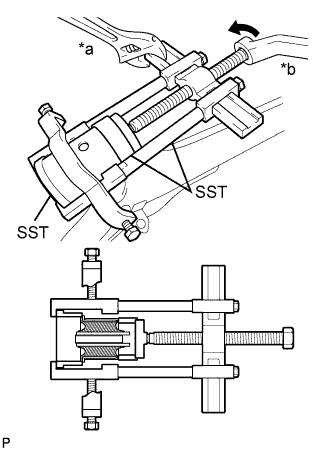
    C107560E03
  1. Using SST, install the rear axle carrier bush LH to the rear axle beam.
    Text in Illustration 
    *a
    Hold
    *b
    Turn

    SST
    09223-15020  
    09387-02010  
    09950-40011   (09951-04020, 09952-04010, 09953-04030, 09954-04030, 09955-04051, 09957-04010, 09958-04011)
    09950-60020   (09951-00810)

    NOTICE:
    1. Apply grease to the threads and tip of the SST center bolt before use.
    2. Do not damage the rubber portion when installing the bush.


2. INSTALL REAR AXLE CARRIER BUSH RH

HINT:
The installation procedure for the RH side is the same as that for the LH side.


3. TEMPORARILY TIGHTEN REAR AXLE BEAM


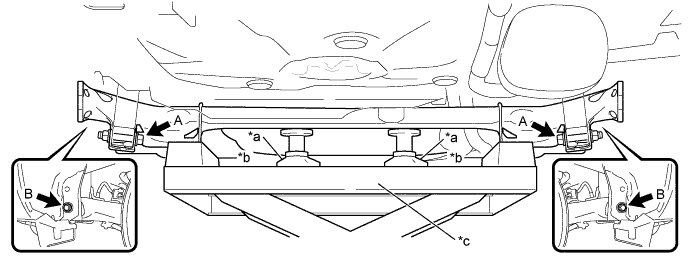
  1. Slowly jack up the rear axle beam with an engine lifter using 2 wooden blocks and 2 plate lift attachments or equivalent tools and temporarily tighten the rear axle beam to the body with the 2 bolts B.


    C261477E02


    Text in Illustration  
    *a
    Plate Lift Attachment
    *b
    Wooden Block
    *c
    Engine Lifter
    -
    -

    NOTICE:
    Make sure to secure the rear axle beam to prevent it from dropping.

  1. Temporarily tighten the rear axle beam to the rear shock absorber assemblies LH and RH with the 2 bolts A and 2 nuts.

    NOTICE:
    Since stopper nuts are used, turn the bolts.


4. INSTALL REAR COIL SPRING LH
  1. Support the spring seat of the rear axle beam with an engine lifter using 2 wooden blocks.

  1. Remove the 2 bolts while holding the 2 nuts and separate the rear axle beam from the rear shock absorber assemblies LH and RH.

    NOTICE:
    Since a stopper nut is used, turn the bolt.

  1. Slowly lower the rear axle beam with an engine lifter and 2 wooden blocks.

  1. Install the rear lower coil spring insulator LH to the rear axle beam.


    C110329E04
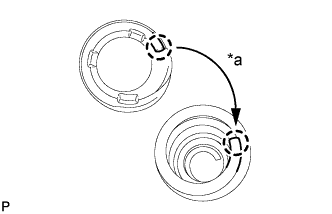
  1. Install the rear upper coil spring insulator LH so that its gap fits to the end of the rear coil spring LH.
    Text in Illustration 
    *a
    Fit


    C112606E03
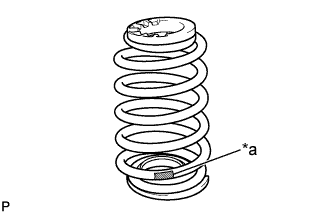
  1. Install the rear coil spring LH to the rear axle beam.
    Text in Illustration 
    *a
    Paint Mark

    NOTICE:
    The paint mark of the rear coil spring LH should be towards the underside and rear side of the vehicle.

  1. Slowly jack up the rear axle beam with an engine lifter using 2 wooden blocks, and temporarily tighten the rear axle beam to the rear shock absorber assemblies LH and RH with the 2 bolts and 2 nuts.

    NOTICE:
    Since a stopper nut is used, turn the bolt.


5. INSTALL REAR COIL SPRING RH

HINT:
The installation procedure for the RH side is the same as that for the LH side.


6. INSTALL REAR AXLE HUB AND BEARING ASSEMBLY LH
  1. Install the axle hub and bearing to the axle beam with the 4 bolts.

    Torque:
    90 N*m{ 918 kgf*cm , 67 ft.*lbf }


7. INSTALL REAR AXLE HUB AND BEARING ASSEMBLY RH

HINT:
The installation procedure for the RH side is the same as that for the LH side.


8. INSPECT REAR AXLE HUB BEARING


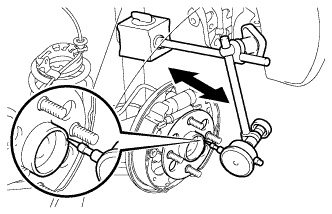
C121815
  1. Inspect the axle hub and bearing backlash.

    1. Using a dial indicator, check the backlash near the center of the axle hub.

      Maximum:
      0.05 mm (0.0020 in.)

      If the backlash exceeds the maximum, replace the axle hub and bearing.


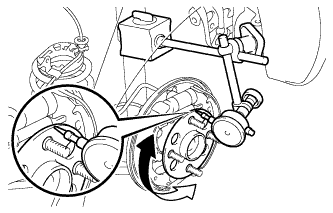
    C121816
  1. Inspect the axle hub and bearing runout.

    1. Using a dial indicator, check the runout of the surface of the axle hub.

      Maximum:
      0.07 mm (0.0028 in.)

      If the runout exceeds the maximum, replace the axle hub and bearing.


9. INSTALL REAR BRAKE DRUM SUB-ASSEMBLY


10. ADJUST REAR DRUM BRAKE SHOE CLEARANCE
  1. Provisionally install the 2 hub nuts.


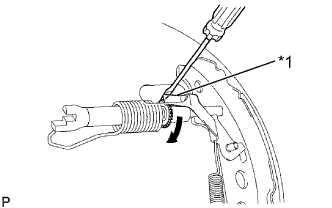
    F040023E07
  1. Remove the hole plug, and turn the adjuster to expand the shoe until the drum locks.
    Text in Illustration 
    *1
    Automatic Adjust Lever
    V100135
    Expand

  1. Using a screwdriver, release the adjuster 12 notches.

  1. Install the hole plug.


11. INSTALL NO. 3 PARKING BRAKE CABLE ASSEMBLY
  1. Install a new cable clamp to the No. 3 parking brake cable assembly.

  1. Install the No. 3 parking brake cable assembly with the bolt and the cable clamp.

    Torque:
    6.0 N*m{ 61 kgf*cm , 53 in.*lbf }


12. INSTALL NO. 2 PARKING BRAKE CABLE ASSEMBLY

HINT:
The installation procedure for the RH side is the same as that for the LH side.


13. INSTALL REAR NO. 4 BRAKE TUBE
  1. Install the rear No. 4 brake tube to the rear axle beam with the nut.

    Torque:
    5.0 N*m{ 51 kgf*cm , 44 in.*lbf }

  1. Install the rear flexible hose LH to the rear axle beam with a new clip.

  1. Using a 10 mm union nut wrench, connect the rear No. 4 brake tube while holding the rear flexible hose LH with a wrench.

    Torque:
    15 N*m{ 155 kgf*cm , 11 ft.*lbf }

    NOTICE:
    Use the formula to calculate special torque values for situations where the union nut wrench is combined with a torque wrench (Click here).


14. INSTALL REAR NO. 3 BRAKE TUBE

HINT:
The installation procedure for the RH side is the same as that for the LH side.


15. INSTALL SKID CONTROL SENSOR WIRE (w/ ABS)
  1. Install the skid control sensor wire to the rear axle beam with the nut.

    Torque:
    6.0 N*m{ 61 kgf*cm , 53 in.*lbf }

  1. Connect the skid control sensor wire connector.


16. INSTALL REAR WHEEL

Torque:
103 N*m{ 1050 kgf*cm , 76 ft.*lbf }


17. STABILIZE SUSPENSION
  1. Lower the vehicle from the engine lifter.

  1. Bounce the vehicle up and down several times to stabilize the suspension.


18. FULLY TIGHTEN REAR AXLE BEAM


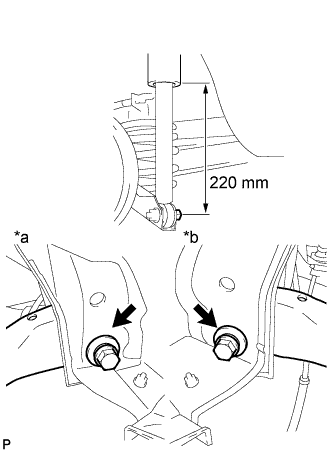
    C107574E07
  1. Suspend the jack on the rear axle spring seat and adjust the length of the rear shock absorber to the reference value.
    Text in Illustration 
    *a
    RH Side
    *b
    LH Side

    Length of shock absorber:
    220 mm (8.66 in.)

  1. Fully tighten the 2 bolts.

    Torque:
    90 N*m{ 918 kgf*cm , 67 ft.*lbf }


19. FULLY TIGHTEN REAR SHOCK ABSORBER LH
  1. Fully tighten the rear shock absorber (lower side) with the bolt.

    Torque:
    49 N*m{ 500 kgf*cm , 36 ft.*lbf }

    NOTICE:
    Since a stopper nut is used, turn the bolt.


20. FULLY TIGHTEN REAR SHOCK ABSORBER RH

HINT:
The installation procedure for the RH side is the same as that for the LH side.


21. FILL RESERVOIR WITH BRAKE FLUID


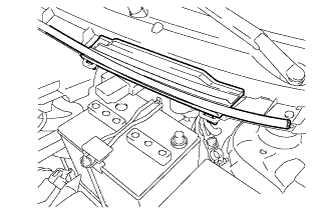
C241208
  1. Disengage the 3 clips and separate the hood to cowl top seal.

  1. Remove the cowl top ventilator louver.


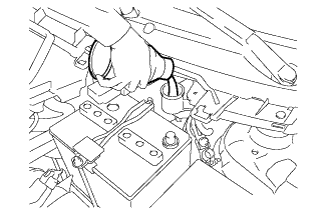
    C241209
  1. Set the brake fluid can upside down on the reservoir.

    Fluid:
    SAE J1703 or FMVSS No. 116 DOT3


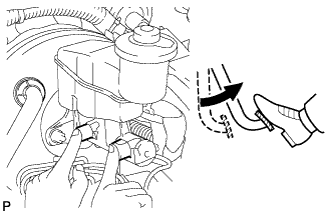
22. BLEED MASTER CYLINDER

HINT:
If the master cylinder has been disassembled or if the reservoir becomes empty, bleed the air from the master cylinder.


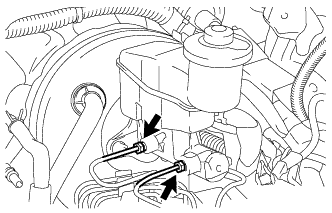
    C274940
  1. Using a 10 mm union nut wrench, disconnect the 2 brake tubes from the master cylinder.


    C121826
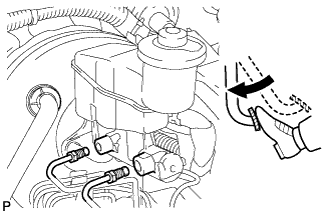
  1. Slowly depress the brake pedal and hold it there (Step A).


    C121827
  1. Block the outer holes with your fingers, and release the brake pedal (Step B).

  1. Repeat step A and B 3 or 4 times.


    C274940
  1. Using a 10 mm union nut wrench, connect the 2 brake tubes to the master cylinder.

    Torque:
    15 N*m{ 155 kgf*cm , 11 ft.*lbf }

    NOTICE:
    Use the formula to calculate special torque values for situations where a union nut wrench is combined with a torque wrench (Click here).


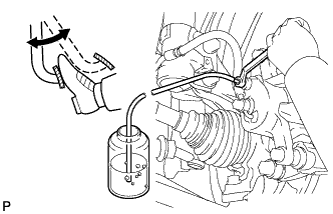
23. BLEED BRAKE LINE


C116913
  1. Connect the vinyl tube to the bleeder plug.

  1. Depress the brake pedal several times, then loosen the bleeder plug with the pedal depressed (Step C).

  1. At the point where the fluid stops coming out, tighten the bleeder plug, then release the brake pedal (Step D).

  1. Repeat step C and D until all the air in the fluid is completely bled out.

  1. Tighten the bleeder plug.

    Torque:
    8.3 N*m{ 85 kgf*cm , 73 in.*lbf }

  1. Repeat the above procedure to bleed the air out of the brake line for each wheel.


24. INSPECT FLUID LEVEL IN RESERVOIR
  1. Check the fluid level and add fluid if necessary.

    Fluid:
    SAE J1703 or FMVSS No. 116 DOT3


25. INSPECT FOR BRAKE FLUID LEAK


26. INSPECT REAR WHEEL ALIGNMENT
(Click here)


27. CHECK ABS SENSOR SIGNAL (w/ ABS)
(Click here)