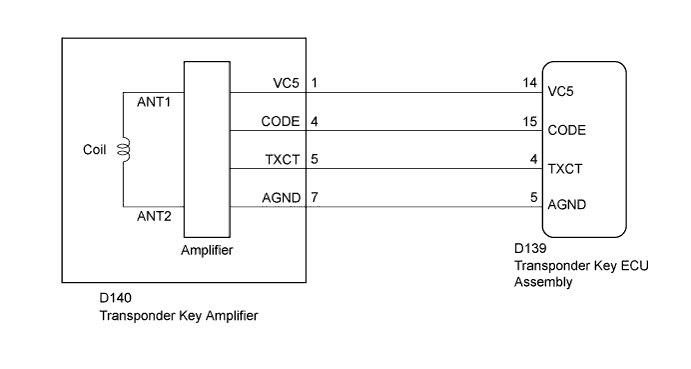
DTC B2796 No Communication in Immobiliser System |
| DTC Code | DTC Detection Condition | Trouble Area | DTC Output Confirmation Operation |
| B2796 | The key code cannot be transmitted (1 trip detection logic*). |
| Insert the key into the ignition key cylinder. |
| Vehicle Condition when Malfunction Detected | Fail-safe Operation when Malfunction Detected |
| Engine cannot be started | - |
| DTC Code | Data List and Active Test |
| B2796 | Response |
| 1.CLEAR DTC |
Clear the DTCs (Click here).
| NEXT | |
 |
| 2.CHECK FOR DTC |
Insert and remove each registered key one at a time, and check for DTC each time (Click here).
| Result | Proceed to |
| OK | A |
| NG (all keys) | B |
| NG (any key) | C |
|
| ||||
|
| ||||
| A | ||
 | ||
| ||
| 3.CHECK CONNECTION OF CONNECTOR |
Check the connection of the transponder key ECU assembly and transponder key amplifier connectors.
Visually inspect the terminals of the transponder key ECU assembly and transponder key amplifier connectors.
|
| ||||
| OK | |
|
| 4.CHECK WHETHER ENGINE STARTS |
Check that the engine starts with an already registered vehicle key.
|
| ||||
| OK | |
|
| 5.CLEAR DTC |
Clear the DTCs (Click here).
| NEXT | |
|
| 6.CHECK FOR DTC |
Check for DTCs (Click here).
|
| ||||
| OK | ||
| ||
| ||
| 7.CHECK TRANSPONDER KEY AMPLIFIER |
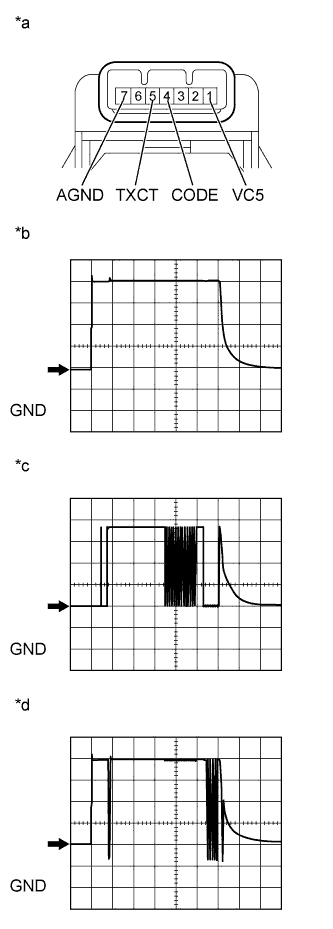 |
Using an oscilloscope, check the waveform.
Waveform 1 (Reference)
| Item | Content |
| Tester Connection | D140-1 (VC5) - Body ground |
| Tool Setting | 1 V/DIV., 20 ms./DIV. |
| Condition | Key inserted in ignition key cylinder |
Waveform 2 (Reference)
| Item | Content |
| Tester Connection | D140-5 (TXCT) - Body ground |
| Tool Setting | 1 V/DIV., 20 ms./DIV. |
| Condition | Key inserted in ignition key cylinder |
Waveform 3 (Reference)
| Item | Content |
| Tester Connection | D140-4 (CODE) - Body ground |
| Tool Setting | 1 V/DIV., 20 ms./DIV. |
| Condition | Key inserted in ignition key cylinder |
| *a | Component with harness connected (Transponder Key Amplifier) |
| *b | Waveform 1 |
| *c | Waveform 2 |
| *d | Waveform 3 |
| Result | Proceed to |
| OK | A |
| NG (Waveform 1) | B |
| NG (Waveform 2) | C |
| NG (Waveform 3) | D |
|
| ||||
|
| ||||
|
| ||||
| A | ||
| ||
| ||
| 8.CHECK TRANSPONDER KEY AMPLIFIER (VC5) |
Disconnect the D140 transponder key amplifier connector.
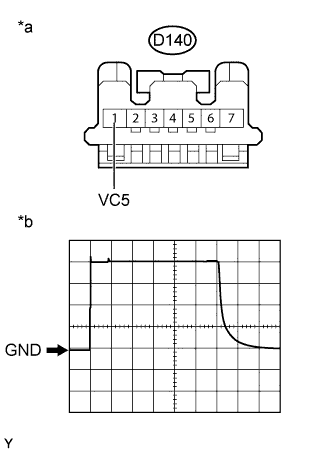 |
Using an oscilloscope, check the waveform.
Waveform (Reference)
| Item | Content |
| Tester Connection | D140-1 (VC5) - Body ground |
| Tool Setting | 1 V/DIV., 20 ms./DIV. |
| Condition | Key inserted in ignition key cylinder |
| *a | Front view of wire harness connector (to Transponder Key Amplifier) |
| *b | Waveform |
|
| ||||
| OK | ||
| ||
| ||
| 9.CHECK HARNESS AND CONNECTOR (TRANSPONDER KEY AMPLIFIER - TRANSPONDER KEY ECU ASSEMBLY) |
Disconnect the D140 transponder key amplifier connector.
Disconnect the D139 transponder key ECU assembly connector.
Measure the resistance according to the value(s) in the table below.
| Tester Connection | Condition | Specified Condition |
| D140-1 (VC5) - D139-14 (VC5) | Always | Below 1 Ω |
| D140-7 (AGND) - F54-5 (AGND) | Always | Below 1 Ω |
| D140-1 (VC5) - Body ground | Always | 10 kΩ or higher |
|
| ||||
| OK | ||
| ||
| ||
| 10.CHECK TRANSPONDER KEY AMPLIFIER (TXCT) |
Disconnect the D140 transponder key amplifier connector.
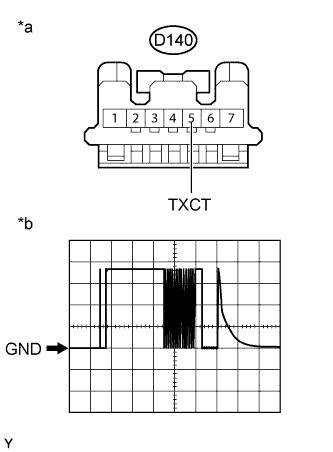 |
Using an oscilloscope, check the waveform.
Waveform (Reference)
| Item | Content |
| Tester Connection | D140-5 (TXCT) - Body ground |
| Tool Setting | 1 V/DIV., 20 ms./DIV. |
| Condition | Key inserted in ignition key cylinder |
| *a | Front view of wire harness connector (to Transponder Key Amplifier) |
| *b | Waveform |
|
| ||||
| OK | ||
| ||
| ||
| 11.CHECK HARNESS AND CONNECTOR (TRANSPONDER KEY AMPLIFIER - TRANSPONDER KEY ECU ASSEMBLY) |
Disconnect the D140 transponder key amplifier connector.
Disconnect the D139 transponder key ECU assembly connector.
Measure the resistance according to the value(s) in the table below.
| Tester Connection | Condition | Specified Condition |
| D140-5 (TXCT) - D139-4 (TXCT) | Always | Below 1 Ω |
| D140-5 (TXCT) - Body ground | Always | 10 kΩ or higher |
|
| ||||
| OK | ||
| ||
| ||
| 12.CHECK TRANSPONDER KEY AMPLIFIER (CODE) |
Disconnect the D140 transponder key amplifier connector.
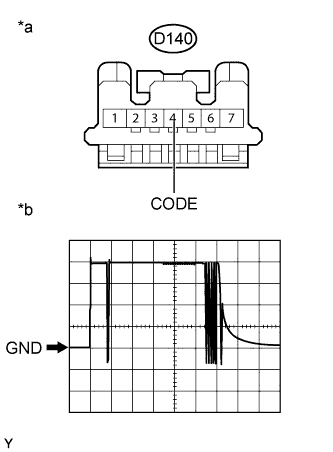 |
Using an oscilloscope, check the waveform.
Waveform (Reference)
| Item | Content |
| Tester Connection | D140-4 (CODE) - Body ground |
| Tool Setting | 1 V/DIV., 20 ms./DIV. |
| Condition | Key inserted in ignition key cylinder |
| *a | Front view of wire harness connector (to Transponder Key Amplifier) |
| *b | Waveform |
|
| ||||
| OK | ||
| ||
| ||
| 13.CHECK HARNESS AND CONNECTOR (TRANSPONDER KEY AMPLIFIER - TRANSPONDER KEY ECU ASSEMBLY) |
Disconnect the D140 transponder key amplifier connector.
Disconnect the D139 transponder key ECU assembly connector.
Measure the resistance according to the value(s) in the table below.
| Tester Connection | Condition | Specified Condition |
| D140-4 (CODE) - D139-15 (CODE) | Always | Below 1 Ω |
| D140-4 (CODE) - Body ground | Always | 10 kΩ or higher |
|
| ||||
| OK | ||
| ||
| ||

