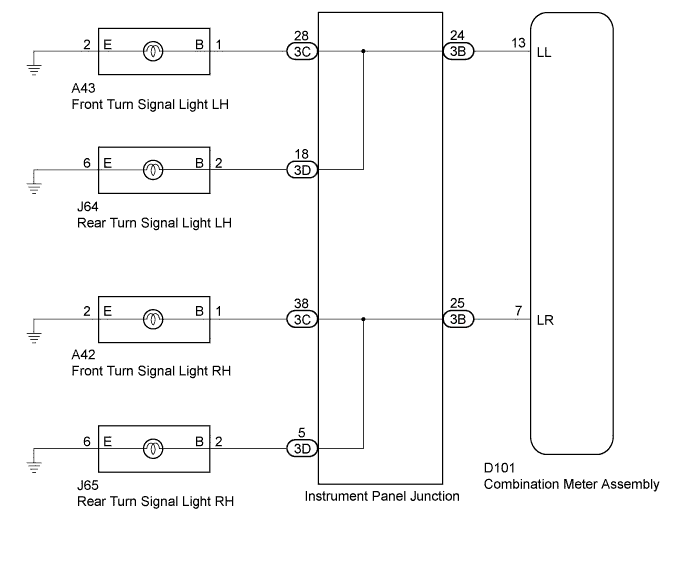
DTC B1507 Open in Turn Signal Circuit |
DTC B1508 Short in Turn Signal / Hazard Flasher Circuit |
| DTC No. | DTC Detection | Trouble Area |
| B1507 | When IG voltage is 9.5 V or more and the following condition detected:
|
|
| B1508 | When IG voltage is 9.5 V or more and the following condition detected:
|
|
| 1.INSPECT LIGHTS |
Inspect each turn signal light illumination.
| Result | Proceed to |
| One side of the turn signal lights does not illuminate. | A |
| Front turn signal lights do not illuminate. | B |
| Rear turn signal lights do not illuminate. | C |
|
| ||||
|
| ||||
| A | |
 |
| 2.CHECK HARNESS AND CONNECTOR (COMBINATION METER ASSEMBLY - INSTRUMENT PANEL JUNCTION BLOCK ASSEMBLY) |
Disconnect the D101 combination meter assembly connector.
Disconnect the 3B instrument panel junction block assembly connector.
Measure the resistance according to the value(s) in the table below.
| Tester Connection | Condition | Specified Condition |
| D101-13 (LL) - 3B-24 | Always | Below 1 Ω |
| D101-13 (LL) - Body ground | Always | 10 kΩ or higher |
| Tester Connection | Condition | Specified Condition |
| D101-7 (LR) - 3B-25 | Always | Below 1 Ω |
| D101-7 (LR) - Body ground | Always | 10 kΩ or higher |
| Result | Proceed to |
| NG | A |
| OK | B |
|
| ||||
| A | ||
 | ||
| ||
| 3.CHECK HARNESS AND CONNECTOR (FRONT TURN SIGNAL LIGHT - INSTRUMENT PANEL JUNCTION BLOCK ASSEMBLY) |
Disconnect the A42*1 or A43*2 front turn signal light connector.
Disconnect the 3C instrument panel junction block assembly connector.
Measure the resistance according to the value(s) in the table below.
| Tester Connection | Condition | Specified Condition |
| A43-1 (B) - 3C-28 | Always | Below 1 Ω |
| A43-2 (E) - Body ground | Always | Below 1 Ω |
| A43-1 (B) - Body ground | Always | 10 kΩ or higher |
| Tester Connection | Condition | Specified Condition |
| A42-1 (B) - 3C-38 | Always | Below 1 Ω |
| A42-2 (E) - Body ground | Always | Below 1 Ω |
| A42-1 (B) - Body ground | Always | 10 kΩ or higher |
| Result | Proceed to |
| NG | A |
| OK | B |
|
| ||||
| A | ||
| ||
| ||
| 4.CHECK HARNESS AND CONNECTOR (REAR TURN SIGNAL LIGHT - INSTRUMENT PANEL JUNCTION BLOCK ASSEMBLY) |
Disconnect the J65*1 or J64*2 rear turn signal light connector.
Disconnect the 3D instrument panel junction block assembly connector.
Measure the resistance according to the value(s) in the table below.
| Tester Connection | Condition | Specified Condition |
| J64-2 (B) - 3D-18 | Always | Below 1 Ω |
| J64-6 (E) -Body ground | Always | Below 1 Ω |
| J64-2 (B) -Body ground | Always | 10 kΩ or higher |
| Tester Connection | Condition | Specified Condition |
| J65-2 (B) - 3D-5 | Always | Below 1 Ω |
| J65-6 (E) -Body ground | Always | Below 1 Ω |
| J65-2 (B) -Body ground | Always | 10 kΩ or higher |
|
| ||||
| OK | |
|
| 5.INSPECT INSTRUMENT PANEL JUNCTION BLOCK ASSEMBLY |
Remove the instrument panel junction block assembly (Click here).
Remove the main body ECU (multiplex network body ECU) .
Measure the resistance according to the value(s) in the table below.
| Tester Connection | Condition | Specified Condition |
| 3B-25 - 3C-38 | Always | Below 1 Ω |
| 3B-25 - 3D-5 | Always | Below 1 Ω |
| 3B-24 - 3C-28 | Always | Below 1 Ω |
| 3B-24 - 3D-18 | Always | Below 1 Ω |
|
| ||||
| OK | ||
| ||
| ||

