C50 MANUAL TRANSMISSION / TRANSAXLE MANUAL TRANSAXLE UNIT(for 1NZ-FE) REASSEMBLY
PROCEDURE

 1. PRECAUTION
- NOTICE:
- ·
All disassembled parts should be cleaned before reassembly.
·Coat all of the sliding and rotating surfaces with gear oil before reassembly, and check that they move smoothly after reassembly.
33134B
2.INSTALL OUTPUT SHAFT COVER
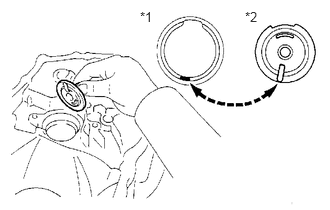
| *1 | Transaxle Case |
| *2 | Output Shaft Cover |
Install the output shaft cover to the transaxle case.
- NOTICE:
-
Insert the output shaft cover key into the case groove.
33321N
3.INSTALL OUTPUT SHAFT FRONT BEARING
Coat a new output shaft front bearing with gear oil.
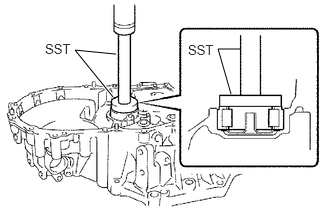
Using SST and a press, install the output shaft front bearing to the transaxle case.
- SST
- 09950-60010 (09951-00550)
09950-70010 (09951-07150)
- NOTICE:
- ·
Install the output shaft front bearing in the correct direction as shown in the illustration.
- ·
Press in the output shaft front bearing until it is fit against the end.
31105D
4.INSTALL FRONT TRANSAXLE CASE OIL SEAL
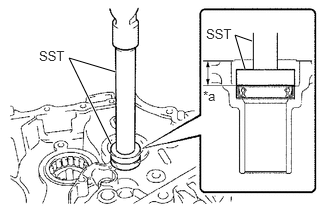
| *a | Drive in Depth |
Using SST and a hammer, install a new front transaxle case oil seal to the transaxle case.
- SST
- 09950-60010 (09951-00370)
09950-70010 (09951-07150)
- Standard depth:
15.6 to 16.0 mm (0.615 to 0.629 in.)
Coat the lip of the front transaxle case oil seal with MP grease.
33311A
5.INSTALL INPUT SHAFT FRONT BEARING
Coat a new input shaft front bearing with gear oil.
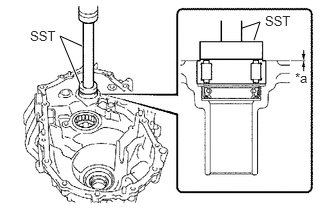
| *a | Drive in Depth |
Using SST and a press, install the input shaft front bearing to the transaxle case.
- SST
- 09950-60010 (09951-00420)
09950-70010 (09951-07150)
- Standard depth:
0 to 0.3 mm (0 to 0.0118 in.)
33261L
6.INSTALL SHIFT AND SELECT LEVER SHAFT BUSH
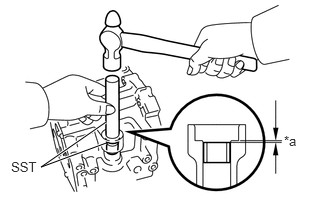
| *a | Drive in Depth |
Using SST and a hammer, install a new shift and select lever shaft bush to the manual transmission case.
- SST
- 09950-60010 (09951-00220)
09950-70010 (09951-07100)
- Standard depth:
0 to 0.5 mm (0 to 0.0196 in.)
33261H
7.INSTALL SHIFT AND SELECT LEVER SHAFT OIL SEAL
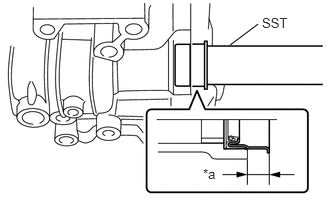
| *a | Protrusion Height |
Using SST, install a new shift and select lever shaft oil seal to the manual transmission case.
- SST
- 09950-60010 (09951-00240)
09950-70010 (09951-07100)
- Standard height:
9.7 to 10.3 mm (0.382 to 0.405 in.)
Coat the lip of the shift and select lever shaft oil seal with MP grease.
41311E
8.INSTALL FRONT DIFFERENTIAL CASE FRONT TAPERED ROLLER BEARING
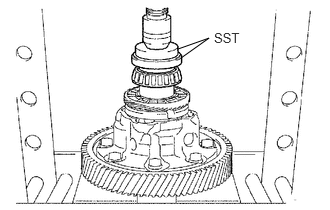
Using SST and a press, install a new front differential case front tapered roller bearing (inner race) to the differential case assembly.
- SST
- 09350-32014 (09351-32120)
09950-60010 (09951-00530)
Apply gear oil to the inside of a new front differential case front tapered roller bearing (outer race).
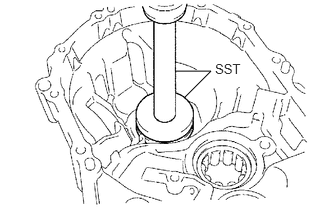
Using SST and a press, install the front differential case front tapered roller bearing (outer race) with the front differential case front plate washer to the transaxle case.
- SST
- 09950-60020 (09951-00680)
09950-70010 (09951-07150)
41311F
9.INSTALL FRONT DIFFERENTIAL CASE REAR TAPERED ROLLER BEARING
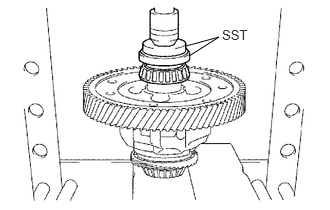
Using SST and a press, install a new front differential case rear tapered roller bearing (inner race) to the differential case assembly.
- SST
- 09350-32014 (09351-32120)
09950-60010 (09951-00530)
Apply gear oil to the inside of a new front differential case rear tapered roller bearing (outer race).
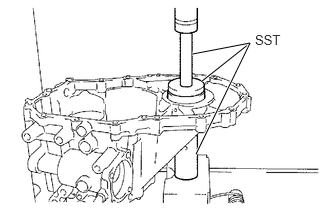
Using SST and a press, install the front differential case rear tapered roller bearing (outer race) with the front differential case rear plate washer to the manual transmission case.
- SST
- 09309-36010
09950-60020 (09951-00710)
09950-70010 (09951-07150)
- HINT:
-
Use a front differential case rear plate washer of the same thickness as the removed one.
10.ADJUST DIFFERENTIAL SIDE BEARING PRELOAD
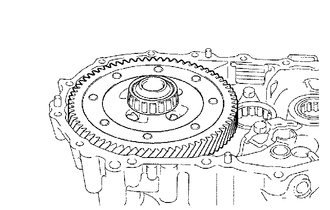
Coat the differential case assembly with gear oil and install it to the transaxle case.
Install the manual transmission case with the 16 bolts.
- Torque:
- 29.4 N*m (300 kgf*cm, 22 ft.*lbf)
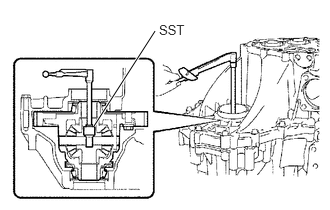
Using SST and a torque wrench, turn the differential case assembly to the right and left 2 or 3 times to allow the bearings to settle.
- SST
- 09564-32011
Using SST and a torque wrench, measure the preload.
- SST
- 09564-32011
- Preload (at starting):
- New bearing:
0.78 to 1.57 N*m (8.0 to 16.0 kgf*cm, 7.0 to 13.8 in.*lbf)
- Used bearing:
0.49 to 0.98 N*m (5.0 to 9.9 kgf*cm, 4.4 to 8.6 in.*lbf)
If the preload is out of the specification, select another front differential case rear plate washer.
- Front Differential Case Rear Plate Washer Thickness:
Part No. Mark Thickness
mm (in.)Part No. Mark Thickness
mm (in.)90564-41014 AA 2.10 (0.0827) 90564-41024 LL 2.60 (0.1024) 90564-41015 BB 2.15 (0.0846) 90564-41025 MM 2.65 (0.1043) 90564-41016 CC 2.20 (0.0866) 90564-41026 NN 2.70 (0.1063) 90564-41017 DD 2.25 (0.0886) 90564-41027 PP 2.75 (0.1083) 90564-41018 EE 2.30 (0.0906) 90564-41028 QQ 2.80 (0.1102) 90564-41019 FF 2.35 (0.0925) 90564-41029 RR 2.85 (0.1122) 90564-41020 GG 2.40 (0.0945) 90564-41030 SS 2.90 (0.1142) 90564-41021 HH 2.45 (0.0965) 90564-41031 TT 2.95 (0.1161) 90564-41022 JJ 2.50 (0.0984) 90564-41032 UU 3.00 (0.1181) 90564-41023 KK 2.55 (0.1004) - - -
- HINT:
-
The preload changes by approximately 0.3 to 0.4 N*m (3.1 to 4.0 kgf*cm, 2.7 to 3.5 in.*lbf) per each 0.05 mm (0.00197 in.) change in the plate washer thickness.
Remove the 16 bolts and the manual transmission case.
Remove the differential case assembly from the transaxle case.
43420H
11.INSTALL FRONT DRIVE SHAFT OIL SEAL LH
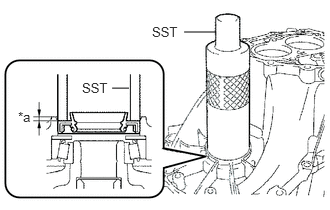
| *a | Drive in Depth |
Using SST and a hammer, install a new front drive shaft oil seal LH to the manual transmission case.
- SST
- 09316-60011 (09316-00011)
- Standard depth:
9.4 to 10.4 mm (0.371 to 0.409 in.)
Coat the lip of the front drive shaft oil seal LH with MP grease.
43410M
12.INSTALL FRONT DRIVE SHAFT OIL SEAL RH
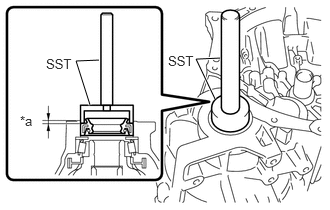
| *a | Drive in Depth |
Using SST and a hammer, install a new front drive shaft oil seal RH to the transaxle case.
- SST
- 09710-20011 (09710-06071)
09950-70010 (09951-07150)
- Standard depth:
1.4 to 2.0 mm (0.0552 to 0.0787 in.)
Coat the lip of the front drive shaft oil seal RH with MP grease.
33449
13.INSTALL TRANSMISSION MAGNET
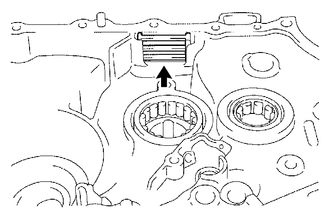
Clean the transmission magnet and install it to the transaxle case.
33326
14.INSTALL BEARING LOCK PLATE
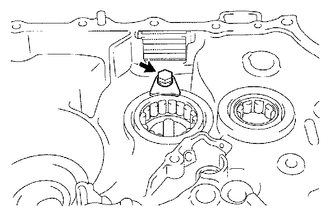
Install the bearing lock plate to the transaxle case with the bolt.
- Torque:
- 11.3 N*m (115 kgf*cm, 8 ft.*lbf)
33124D
15.INSTALL NO. 2 OIL RECEIVER PIPE
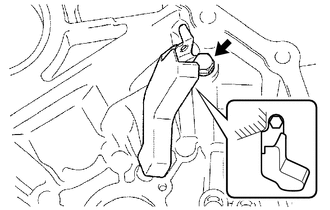
Install the No. 2 oil receiver pipe to the manual transmission case with the bolt.
- Torque:
- 17.2 N*m (175 kgf*cm, 13 ft.*lbf)
- NOTICE:
- ·
Do not deform the No. 2 oil receiver pipe.
·Install the No. 2 oil receiver pipe while holding it against the manual transmission case as shown in the illustration.
33124C
16.INSTALL NO. 1 OIL RECEIVER PIPE
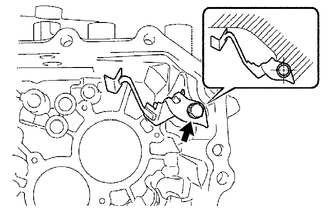
Install the No. 1 oil receiver pipe to the manual transmission case with the bolt.
- Torque:
- 17.2 N*m (175 kgf*cm, 13 ft.*lbf)
- NOTICE:
- ·
Do not deform the No. 1 oil receiver pipe.
·Install the No. 1 oil receiver pipe while holding it against the manual transmission case as shown in the illustration.
33280
17.INSTALL REVERSE RESTRICT PIN ASSEMBLY
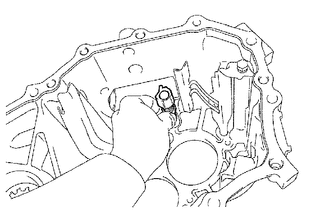
Install the reverse restrict pin assembly to the manual transmission case.
- NOTICE:
-
Set the reverse restrict pin assembly in the correct direction.
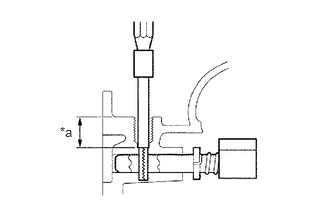
| *a | Drive in Depth |
Using a 5 mm pin punch and a hammer, install the slotted spring pin to the reverse restrict pin assembly.
- Standard depth:
15.5 to 16.5 mm (0.611 to 0.649 in.)
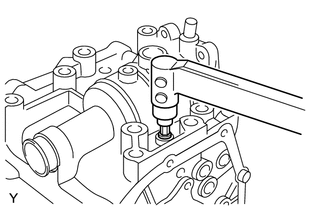
Clean and degrease the reverse restrict pin plug and installation hole.
Apply adhesive to 2 or 3 threads on the end of the reverse restrict pin plug.
- Adhesive:
Toyota Genuine Adhesive 1344, Three Bond 1344 or equivalent
- NOTICE:
-
To prevent contamination by foreign matter, install immediately after applying adhesive.
Using a 6 mm hexagon socket wrench, install the reverse restrict pin plug to the manual transmission case.
- Torque:
- 12.7 N*m (130 kgf*cm, 9 ft.*lbf)
33125
18.INSTALL MANUAL TRANSAXLE CASE RECEIVER
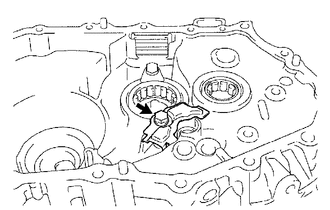
Install the manual transaxle case receiver to the transaxle case with the bolt.
- Torque:
- 11.3 N*m (115 kgf*cm, 8 ft.*lbf)
19.INSTALL DIFFERENTIAL CASE ASSEMBLY
Coat the differential case assembly with gear oil and install it to the transaxle case.
20.INSTALL INPUT SHAFT ASSEMBLY

|
Gear Oil |
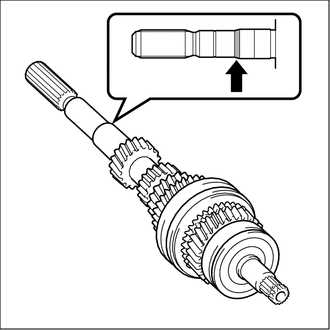
Apply gear oil to the entire circumference of the input shaft assembly.
- NOTICE:
-
To prevent the front transaxle case oil seal from being caught, make sure to apply gear oil to the input shaft assembly.
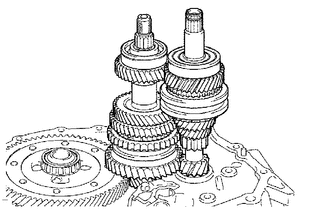
Coat the sliding and rotating surfaces of the input shaft assembly and the output shaft assembly with gear oil and install them to the transaxle case.
- NOTICE:
-
Do not damage the front transaxle case oil seal.
33402
21.INSTALL REVERSE IDLER GEAR SUB-ASSEMBLY
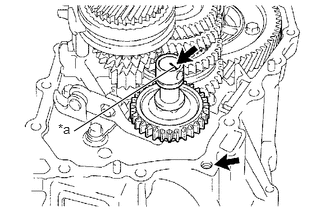
| *a | Alignment Mark |
Coat the reverse idler gear sub-assembly, reverse idler thrust washer and the reverse idler gear shaft with gear oil, and install them as shown in the illustration.
- HINT:
-
Align the alignment mark on the reverse idler gear shaft with the bolt hole shown in the illustration.
33242
22.INSTALL NO. 1 GEAR SHIFT FORK SHAFT
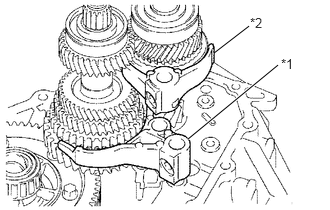
| *1 | No. 1 Gear Shift Fork |
| *2 | No. 2 Gear Shift Fork |
Coat the No. 1 gear shift fork and the No. 2 gear shift fork with gear oil and install them.
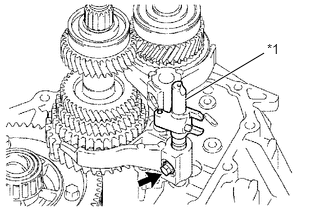
| *1 | No. 1 Gear Shift Fork Shaft |
Coat the No. 1 gear shift fork shaft with gear oil and install it.
Clean and degrease the No. 1 gear shift fork set bolt and installation hole.
Apply adhesive to 2 or 3 threads on the end of the No. 1 gear shift fork set bolt.
- Adhesive:
Toyota Genuine Adhesive 1324, Three Bond 1324 or equivalent
- NOTICE:
-
To prevent contamination by foreign matter, install immediately after applying adhesive.
Install the No. 1 gear shift fork set bolt.
- Torque:
- 15.7 N*m (160 kgf*cm, 12 ft.*lbf)
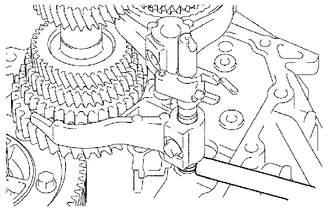
Using a brass bar and a hammer, install a new shift fork shaft snap ring to the No. 1 gear shift fork shaft.
33244G
23.INSTALL NO. 3 GEAR SHIFT FORK SHAFT
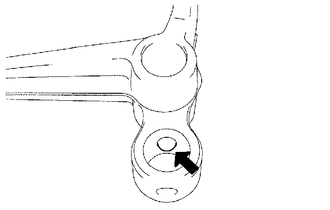
Coat the 2 reverse shift fork balls with MP grease and install them to the reverse shift fork.
Install the reverse shift fork to the No. 3 gear shift fork shaft.
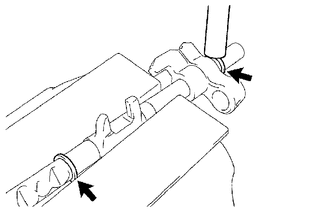
Secure the No. 3 gear shift fork shaft in a vise between aluminum plates.
- NOTICE:
-
Do not overtighten the vise.
Using a brass bar and a hammer, install 2 new shift fork shaft snap rings to the No. 3 gear shift fork shaft.
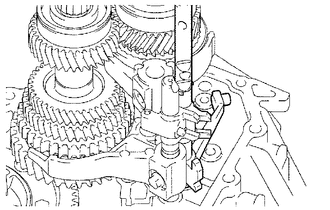
Coat the No. 3 gear shift fork shaft with gear oil and install it.
33243A
24.INSTALL NO. 2 GEAR SHIFT FORK SHAFT
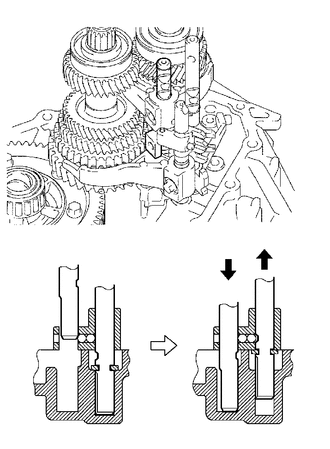
Coat the No. 1 gear shift head and the No. 2 gear shift fork shaft with gear oil and install them.
- NOTICE:
-
To avoid interference by the 2 reverse shift fork balls, lift up the No. 3 gear shift fork shaft to the position shown in the illustration.
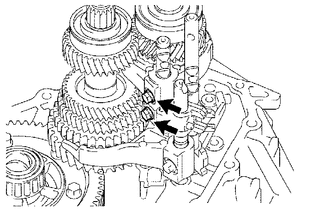
Clean and degrease the No. 2 gear shift fork set bolt, No. 1 gear shift head set bolt and installation holes.
Apply adhesive to 2 or 3 threads on the ends of the No. 2 gear shift fork set bolt and the No. 1 gear shift head set bolt.
- Adhesive:
Toyota Genuine Adhesive 1324, Three Bond 1324 or equivalent
- NOTICE:
-
To prevent contamination by foreign matter, install immediately after applying adhesive.
Install the No. 2 gear shift fork set bolt and the No. 1 gear shift head set bolt to the No. 2 gear shift fork and the No. 1 gear shift head.
- Torque:
- 15.7 N*m (160 kgf*cm, 12 ft.*lbf)
33240
25.INSTALL REVERSE SHIFT ARM BRACKET ASSEMBLY
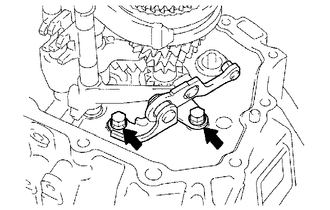
Install the reverse shift arm bracket assembly to the transaxle case with the 2 bolts.
- Torque:
- 17.2 N*m (175 kgf*cm, 13 ft.*lbf)
33111
26.INSTALL MANUAL TRANSMISSION CASE
Clean and degrease the contact surfaces of the manual transmission case and the transaxle case.
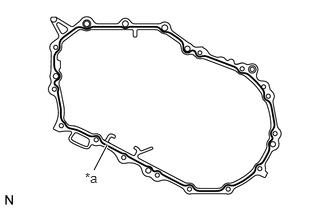
| *a | Seal Packing
(Seal Diameter: 1.2 mm (0.0472 in.)) |
Apply seal packing to the manual transmission case as shown in the illustration.
- Seal packing:
Toyota Genuine Seal Packing 1281, Three Bond 1281 or equivalent
- NOTICE:
-
Assemble the parts within 10 minutes of application. Otherwise, the seal packing material must be removed and reapplied.
Install the manual transmission case to the transaxle case.
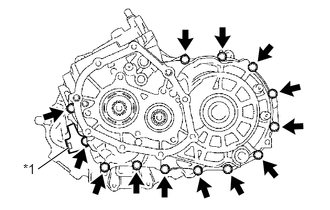
| *1 | Clutch Tube Bracket |
Install the clutch tube bracket and the 13 bolts to the manual transmission case.
- Torque:
- 29.4 N*m (300 kgf*cm, 22 ft.*lbf)
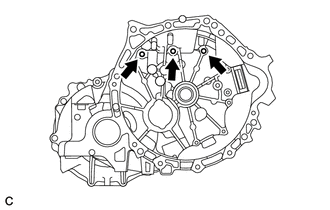
Install the 3 bolts to the transaxle case.
- Torque:
- 29.4 N*m (300 kgf*cm, 22 ft.*lbf)
33451H
27.INSTALL REVERSE IDLER GEAR SHAFT BOLT
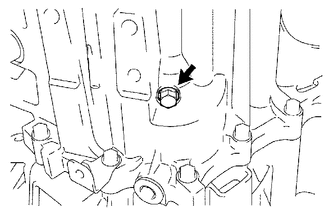
Clean and degrease the reverse idler gear shaft bolt and installation hole.
Apply adhesive to 2 or 3 threads on the end of the reverse idler gear shaft bolt.
- Adhesive:
Toyota Genuine Adhesive 1324, Three Bond 1324 or equivalent
- NOTICE:
-
To prevent contamination by foreign matter, install immediately after applying adhesive.
Install a new gasket and the reverse idler gear shaft bolt to the manual transmission case.
- Torque:
- 29.4 N*m (300 kgf*cm, 22 ft.*lbf)
33290
28.INSTALL NO. 1 LOCK BALL ASSEMBLY
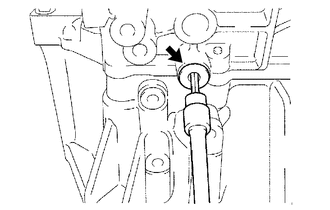
Clean and degrease the No. 1 lock ball assembly and installation hole.
Apply adhesive to 2 or 3 threads on the end of the No. 1 lock ball assembly.
- Adhesive:
Toyota Genuine Adhesive 1344, Three Bond 1344 or equivalent
- NOTICE:
-
To prevent contamination by foreign matter, install immediately after applying adhesive.
Using a 6 mm hexagon socket wrench, install the No. 1 lock ball assembly to the manual transmission case.
- Torque:
- 29 N*m (296 kgf*cm, 21 ft.*lbf)
33275C
29.INSTALL SHIFT DETENT BALL
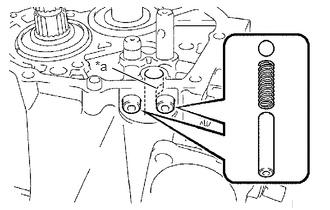
| *a | No. 1 Gear Shift Fork Shaft Hole |
Install the 2 shift detent balls, 2 compression springs and the 2 spring seats to the manual transmission case.
- NOTICE:
-
Do not drop the shift detent ball into the No. 1 gear shift fork shaft hole of the manual transmission case.
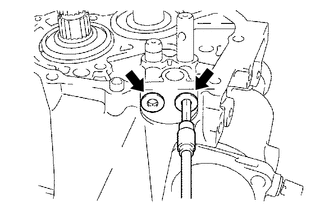
Clean and degrease the 2 shift detent ball plugs and installation holes.
Apply adhesive to 2 or 3 threads on the ends of the 2 shift detent ball plugs.
- Adhesive:
Toyota Genuine Adhesive 1344, Three Bond 1344 or equivalent
- NOTICE:
-
To prevent contamination by foreign matter, install immediately after applying adhesive.
Using a 6 mm hexagon socket wrench, install the 2 shift detent ball plugs to the manual transmission case.
- Torque:
- 22 N*m (224 kgf*cm, 16 ft.*lbf)
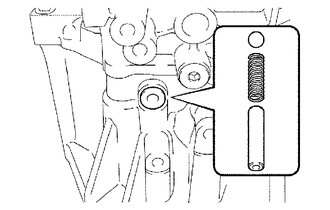
Install the shift detent ball, compression spring and the spring seat to the transaxle case.
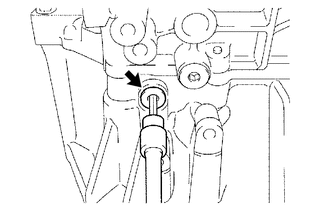
Clean and degrease the shift detent ball plug and installation hole.
Apply adhesive to 2 or 3 threads on the end of the shift detent ball plug.
- Adhesive:
Toyota Genuine Adhesive 1344, Three Bond 1344 or equivalent
- NOTICE:
-
To prevent contamination by foreign matter, install immediately after applying adhesive.
Using a 6 mm hexagon socket wrench, install the shift detent ball plug to the transaxle case.
- Torque:
- 22 N*m (224 kgf*cm, 16 ft.*lbf)
33311X
30.INSTALL INPUT SHAFT REAR BEARING HOLE SNAP RING
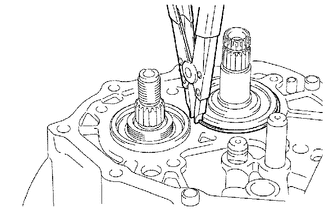
Using a snap ring expander, install a new input shaft rear bearing hole snap ring to the input shaft.
- NOTICE:
-
Do not expand the input shaft rear bearing hole snap ring excessively.
33111R
31.INSTALL OUTPUT SHAFT REAR BEARING HOLE SNAP RING
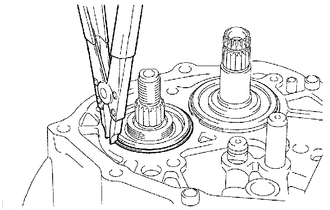
Using a snap ring expander, install a new output shaft rear bearing hole snap ring to the output shaft.
- NOTICE:
-
Do not expand the output shaft rear bearing hole snap ring excessively.
33242E
32.INSTALL SHIFT FORK SHAFT SNAP RING
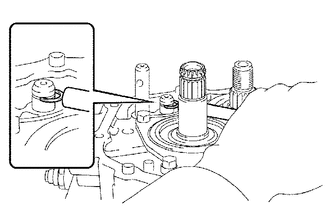
Using a brass bar and a hammer, install a new shift fork shaft snap ring to the No. 2 gear shift fork shaft.
33151D
33.INSTALL REAR BEARING RETAINER
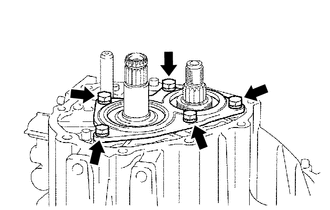
Clean and degrease the 5 bolts and installation holes.
Apply adhesive to 2 or 3 threads on the ends of the 5 bolts.
- Adhesive:
Toyota Genuine Adhesive 1324, Three Bond 1324 or equivalent
- NOTICE:
-
To prevent contamination by foreign matter, install immediately after applying adhesive.
Install the rear bearing retainer to the manual transmission case with the 5 bolts.
- Torque:
- 27.4 N*m (279 kgf*cm, 20 ft.*lbf)
33428C
34.INSTALL 5TH DRIVEN GEAR
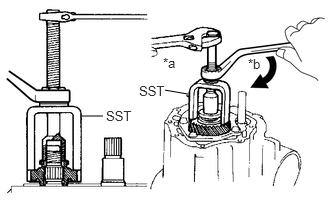
| *a | Hold |
| *b | Turn |
Using SST, install the 5th driven gear to the output shaft.
- SST
- 09309-12020
33336A
35.INSTALL 5TH GEAR NEEDLE ROLLER BEARING
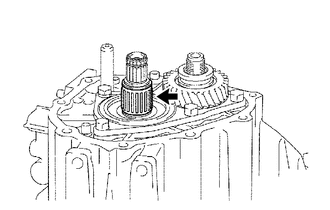
Coat the 5th gear needle roller bearing and the 5th gear bearing spacer with gear oil, and install them to the input shaft.
33336
36.INSTALL 5TH GEAR
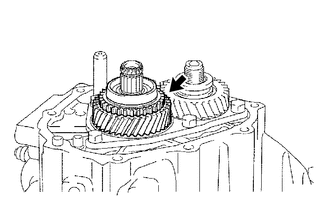
Coat the 5th gear with gear oil and install it to the input shaft.
33369
37.INSTALL NO. 3 SYNCHRONIZER RING
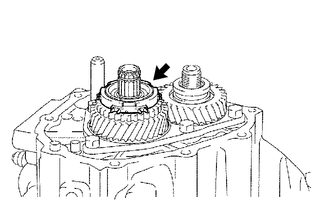
Coat the No. 3 synchronizer ring with gear oil and install it to the 5th gear.
33393
38.INSTALL NO. 3 TRANSMISSION CLUTCH HUB
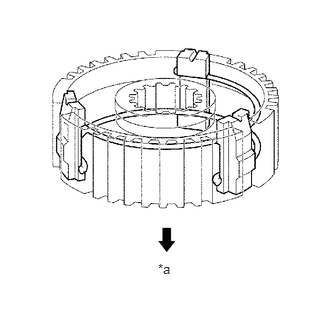
| *a | Engine Side |
Install the 3 synchromesh shifting keys and the 2 synchromesh shifting key springs to the No. 3 transmission clutch hub as shown in the illustration.
- NOTICE:
-
Do not set the 2 shifting key spring openings in the same position.
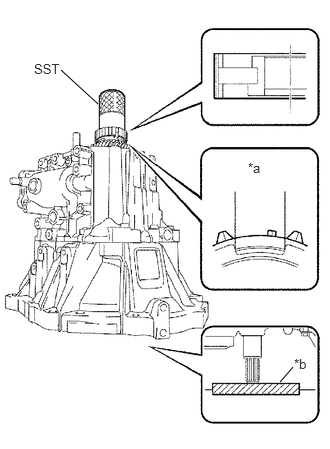
| *a | Key Position |
| *b | Wooden Block |
Using SST and a hammer, install the No. 3 transmission clutch hub to the input shaft.
- SST
- 09636-20010
- NOTICE:
- ·
Do not install the No. 3 transmission clutch hub in the wrong direction.
·Install the No. 3 transmission clutch hub with the No. 3 synchronizer ring key groove and the No. 3 synchromesh shifting key aligned.
·Check that the 5th gear is rotating.
·Place a suitable sized wooden block to support the input shaft.
Select a snap ring that will allow minimum axial play.
- Standard clearance:
0.1 mm (0.00394 in.) or less
- Snap Ring Thickness:
Part No. Mark Thickness
mm (in.)90520-18002 A 2.25 (0.0886) 90520-18003 B 2.31 (0.0909) 90520-18004 C 2.37 (0.0933) 90520-18006 D 2.43 (0.0957) 90520-18007 E 2.49 (0.0980) 90520-18008 F 2.55 (0.1004) 90520-18009 G 2.61 (0.1028)
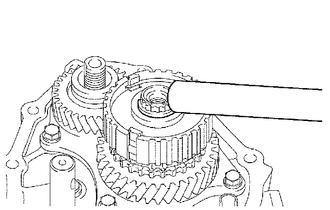
Using a brass bar and a hammer, install a new snap ring to the input shaft.
39.INSPECT 5TH GEAR THRUST CLEARANCE
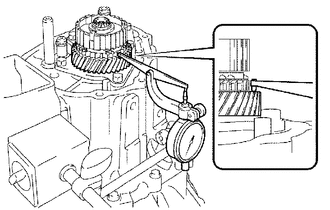
Using a dial indicator, measure the 5th gear thrust clearance.
- Standard clearance:
0.10 to 0.55 mm (0.00394 to 0.0216 in.)
- Maximum clearance:
0.55 mm (0.0216 in.)
If the clearance exceeds the maximum, replace the No. 3 transmission clutch hub, 5th gear or input shaft rear radial ball bearing.
40.INSPECT 5TH GEAR RADIAL CLEARANCE
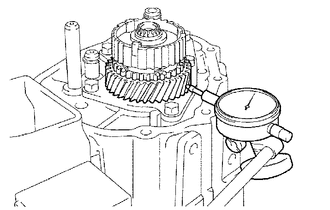
Using a dial indicator, measure the 5th gear radial clearance.
- Standard clearance:
0.015 to 0.058 mm (0.000591 to 0.00228 in.)
- Maximum clearance:
0.058 mm (0.00228 in.)
If the clearance exceeds the maximum, replace the 5th gear, 5th gear needle roller bearing or input shaft.
33214G
41.INSTALL NO. 3 GEAR SHIFT FORK
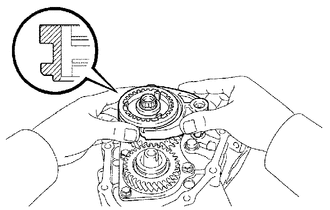
Coat the No. 3 transmission hub sleeve with gear oil and install it with the No. 3 gear shift fork to the No. 3 transmission clutch hub.
- HINT:
-
Set the No. 3 transmission clutch hub in the correct direction.
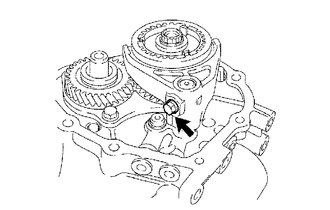
Clean and degrease the No. 3 gear shift fork set bolt and installation hole.
Apply adhesive to 2 or 3 threads on the end of the No. 3 gear shift fork set bolt.
- Adhesive:
Toyota Genuine Adhesive 1324, Three Bond 1324 or equivalent
- NOTICE:
-
To prevent contamination by foreign matter, install immediately after applying adhesive.
Install the No. 3 gear shift fork set bolt to the No. 3 gear shift fork.
- Torque:
- 15.7 N*m (160 kgf*cm, 12 ft.*lbf)
33321G
42.INSTALL MANUAL TRANSMISSION OUTPUT SHAFT REAR SET NUT
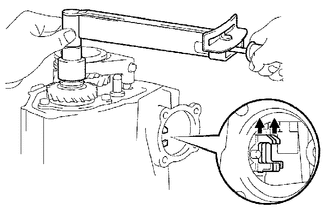
Engage the 2 gears simultaneously to lock the transmission.
Using a 27 mm socket wrench, install a new manual transmission output shaft rear set nut.
- Torque:
- 117.6 N*m (1199 kgf*cm, 87 ft.*lbf)
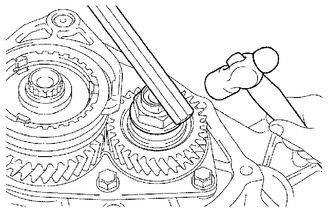
Using a chisel and a hammer, stake the manual transmission output shaft rear set nut.
Disengage the 2 gears.
33102
43.INSTALL MANUAL TRANSMISSION CASE COVER SUB-ASSEMBLY
Clean and degrease the contact surfaces of the manual transmission case cover sub-assembly and the manual transmission case.
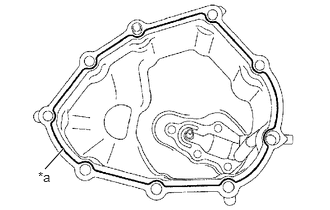
| *a | Seal Packing
(Seal Diameter 1.2 mm (0.0472 in.)) |
Apply seal packing to the manual transmission case cover sub-assembly as shown in the illustration.
- Seal packing:
Toyota Genuine Seal Packing 1281, Three Bond 1281 or equivalent
- NOTICE:
-
Assemble the parts within 10 minutes of application. Otherwise, the seal packing material must be removed and reapplied.
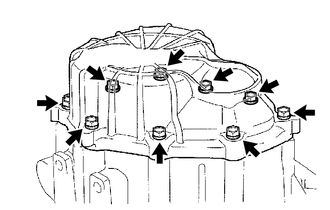
Clean and degrease the 9 bolts and installation holes.
Apply adhesive to 2 or 3 threads on the ends of the 9 bolts.
- Adhesive:
Toyota Genuine Adhesive 1344, Three Bond 1344 or equivalent
- NOTICE:
-
To prevent contamination by foreign matter, install immediately after applying adhesive.
Install the manual transmission case cover sub-assembly to the manual transmission case with the 9 bolts.
- Torque:
- 21 N*m (214 kgf*cm, 15 ft.*lbf)
44.INSTALL SHIFT AND SELECT LEVER SHAFT ASSEMBLY
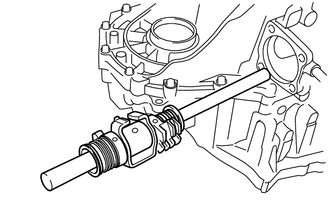
Coat the shift and select lever shaft assembly with gear oil and install it to the manual transmission case.
- NOTICE:
- ·
Do not damage the shift and select lever shaft oil seal.
·Set the claws of the shift interlock plate into the shift head part of the gear shift fork shaft securely.
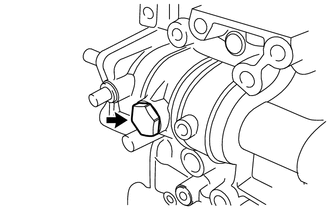
Install a new gasket and the shift interlock plate bolt to the manual transmission case.
- Torque:
- 29.4 N*m (300 kgf*cm, 22 ft.*lbf)
33528C
45.INSTALL CONTROL SHAFT COVER OIL SEAL
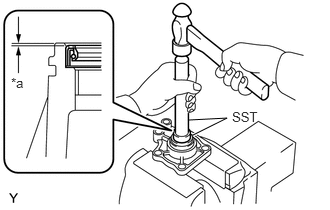
| *a | Drive in Depth |
Using SST and a hammer, install a new control shaft cover oil seal to the control shaft cover.
- SST
- 09950-60010 (09951-00280)
09950-70010 (09951-07150)
- Standard depth:
0.2 to 1.2 mm (0.00788 to 0.0472 in.)
Coat the lip of the control shaft cover oil seal with MP grease.
33528B
46.INSTALL CONTROL SHAFT COVER
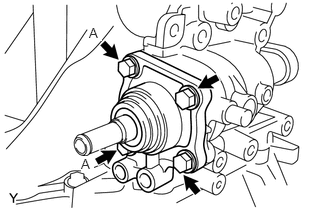
Clean and degrease the 2 bolts A and installation holes.
Apply adhesive to 2 or 3 threads on the ends of the 2 bolts A.
- Adhesive:
Toyota Genuine Adhesive 1344, Three Bond 1344 or equivalent
- NOTICE:
-
To prevent contamination by foreign matter, install immediately after applying adhesive.
Install a new gasket and the control shaft cover to the manual transmission case with the 4 bolts.
- Torque:
- 19.6 N*m (200 kgf*cm, 14 ft.*lbf)
- NOTICE:
-
Do not damage the control shaft cover oil seal.
33295A
47.INSTALL SHIFT GATE PIN
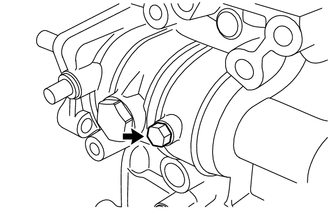
Clean and degrease the shift gate pin and installation hole.
Apply adhesive to 2 or 3 threads on the end of the shift gate pin.
- Adhesive:
Toyota Genuine Adhesive 1324, Three Bond 1324 or equivalent
- NOTICE:
-
To prevent contamination by foreign matter, install immediately after applying adhesive.
Install the washer and the shift gate pin to the manual transmission case.
- Torque:
- 11 N*m (112 kgf*cm, 8 ft.*lbf)
33544C
48.INSTALL SHIFT LEVER DAMPER
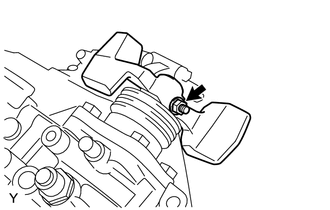
Install the dust boot to the control shaft cover.
Install the shift lever damper to the shift and select lever shaft assembly with the lock pin.
Install the washer and the nut.
- Torque:
- 11.8 N*m (120 kgf*cm, 9 ft.*lbf)
33527
49.INSTALL FLOOR SHIFT CONTROL SHIFT LEVER
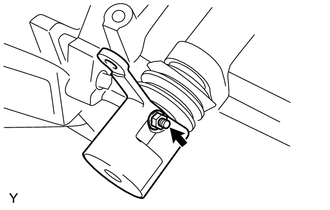
Install the dust boot to the shift and select lever shaft oil seal.
Install the floor shift control shift lever to the shift and select lever shaft assembly with the lock pin.
Install the washer and the nut.
- Torque:
- 11.8 N*m (120 kgf*cm, 9 ft.*lbf)
33590F
50.INSTALL FLOOR SHIFT SELECTING BELLCRANK ASSEMBLY
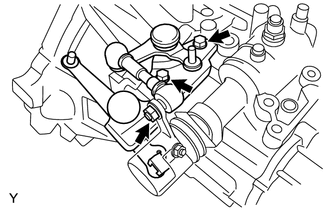
Coat the inside circumferential surface of the shift and select lever bush with MP grease and install it to the floor shift control shift lever.
Install the floor shift selecting bellcrank assembly to the manual transmission case with the 2 bolts and the nut.
- Torque:
- Bolt : 24.5 N*m (250 kgf*cm, 18 ft.*lbf)
- Nut : 11.8 N*m (120 kgf*cm, 9 ft.*lbf)
33111G
51.INSTALL MANUAL TRANSMISSION BREATHER PLUG
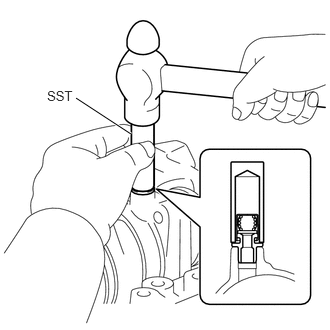
Using SST and a hammer, install the manual transmission breather plug to the manual transmission case.
- SST
- 09350-30020 (09350-07110)
84210
52.INSTALL BACK-UP LIGHT SWITCH ASSEMBLY
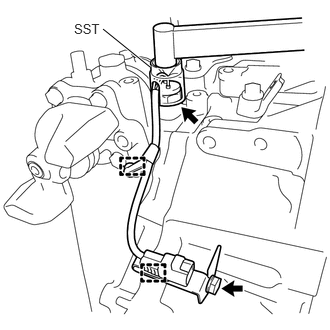
Install the wire harness clamp bracket to the transaxle case with the bolt.
- Torque:
- 11.8 N*m (120 kgf*cm, 9 ft.*lbf)
Using SST, install a new gasket and the back-up light switch assembly to the manual transmission case.
- SST
- 09817-16011
- Torque:
- 40.2 N*m (410 kgf*cm, 30 ft.*lbf)
Engage the 2 clamps to install the wire harness of the back-up light switch assembly to the manual transmission case and the wire harness clamp bracket.
33104
53.INSTALL DRAIN PLUG SUB-ASSEMBLY
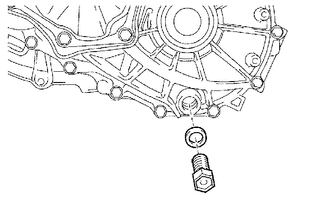
Install a new gasket and the drain plug sub-assembly to the manual transmission case.
- Torque:
- 39.2 N*m (400 kgf*cm, 29 ft.*lbf)
33101A
54.INSTALL MANUAL TRANSMISSION FILLER PLUG
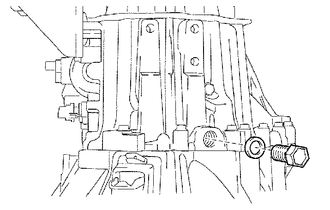
Install a new gasket and the manual transmission filler plug to the manual transmission case.
- Torque:
- 39.2 N*m (400 kgf*cm, 29 ft.*lbf)
31236B
55.INSTALL RELEASE FORK SUPPORT
31126
56.INSTALL CLUTCH RELEASE FORK BOOT
31232A
57.INSTALL RELEASE BEARING HUB CLIP
31204
58.INSTALL CLUTCH RELEASE FORK SUB-ASSEMBLY
31230
59.INSTALL CLUTCH RELEASE BEARING ASSEMBLY