2NR-FE ENGINE CONTROL SFI SYSTEM C1476 Brake Booster Pressure Sensor Circuit Low C1477 Brake Booster Pressure Sensor Circuit High
DESCRIPTION
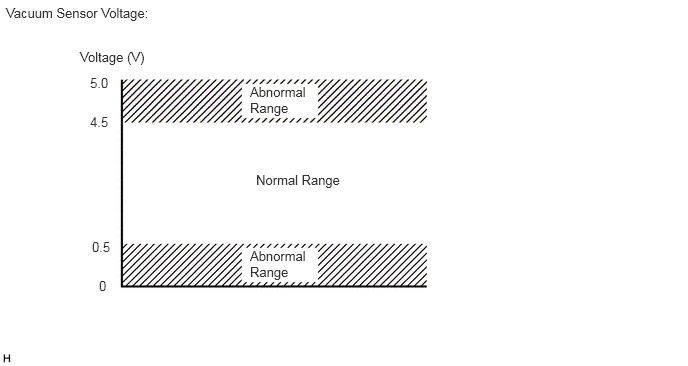
The ECM detects changes in the brake booster assembly pressure based on the voltage signal received from the vacuum sensor assembly installed to the brake booster assembly. If the ECM determines that there is a malfunction in the signal sent by the vacuum sensor assembly, it stores DTC C1476 or C1477.
| DTC No. | Detection Item | DTC Detection Condition | Trouble Area | MIL | Memory |
|---|---|---|---|---|---|
| C1476 | Brake Booster Pressure Sensor Circuit Low | The brake booster pressure sensor output voltage is 0.5 V or less for 1.2 seconds or more (1 trip detection logic). | ·
Vacuum sensor assembly ·
Wire harness or connector ·
ECM |
Does not come on | DTC stored |
| C1477 | Brake Booster Pressure Sensor Circuit High | The brake booster pressure sensor output voltage is 4.5 V or higher for 1.2 seconds or more (1 trip detection logic). | ·
Vacuum sensor assembly ·
Wire harness or connector ·
ECM |
Does not come on | DTC stored |
- HINT:
-
When any of these DTCs are output, check the brake booster pressure by using the GTS. Enter the following menus: Powertrain / Engine and ECT / Data List / Brake Boost Pressure Sensor.
Brake Boost Pressure Sensor Malfunction 0.5 V or less ·Short to ground in PB circuit
·Short in PB to E2 circuit
·Open in VC circuit
4.5 V or higher ·Short in PB to VC circuit
·Open in PB circuit
·Open in E2 circuit
MONITOR DESCRIPTION
If there is a defect or an open or short circuit in the vacuum sensor assembly, the voltage level deviates from the normal operating range. The ECM interprets this deviation as a malfunction in the vacuum sensor assembly circuit and stores a DTC.
CONFIRMATION DRIVING PATTERN
Connect the GTS to the DLC3.
Turn the ignition switch to ON.
Turn the GTS on.
Clear the DTCs (even if no DTCs are stored, perform the clear DTC procedure).
Turn the ignition switch off and wait for at least 30 seconds.
Turn the ignition switch to ON and wait for at least 5 seconds.
Turn the GTS on.
Idle the engine for 10 seconds or more.
Enter the following menus: Powertrain / Engine and ECT / Trouble Codes.
Read the pending DTCs.
- HINT:
- ·
If a pending DTC is output, the system is malfunctioning.
·If a pending DTC is not output, perform the following procedure.
Enter the following menus: Powertrain / Engine and ECT / Utility / All Readiness.
Input the DTC: C1476 or C1477.
Check the DTC judgment result.
| GTS Display | Description |
|---|---|
| NORMAL | ·
DTC judgment completed ·
System normal |
| ABNORMAL | ·
DTC judgment completed ·
System abnormal |
| INCOMPLETE | ·
DTC judgment not completed ·
Perform driving pattern after confirming DTC enabling conditions |
| N/A | ·
Unable to perform DTC judgment ·
Number of DTCs which do not fulfill DTC preconditions has reached ECU memory limit |
- HINT:
- ·
If the judgment result shows NORMAL, the system is normal.
·If the judgment result shows ABNORMAL, the system has a malfunction.
·If the judgment result shows INCOMPLETE or N/A, perform the Confirmation Driving Pattern and check the DTC judgment result again.
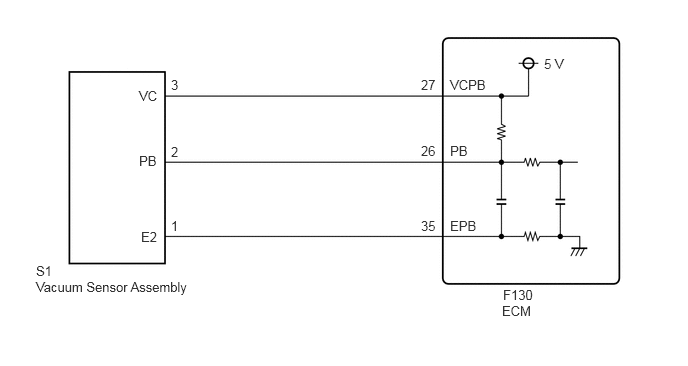
WIRING DIAGRAM
CAUTION / NOTICE / HINT
- HINT:
-
Read freeze frame data using the GTS. The ECM records vehicle and driving condition information as freeze frame data the moment a DTC is stored. When troubleshooting, freeze frame data can help determine if the vehicle was moving or stationary, if the engine was warmed up or not, if the air fuel ratio was lean or rich, and other data from the time the malfunction occurred.
PROCEDURE
Disconnect the S1 vacuum sensor assembly connector.
Disconnect the F130 ECM connector.
Measure the resistance according to the value(s) in the table below.
- Standard Resistance:
Tester Connection Condition Specified Condition S1-3 (VC) - F130-27 (VCPB) Always Below 1 Ω S1-2 (PB) - F130-26 (PB) Always Below 1 Ω S1-1 (E2) - F130-35 (EPB) Always Below 1 Ω S1-3 (VC) or F130-27 (VCPB) - Body ground and other terminals Always 10 kΩ or higher S1-2 (PB) or F130-26 (PB) - Body ground and other terminals Always 10 kΩ or higher S1-1 (E2) or F130-35 (EPB) - Body ground and other terminals Always 10 kΩ or higher
- Result:
Proceed to OK NG
OK
NG
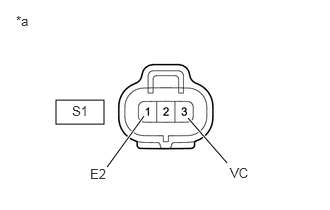
| *a | Front view of wire harness connector
(to Vacuum Sensor Assembly) |
Disconnect the vacuum sensor assembly connector.
Turn the ignition switch to ON.
Measure the voltage according to the value(s) in the table below.
- Standard Voltage:
Tester Connection Switch Condition Specified Condition S1-3 (VC) - S1-1 (E2) Ignition switch ON 4.75 to 5.25 V
- Result:
Proceed to OK NG
OK
NG