U340E AUTOMATIC TRANSMISSION / TRANSAXLE VALVE BODY ASSEMBLY INSTALLATION
PROCEDURE

 35149B
1.INSTALL TRANSAXLE CASE 2ND BRAKE GASKET
Apply a light coat of Toyota Genuine ATF WS to a new transaxle case 2nd brake gasket and install it to the automatic transaxle case sub-assembly.
35145C
2.INSTALL TRANSAXLE CASE GASKET
Apply a light coat of Toyota Genuine ATF WS to a new transaxle case gasket and install it to the automatic transaxle case sub-assembly.
35251
3.INSTALL CHECK BALL BODY
Install the check ball body compression spring and check ball body to the automatic transaxle case sub-assembly.
35410
4.INSTALL TRANSMISSION VALVE BODY ASSEMBLY
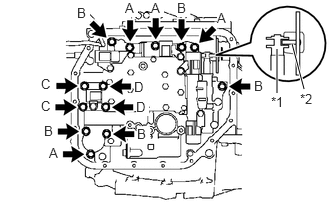
| *1 | Manual Valve |
| *2 | Manual Valve Lever Sub-assembly |
Align the groove of the manual valve with the pin of the manual valve lever sub-assembly.
Temporarily install the transmission valve body assembly to the automatic transaxle case sub-assembly with the 13 bolts.
- HINT:
-
Bolt length:
- ·
Bolt A: 20 mm (0.787 in.)
·Bolt B: 32 mm (1.26 in.)
·Bolt C: 45 mm (1.77 in.)
·Bolt D: 55 mm (2.17 in.)
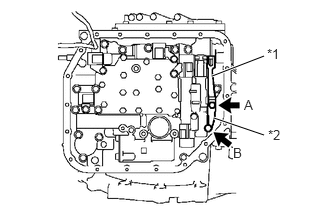
| *1 | Manual Detent Spring Sub-assembly |
| *2 | Manual Detent Spring Cover |
Temporarily install the manual detent spring sub-assembly and manual detent spring cover to the transmission valve body assembly with the 2 bolts.
- HINT:
-
Bolt length:
- ·
Bolt A: 14 mm (0.551 in.)
·Bolt B: 45 mm (1.77 in.)
Check that the manual valve lever sub-assembly comes into contact with the center of the roller at the tip of the manual detent spring sub-assembly.
Tighten the 15 bolts.
- Torque:
- 10.8 N*m (110 kgf*cm, 8 ft.*lbf)
82125J
5.CONNECT TRANSMISSION WIRE
Connect the 5 connectors to the transmission valve body assembly.
Apply a light coat of Toyota Genuine ATF WS to the ATF temperature sensor O-ring on the transmission wire.
Install the transmission wire to the transmission valve body assembly with the temperature sensor clamp and bolt.
- Torque:
- 10.8 N*m (110 kgf*cm, 8 ft.*lbf)
- HINT:
-
Bolt length: 55 mm (2.17 in.)
35330
6.INSTALL VALVE BODY OIL STRAINER ASSEMBLY
Apply a light coat of Toyota Genuine ATF WS to a new oil strainer O-ring and install it to the valve body oil strainer assembly.
Install the valve body oil strainer assembly to the transmission valve body assembly with the 3 bolts.
- Torque:
- 10.8 N*m (110 kgf*cm, 8 ft.*lbf)
35394
7.INSTALL TRANSMISSION OIL CLEANER MAGNET
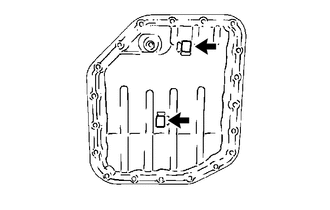
Install the 2 transmission oil cleaner magnets to the automatic transaxle oil pan sub-assembly as shown in the illustration.
35106D
8.INSTALL AUTOMATIC TRANSAXLE OIL PAN SUB-ASSEMBLY
Clean and degrease the 2 bolts A and bolt holes.
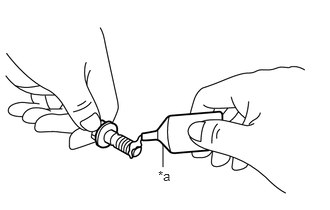
| *a | Adhesive |
Apply adhesive to 2 or 3 threads on the ends of the 2 bolts A.
- Adhesive:
Toyota Genuine Adhesive 1324, Three Bond 1324 or equivalent
- NOTICE:
-
To prevent contamination by foreign matter, install immediately after applying adhesive.
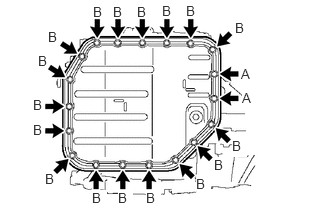
Install a new automatic transaxle oil pan gasket and automatic transaxle oil pan sub-assembly to the automatic transaxle case sub-assembly with the 19 bolts.
- Torque:
- Bolt A : 7.4 N*m (75 kgf*cm, 65 in.*lbf)
- Bolt B : 7.8 N*m (80 kgf*cm, 69 in.*lbf)
- NOTICE:
-
Completely remove any oil or grease from the contact surfaces of the automatic transaxle case sub-assembly and the automatic transaxle oil pan sub-assembly with the automatic transaxle oil pan gasket before installation.
9.ADD AUTOMATIC TRANSAXLE FLUID
Pull out the transmission oil level dipstick sub-assembly from the transmission oil filler tube sub-assembly.
Add Toyota Genuine ATF WS through the transmission oil filler tube sub-assembly.
- Automatic Transaxle Fluid (ATF):
Classification Capacity
(Reference)Toyota Genuine ATF WS Dry fill 6.4 liters (6.8 US qts, 5.6 Imp. qts) Drain and refill 2.5 liters (2.6 US qts, 2.2 Imp. qts)
10.INSPECT AUTOMATIC TRANSAXLE FLUID
11.INSPECT FOR AUTOMATIC TRANSAXLE FLUID LEAK
51442C
12.INSTALL ENGINE UNDER COVER LH