FRONT SUSPENSION FRONT SHOCK ABSORBER INSTALLATION
CAUTION / NOTICE / HINT
- HINT:
- ·
Use the same procedure for the RH and LH sides.
·The procedure listed below is for the LH side.
PROCEDURE

 48520
1.INSTALL FRONT SHOCK ABSORBER ASSEMBLY
Secure SST in a vise.
- SST
- 09727-30021 (09727-00010, 09727-00021, 09727-00031)
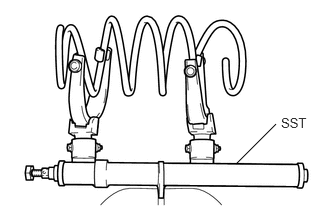
Temporarily install the front coil spring to SST.
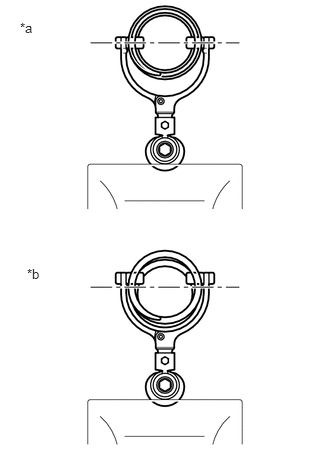
| *a | Correct |
| *b | Incorrect |
Attach the arm of SST to the diameter of the front coil spring.
- CAUTION:
- ·
Make sure that the front coil spring is installed so that the distance between the upper and lower hooks of SST is at the maximum.
·Make sure that the claws of the hooks are securely attached.
Using SST, compress the front coil spring.
- CAUTION:
- ·
If the front coil spring bends during the compression, immediately stop the compression and reinstall SST.
·Do not compress the spring until the coil springs contact each other.
·Do not use an impact wrench. It will damage SST.
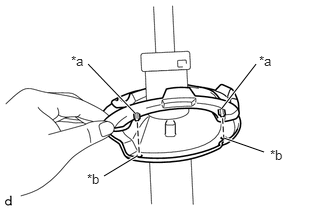
| *a | Positioning Pin |
| *b | Installation Hole |
Install the front coil spring lower insulator to the front shock absorber assembly.
- NOTICE:
-
When installing the front coil spring lower insulator, fit the front coil spring lower insulator to the depression of the spring seat and insert the positioning pin into the hole.
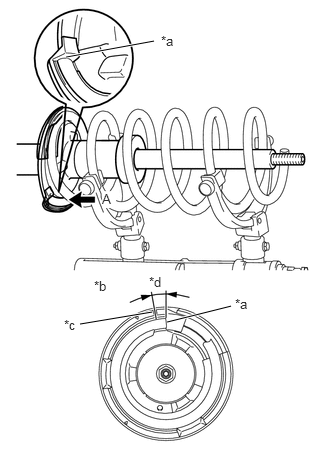
| *a | Lower End |
| *b | View A |
| *c | Convex Portion |
| *d | Installation Allowable Range |
Install the front shock absorber assembly to the front coil spring.
- NOTICE:
- ·
Install the front coil spring so that the end with the smaller diameter is facing upward.
·Install the lower end of the front coil spring within the installation allowable range.
Install the front spring bumper to the front shock absorber assembly.
Install the front upper coil spring seat to the front shock absorber assembly.
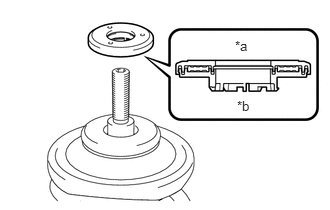
| *a | Upper Side |
| *b | Lower Side |
Install the strut mounting bearing to the front shock absorber assembly.
- NOTICE:
-
Do not install the bearing upside down.
Install the front suspension support sub-assembly to the front shock absorber assembly.
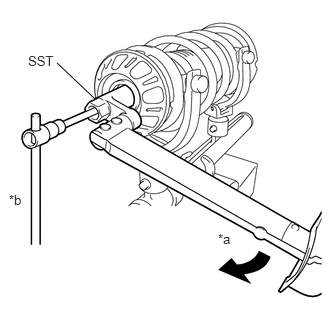
| *a | Turn |
| *b | Hold |
Using SST and a 6 mm hexagon socket wrench, install a new front support to front shock absorber nut to the front shock absorber assembly.
- SST
- 09729-97202
- Torque:
- without SST : 55 N*m (561 kgf*cm, 41 ft.*lbf)
- with SST : 48.5 N*m (495 kgf*cm, 36 ft.*lbf)
- HINT:
- ·
This torque value is effective when SST is parallel to the torque wrench.
·This torque value can be obtained by using a torque wrench with a fulcrum length of 300 mm (11.8 in.) and SST with a fulcrum length of 40 mm (1.57 in.).
·If using a torque wrench with a fulcrum length that is not 300 mm (11.8 in.), calculate the torque specification for the torque wrench and SST based on the "without SST" torque specification.
Click hereGeneral>INTRODUCTION>REPAIR INSTRUCTION>PRECAUTION
Remove the front shock absorber with coil spring from SST.
- NOTICE:
-
Do not use an impact wrench. It will damage SST.
2.TEMPORARILY INSTALL FRONT SHOCK ABSORBER WITH COIL SPRING
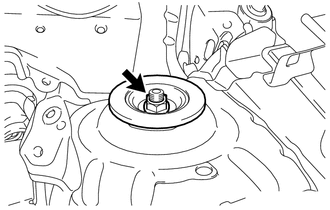
Temporarily install the front shock absorber with coil spring (upper side) and front No. 2 suspension support to the vehicle with a new nut.
Install the front shock absorber with coil spring (lower side) to the steering knuckle with the 2 nuts and 2 bolts.
- Torque:
- 164 N*m (1672 kgf*cm, 121 ft.*lbf)
- HINT:
-
Keep the bolt from rotating while turning the nut.
47313J
3.INSTALL FRONT FLEXIBLE HOSE (w/ ABS)
47313J
4.INSTALL FRONT FLEXIBLE HOSE (w/o ABS)
5.INSTALL FRONT WHEEL
- Torque:
- 103 N*m (1050 kgf*cm, 76 ft.*lbf)
6.TIGHTEN FRONT SHOCK ABSORBER WITH COIL SPRING
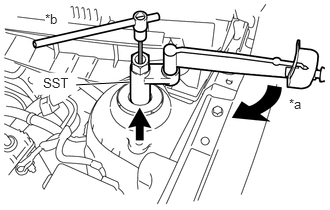
| *a | Turn |
| *b | Hold |
Using SST and a 6 mm hexagon socket wrench, hold the shock absorber rod in place and tighten the nut.
- SST
- 09729-97202
- Torque:
- without SST : 55 N*m (561 kgf*cm, 41 ft.*lbf)
- with SST : 48.5 N*m (495 kgf*cm, 36 ft.*lbf)
- HINT:
- ·
This torque value is effective when SST is parallel to a torque wrench.
·This torque value can be obtained by using a torque wrench with a fulcrum length of 300 mm (11.8 in.) and SST with a fulcrum length of 40 mm (1.57 in.).
·If using a torque wrench with a fulcrum length that is not 300 mm (11.8 in.), calculate the torque specification for the torque wrench and SST based on the "without SST" torque specification.
Click hereGeneral>INTRODUCTION>REPAIR INSTRUCTION>PRECAUTION
7.INSTALL WINDSHIELD WIPER MOTOR AND LINK
8.INSPECT AND ADJUST FRONT WHEEL ALIGNMENT