AUDIO / VIDEO FRONT DOOR SPEAKER(for TMT Made) INSTALLATION
CAUTION / NOTICE / HINT
- HINT:
- ·
Use the same procedure for both the LH and RH sides.
·The procedure described below is for the LH side.
PROCEDURE

 86160
1.INSTALL FRONT NO. 1 SPEAKER ASSEMBLY
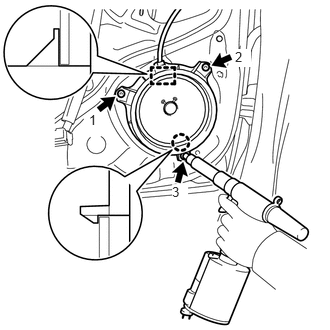
Engage the guide and claw to temporarily install the front No. 1 speaker assembly.
Using an air riveter or hand riveter, install the front No. 1 speaker assembly with 3 new rivets.
- HINT:
-
Install the rivets in the order shown in the illustration.
- NOTICE:
- ·
Do not touch the cone part of the front No. 1 speaker assembly.
·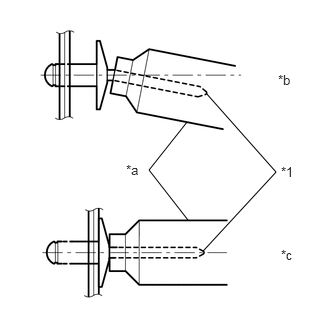 2.115,2.615 2.875,1.792 2.875,1.792 2.146,0.969 false 1.958,2.292 1.552,1.771 1.552,1.771 1.948,1.271 false 1.313,1.688 1.625,1.885 0.313,0.198 10 false *a 2.927,1.708 3.24,1.906 0.313,0.198 10 false *1 2.896,0.75 3.208,0.948 0.313,0.198 10 false *b 2.927,2.573 3.24,2.771 0.313,0.198 10 false *c
*1 Mandrel *a Riveter *b Incorrect *c Correct
Do not pry on the rivets with the riveter, as this will cause damage to the riveter and mandrel.
·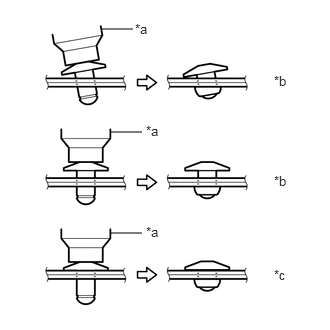 1.052,0.302 1.385,0.302 false 1.146,1.375 1.479,1.375 false 1.146,2.427 1.479,2.427 false 2.854,1.802 3.167,1.958 0.313,0.156 10 false *b 2.854,2.781 3.167,2.938 0.313,0.156 10 false *c 1.406,0.219 1.719,0.375 0.313,0.156 10 false *a 1.521,1.281 1.833,1.438 0.313,0.156 10 false *a 1.521,2.333 1.833,2.49 0.313,0.156 10 false *a 2.854,0.76 3.167,0.917 0.313,0.156 10 false *b
*a Riveter *b Incorrect *c Correct
Confirm that the rivets are seated properly against the front No. 1 speaker assembly.
·Do not tilt the riveter when installing the rivets to the front No. 1 speaker assembly.
·Do not leave any clearance between the rivet heads and front No. 1 speaker assembly.
·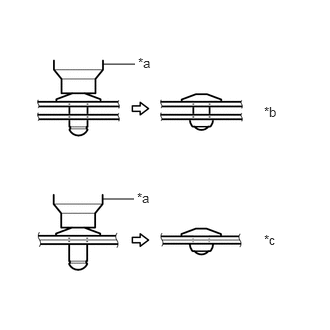 1.073,0.667 1.406,0.667 false 1.063,2.073 1.396,2.073 false 1.427,1.979 1.74,2.135 0.313,0.156 10 false *a 1.438,0.573 1.75,0.729 0.313,0.156 10 false *a 2.75,1.083 3.063,1.24 0.313,0.156 10 false *b 2.75,2.417 3.063,2.573 0.313,0.156 10 false *c
*a Riveter *b Incorrect *c Correct
Do not leave any clearance between the front No. 1 speaker assembly and door. Firmly hold the 2 items together while installing the rivets.
Connect the connector.
67602
2.INSTALL FRONT DOOR TRIM BOARD SUB-ASSEMBLY
74232
3.INSTALL FRONT ARMREST BASE UPPER PANEL
74210
4.INSTALL FRONT ARMREST ASSEMBLY
67492A
5.INSTALL FRONT DOOR LOWER FRAME BRACKET GARNISH