AUDIO / VIDEO REAR DOOR SPEAKER(for TMMIN Made) INSTALLATION
CAUTION / NOTICE / HINT
- HINT:
-
The procedure described below is for the LH side. Use the same procedure for both the RH and LH sides, unless otherwise specified.
PROCEDURE

 86160B
1.INSTALL REAR SPEAKER ASSEMBLY
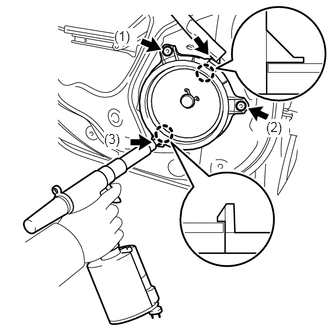
Engage the 2 claws to the vehicle body and temporarily install the rear speaker assembly.
Using an air riveter or a hand riveter, install the rear speaker assembly with 3 new rivets.
- HINT:
-
Install the rivets in the order shown in the illustration.
- NOTICE:
- ·
Do not touch the cone part of the rear speaker assembly.
·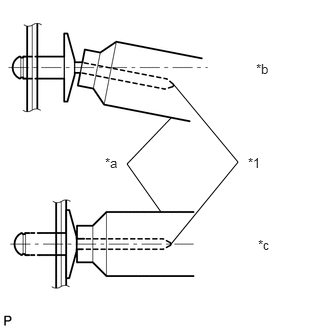 1.677,2.208 1.323,1.708 1.323,1.708 1.781,1.229 false 1.781,2.542 2.479,1.688 2.479,1.688 1.813,0.885 false 2.667,0.635 2.979,0.833 0.313,0.198 10 false *b 2.688,2.469 3,2.667 0.313,0.198 10 false *c 1.094,1.615 1.406,1.813 0.313,0.198 10 false *a 2.583,1.615 2.896,1.813 0.313,0.198 10 false *1
*1 Mandrel *a Riveter *b Incorrect *c Correct
Do not pry on the rivets with the riveter, as this will cause damage to the riveter and mandrel.
·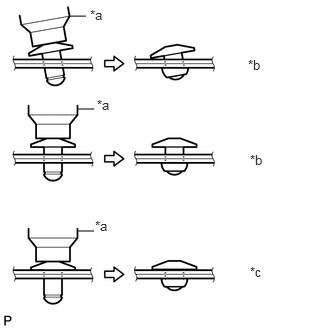 0.729,0.167 0.896,0.167 false 0.813,1.135 0.979,1.135 false 0.813,2.406 0.979,2.406 false 0.938,0.073 1.25,0.271 0.313,0.198 10 false *a 1.01,1.01 1.323,1.208 0.313,0.198 10 false *a 0.99,2.271 1.302,2.469 0.313,0.198 10 false *a 2.583,0.594 2.896,0.792 0.313,0.198 10 false *b 2.604,1.583 2.917,1.781 0.313,0.198 10 false *b 2.604,2.75 2.917,2.948 0.313,0.198 10 false *c
*a Riveter *b Incorrect *c Correct
Confirm that the rivets are seated properly against the rear speaker assembly.
·Do not tilt the riveter when installing the rivets to the rear speaker assembly.
·Do not leave any clearance between the rivet heads and rear speaker assembly.
·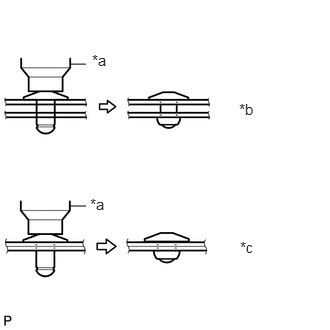 0.729,0.667 0.896,0.667 false 0.729,2.146 0.896,2.146 false 0.958,0.531 1.302,0.75 0.344,0.219 11 false *a 0.938,2.031 1.281,2.25 0.344,0.219 11 false *a 2.49,1.042 2.833,1.26 0.344,0.219 11 false *b 2.5,2.479 2.844,2.698 0.344,0.219 11 false *c
*a Riveter *b Incorrect *c Correct
Do not leave any clearance between the rear speaker assembly and door. Firmly hold the 2 items together while installing the rivets.
Connect the connector.
67604
2.INSTALL REAR DOOR TRIM BOARD SUB-ASSEMBLY
74272A
3.INSTALL REAR DOOR ARMREST BASE UPPER PANEL (w/ Power Window)
74272A
4.INSTALL REAR DOOR ARMREST BASE UPPER PANEL (w/o Power Window)
69260E
5.INSTALL REAR DOOR WINDOW REGULATOR HANDLE ASSEMBLY (w/o Power Window)