CLUTCH CLUTCH UNIT(for C551) REMOVAL
CAUTION / NOTICE / HINT
The necessary procedures (adjustment, calibration, initialization or registration) that must be performed after parts are removed and installed, or replaced during clutch unit removal/installation are shown below.
| Replaced Part or Performed Procedure | Necessary Procedure | Effect/Inoperative Function when Necessary Procedure not Performed | Link |
|---|---|---|---|
| Auxiliary battery terminal is disconnected/reconnected | Memorize steering angle neutral point | Parking assist monitor system | ( ) |
- CAUTION:
- ·
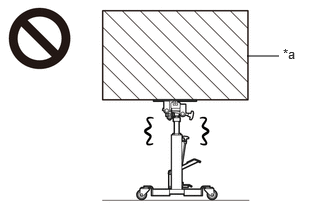 2.573,0.583 2.906,0.583 false 2.948,0.479 3.26,0.677 0.313,0.198 10 false *a
*a Heavy object exceeding the capacity of the transmission jack
Because the manual transaxle assembly is extremely heavy, make sure to follow the work procedures described in the repair manual.
·If work is not performed according to the procedures described in the repair manual, there is a danger that the transmission jack could drop and components could fall down.
- ·
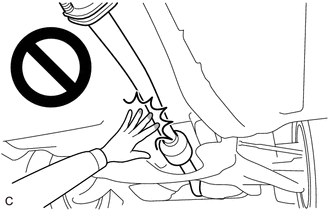
When the engine is hot, do not touch high-temperature areas such as the engine or exhaust pipe.
·Touching high-temperature areas such as the engine and exhaust pipe could result in burns.
- HINT:
-
When the cable is disconnected / reconnected to the auxiliary battery terminal, systems temporarily stop operating. However, each system has a function that completes learning the first time the system is used.
- ·
Learning completes when vehicle is driven
Effect/Inoperative Function When Necessary Procedures are not Performed Necessary Procedures Link Lane tracing assist system Drive the vehicle straight ahead at 35 km/h (22 mph) or more for 5 second or more. ( )
Pre-collision system Stop and start system Drive the vehicle until stop and start control is permitted (approximately 5 to 60 minutes) ( )
·Learning completes when vehicle is operated normally
Effect/Inoperative Function When Necessary Procedures are not Performed Necessary Procedures Link Power door lock control system
·Back door opener
Perform door unlock operation with door control switch or electrical key transmitter sub-assembly switch. ( )
Air conditioning system After the ignition switch is turned to ON, the servo motor standard position is recognized. -
PROCEDURE

 30300
1.REMOVE MANUAL TRANSAXLE ASSEMBLY (When Not Using the Engine Support Bridge)
30300
2.REMOVE MANUAL TRANSAXLE ASSEMBLY (When Using the Engine Support Bridge)
31121
3.REMOVE NO. 1 CLUTCH HOUSING COVER
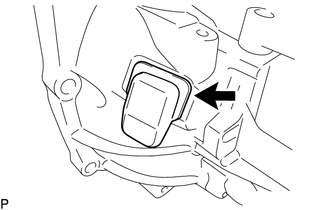
Remove the No. 1 clutch housing cover from the manual transaxle assembly.
31230
4.REMOVE CLUTCH RELEASE BEARING ASSEMBLY
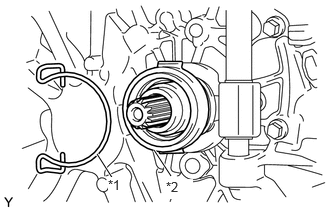
| *1 | Release Bearing Hub Clip |
| *2 | Clutch Release Bearing Assembly |
Disengage the release bearing hub clip and remove the clutch release bearing assembly from the clutch release fork.
31204
5.REMOVE CLUTCH RELEASE FORK SUB-ASSEMBLY
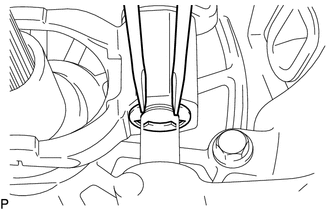
Using 2 screwdrivers and a hammer, tap the E-ring out.
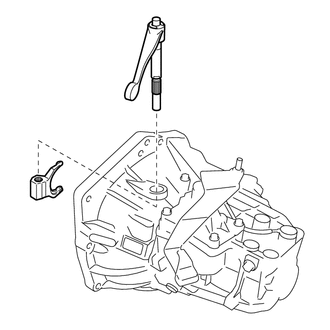
Pull the clutch release fork sub-assembly out of the transaxle case to remove the clutch release fork from the transaxle case.
6.REMOVE CLUTCH RELEASE FORK SHAFT OIL SEAL
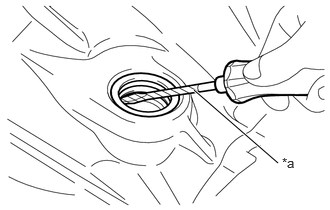
| *a | Protective Tape |
Using a screwdriver with its tip wrapped with protective tape, remove the clutch release fork shaft oil seal.
31210
7.REMOVE CLUTCH COVER ASSEMBLY
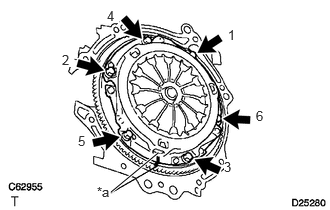
| *a | Matchmark |
Put the matchmarks on the clutch cover assembly and the flywheel sub-assembly.
Loosen each set bolt one turn at a time in the order shown in the illustration until the spring tension is released.
Remove the set bolts and pull off the clutch cover assembly.
- NOTICE:
-
Do not drop the clutch disc assembly.
31250
8.REMOVE CLUTCH DISC ASSEMBLY
Remove the clutch disc assembly.
- NOTICE:
-
Keep the lining part of the clutch disc and the surfaces of the pressure plate and flywheel free of oil and foreign matter.