G16E-GTS ENGINE CONTROL SFI SYSTEM P061512 Starter Relay Circuit Short to Battery
MONITOR DESCRIPTION
While the engine is cranked, current flows from terminal STA2 of the engine stop and start ECU to terminal STA of the ECM (STA signal). If the ECM detects the starter control (STA) signal while the vehicle is being driven, it determines that there is a malfunction in the STA circuit. The ECM then illuminates the MIL and stores this DTC.
This monitor runs when the vehicle is driven at 20 km/h (12.43 mph) or more for 20 seconds or more.
| DTC No. | Detection Item | DTC Detection Condition | Trouble Area | MIL | Note |
|---|---|---|---|---|---|
| P061512 | Starter Relay Circuit Short to Battery | All of the following conditions are met, and battery voltage of 10.5 V or higher is applied to the ECM for 20 seconds (1 trip detection logic):
(a) The vehicle speed is 20 km/h (12.43 mph) or more. (b) The engine speed is 1000 rpm or higher. (c) The STA signal is on. |
·
ST NO. 1 relay ·
STA signal circuit ·
Engine stop and start ECU ·
ECM |
Comes on | SAE: P0617 |
MONITOR STRATEGY
| Frequency of Operation | Continuous |
CONFIRMATION DRIVING PATTERN
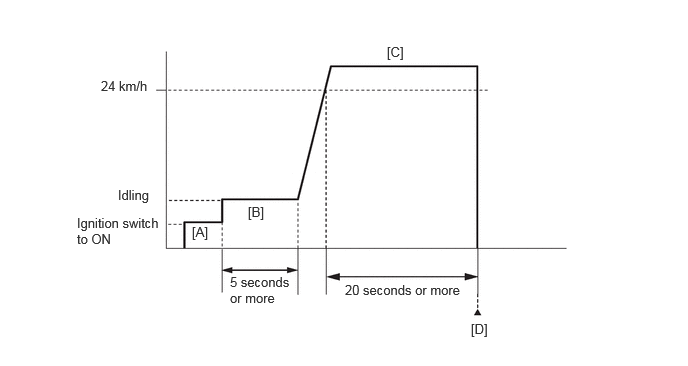
Connect the GTS to the DLC3.
Turn the ignition switch to ON.
Turn the GTS on.
Clear the DTCs (even if no DTCs are stored, perform the clear DTC procedure).
Turn the ignition switch off and wait for at least 30 seconds.
Turn the ignition switch to ON [A].
Turn the GTS on.
Start the engine.
Idle the engine for 5 seconds or more [B].
Drive the vehicle at a speed of 24 km/h (15 mph) or more for 20 seconds or more [C].
- CAUTION:
-
When performing the confirmation driving pattern, obey all speed limits and traffic laws.
Enter the following menus: Powertrain / Engine / Trouble Codes [D].
Read the pending DTCs.
- HINT:
- ·
If a pending DTC is output, the system is malfunctioning.
·If a pending DTC is not output, perform the following procedure.
Enter the following menus: Powertrain / Engine / Utility / All Readiness.
Input the DTC: P061512.
Check the DTC judgment result.
| GTS Display | Description |
|---|---|
| NORMAL | ·
DTC judgment completed ·
System normal |
| ABNORMAL | ·
DTC judgment completed ·
System abnormal |
| INCOMPLETE | ·
DTC judgment not completed ·
Perform driving pattern after confirming DTC enabling conditions |
- HINT:
- ·
If the judgment result is NORMAL, the system is normal.
·If the judgment result is ABNORMAL, the system has a malfunction.
WIRING DIAGRAM
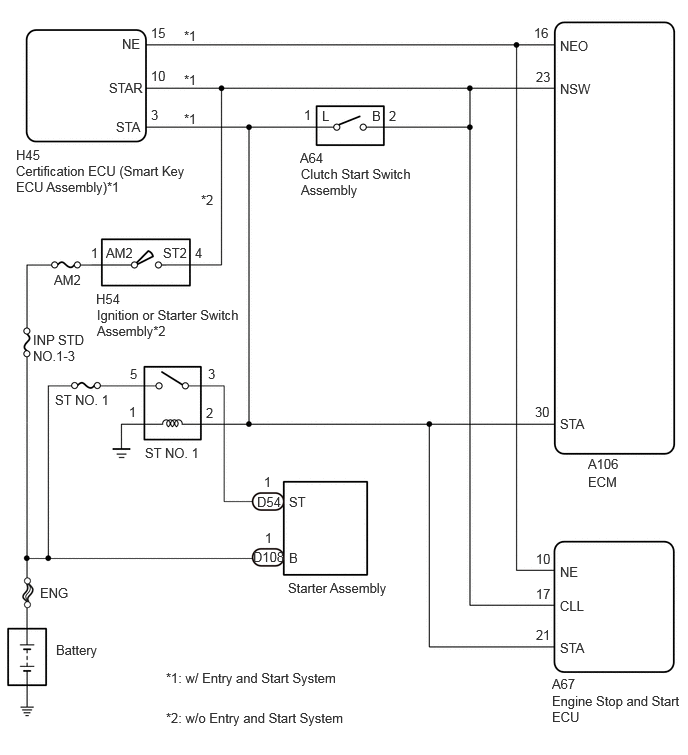
CAUTION / NOTICE / HINT
- HINT:
-
Read Freeze Frame Data using the GTS. The ECM records vehicle and driving condition information as Freeze Frame Data the moment a DTC is stored. When troubleshooting, Freeze Frame Data can help determine if the vehicle was moving or stationary, if the engine was warmed up or not, if the air fuel ratio was lean or rich, and other data from the time the malfunction occurred.
- NOTICE:
-
Inspect the fuses for circuits related to this system before performing the following procedure.
- ·
Inspect the fuses for circuits related to this system before performing the following procedure.
·After turning ignition switch off, waiting time may be required before disconnecting the cable from the negative (-) auxiliary battery terminal. Therefore, make sure to read the disconnecting the cable from the negative (-) auxiliary battery terminal notices before proceeding with work.
Click hereGeneral>INTRODUCTION>REPAIR INSTRUCTION>PRECAUTION
·When the starter assembly is replaced, the number of starter operations stored in the engine stop and start ECU must be reset.
Click hereEngine / Hybrid System>STOP AND START>STOP AND START SYSTEM>REGISTRATION
·When the starter assembly is replaced, "ST NO. 1 relay" must be also replaced.
PROCEDURE
Enter the following menus.
- Powertrain > Engine > Data List
-
Tester Display Starter SW - 50003 372 11
According to the display on the GTS, read the Data List.
- Standard:
Condition Starter SW Ignition switch ON OFF
According to the display on the GTS, read the Data List while the vehicle is being driven with an engine speed of 1000 rpm or more at a vehicle speed of 20 km/h (12.43 mph) or more.
- CAUTION:
-
When performing the confirmation driving pattern, obey all speed limits and traffic laws.
- Standard:
Condition Starter SW Driving at 20 km/h (12.43 mph) or more (engine speed 1000 rpm or more) OFF
- HINT:
-
If the result of either of the above is not as specified, proceed to the next step with the ignition switch to ON, GTS connected and Data List item "Starter SW" selected.
- Result:
Result Proceed to OK A NG B
- HINT:
-
If the starter assembly operates continuously when the ignition switch is turned to ON, proceed to the next step without reading the Data List item "Starter SW".
A
Click hereEngine / Hybrid System>G16E-GTS (ENGINE CONTROL)>SFI SYSTEM>CHECK FOR INTERMITTENT PROBLEMS
B
Enter the following menus.
- Powertrain > Engine > Data List
-
Tester Display Starter SW - 50003 372 11
Remove the ST NO. 1 relay from the No. 1 engine room relay block assembly.
According to the display on the GTS, read the Data List.
- Result:
Result Proceed to The Data List item "Starter SW" does not change from ON A The Data List item "Starter SW" changes from ON to OFF B
- HINT:
- ·
When the result of the above inspection is "The Data List item "Starter SW" does not change from ON", the ST NO. 1 relay is normal.
·DTCs may be stored during this inspection. Check for DTCs and clear them using the GTS.
A
B
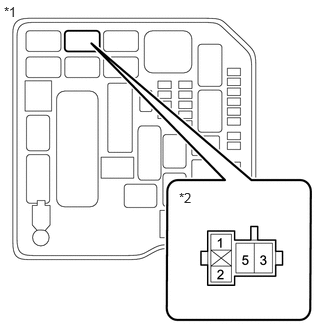
| *1 | No. 1 Engine Room Relay Block Assembly |
| *2 | ST NO. 1 Relay |
- HINT:
-
The purpose of this step is to check for ST NO. 1 relay terminal voltage under abnormal conditions.
Remove the ST NO. 1 relay from the No. 1 engine room relay block assembly.
Turn the ignition switch to ON.
Measure the voltage between ST NO. 1 relay terminal 2 and body ground.
- HINT:
- ·
Make a note of the measured voltage as it will be necessary for the inspecting the change in voltage in the next step. As the next step should be conducted under the same conditions, keep the ignition switch to ON and do not install the ST NO. 1 relay.
·DTCs may be stored during this inspection. Check for DTCs and clear them using the GTS.
·If any voltage was measured with the ignition switch to ON, one of the following malfunctions is suspected:
-Short to +B in the circuit of a connected ECU or the switch.
-Short to +B in the wire harness.
- Result:
Proceed to NEXT
NEXT
| *1 | No. 1 Engine Room Relay Block Assembly |
| *2 | ST NO. 1 Relay |
Disconnect the engine stop and start ECU connector.
Measure the voltage between ST NO. 1 relay terminal 2 and body ground and compare it to the voltage measured in the previous step.
- Result:
Result Proceed to The voltage between ST NO. 1 relay terminal 2 and body ground does not change when the connector is disconnected. A The voltage between ST NO. 1 relay terminal 2 and body ground changes when the connector is disconnected. B
- HINT:
- ·
If the voltage is the same before and after disconnecting the connector, the engine stop and start ECU is normal.
·DTCs may be stored during this inspection. Check for DTCs and clear them using the GTS.
A
B
| *1 | No. 1 Engine Room Relay Block Assembly |
| *2 | ST NO. 1 Relay |
Pre-procedure1
Disconnect the clutch start switch assembly connector.
Procedure1
Measure the voltage between ST NO. 1 relay terminal 2 and body ground and compare it to the voltage measured in the previous step.
Post-procedure1
None.
- Result:
Result Proceed to The voltage between ST NO. 1 relay terminal 2 and body ground does not change when the connector is disconnected. A The voltage between ST NO. 1 relay terminal 2 and body ground changes when the connector is disconnected. B
- HINT:
- ·
If the voltage is the same before and after disconnecting the connector, the clutch pedal switch assembly is normal.
·DTCs may be stored during this inspection. Check for DTCs and clear them using the GTS.
A
B
Check the ignition switch models.
- Result:
Result Proceed to w/ Entry and Start System A w/o Entry and Start System B
A
B
| *1 | No. 1 Engine Room Relay Block Assembly |
| *2 | ST NO. 1 Relay |
Disconnect the ECM connector.
Measure the voltage between ST NO. 1 relay terminal 2 and body ground and compare it to the voltage measured in the previous step.
- Result:
Result Proceed to The voltage between ST NO. 1 relay terminal 2 and body ground does not change when the connector is disconnected. A The voltage between ST NO. 1 relay terminal 2 and body ground changes when the connector is disconnected. B
- HINT:
- ·
If the voltage is the same before and after disconnecting the connector, the ECM is normal.
·DTCs may be stored during this inspection. Check for DTCs and clear them using the GTS.
A
B
Pre-procedure1
Disconnect the ECM connector.
Disconnect the clutch start switch assembly connector.
Disconnect the certification ECU (smart key ECU assembly) connector.
Remove the ST NO. 1 relay from the No. 1 engine room relay block assembly.
Disconnect the engine stop and start ECU connector.
Procedure1
Measure the resistance according to the value(s) in the table below.
- Standard Resistance:
Tester Connection Condition Specified Condition A106-30 (STA), A64-5 (L), H45-3 (STA), A67-21 (STA) or 2 (ST NO. 1 relay) - Other terminals Always 10 kΩ or higher
Post-procedure1
None.
- Result:
Proceed to OK NG
OK
NG
| *1 | No. 1 Engine Room Relay Block Assembly |
| *2 | ST NO. 1 Relay |
Disconnect the ECM connector.
Measure the voltage between ST NO. 1 relay terminal 2 and body ground and compare it to the voltage measured in the previous step.
- Result:
Result Proceed to The voltage between ST NO. 1 relay terminal 2 and body ground does not change when the connector is disconnected. A The voltage between ST NO. 1 relay terminal 2 and body ground changes when the connector is disconnected. B
- HINT:
- ·
If the voltage is the same before and after disconnecting the connector, the ECM is normal.
·DTCs may be stored during this inspection. Check for DTCs and clear them using the GTS.
A
B