FRONT SUSPENSION FRONT LOWER SUSPENSION ARM(for TMC Made except G16E-GTS, LH Side) INSTALLATION
CAUTION / NOTICE / HINT
PROCEDURE

 48069
1.TEMPORARILY INSTALL FRONT LOWER NO. 1 SUSPENSION ARM SUB-ASSEMBLY LH
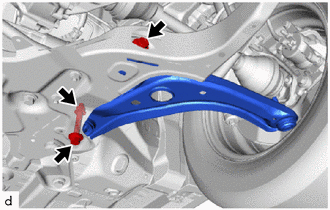
Temporarily install the front lower No. 1 suspension arm sub-assembly LH to the front suspension crossmember sub-assembly with the 2 bolts and nut.
48069
2.CONNECT FRONT LOWER NO. 1 SUSPENSION ARM SUB-ASSEMBLY LH
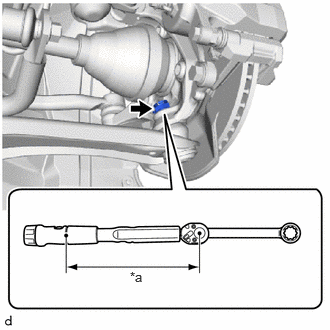
| *a | Torque Wrench Fulcrum Length |
Install the front lower No. 1 suspension arm sub-assembly LH to the steering knuckle with the nut.
- Torque:
- Specified tightening torque : 98 N*m (999 kgf*cm, 72 ft.*lbf)
- NOTICE:
-
Prevent oil from adhering to the threaded and tapered parts.
- HINT:
- ·
Calculate the torque wrench reading when changing the fulcrum length of the torque wrench.
Click hereGeneral>INTRODUCTION>REPAIR INSTRUCTION>PRECAUTION
·When using a ball joint lock nut wrench (fulcrum length of 155.5 mm (6.12 in.)) + torque wrench (fulcrum length of 400 mm (15.7 in.)): 70.5 N*m (719 kgf*cm, 52 ft.*lbf)
Install a new clip.
- NOTICE:
-
Further tighten the nut up to 60° if the holes for the clip are not aligned.
3.INSTALL FRONT WHEEL
4.STABILIZE SUSPENSION
Press down on the vehicle several times to stabilize the suspension.
48069
5.FULLY TIGHTEN FRONT LOWER NO. 1 SUSPENSION ARM SUB-ASSEMBLY LH
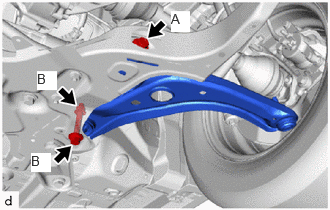
Tighten the bolt (A).
- Torque:
- 147 N*m (1499 kgf*cm, 108 ft.*lbf)
Fully tighten the bolt (B).
- Torque:
- 125 N*m (1275 kgf*cm, 92 ft.*lbf)
- NOTICE:
-
Because the nut has its own stopper, do not turn the nut. Tighten the bolt with the nut secured.
6.INSTALL CENTER ENGINE UNDER COVER
7.INSPECT AND ADJUST FRONT WHEEL ALIGNMENT
8.PERFORM INITIALIZATION
| Parking support brake system | ( ) |
| Parking assist monitor system | ()
|