REAR SUSPENSION REAR TRAILING ARM INSTALLATION
CAUTION / NOTICE / HINT
- HINT:
- ·
Use the same procedure for the RH side and LH side.
·The following procedure is for the LH side.
PROCEDURE

 48727
1.INSTALL REAR SUSPENSION ARM BRACKET
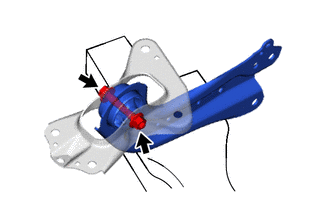
Temporarily install the rear suspension arm bracket to the rear trailing arm assembly with the bolt and nut.
- NOTICE:
- ·
Tighten the nut with the bolt secured.
·Insert the bolt from the inside of the vehicle.
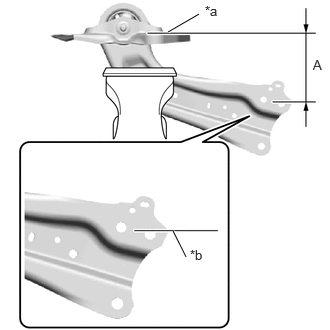
| *a | Upper Surface of Rear Suspension Arm Bracket |
| *b | Edge of Rear Trailing Arm Assembly |
Position the rear trailing arm assembly as shown in the illustration.
- Reference Length (A):
136 mm (5.35 in.)
Fully tighten the nut.
- Torque:
- 120 N*m (1224 kgf*cm, 89 ft.*lbf)
- NOTICE:
-
Tighten the nut with the bolt secured.
48753C
2.INSTALL REAR NO. 1 SUSPENSION SUPPORT COVER
Engage the 3 claws to install the rear No. 1 suspension support cover.
48780E
3.INSTALL REAR TRAILING ARM ASSEMBLY
Using a transmission jack and a wooden block, support the rear No. 2 suspension arm assembly.
- NOTICE:
- ·
When jacking up the rear No. 2 suspension arm assembly, be sure to jack it up slowly.
·Make sure to perform this operation with the vehicle kept as low as possible.
Install the rear trailing arm assembly to the vehicle with the 4 bolts.
- Torque:
- 90 N*m (918 kgf*cm, 66 ft.*lbf)
Install the rear trailing arm assembly to the rear axle carrier sub-assembly with the 2 bolts.
- Torque:
- 150 N*m (1530 kgf*cm, 111 ft.*lbf)
4.INSTALL REAR SPEED SENSOR
Install the rear speed sensor to the rear trailing arm assembly with the bolt.
- Torque:
- 19 N*m (194 kgf*cm, 14 ft.*lbf)
Engage the 3 clamps.
890C0A
5.INSTALL NO. 3 PARKING BRAKE CABLE ASSEMBLY
Install the No. 3 parking brake cable assembly to the rear trailing arm assembly with the nut.
- Torque:
- 15.5 N*m (158 kgf*cm, 11 ft.*lbf)
48840A
6.INSTALL REAR STABILIZER LINK ASSEMBLY
7.INSTALL REAR WHEEL
8.INSPECT AND ADJUST REAR WHEEL ALIGNMENT