DRIVE SHAFT / PROPELLER SHAFT REAR DRIVE SHAFT ASSEMBLY REASSEMBLY
CAUTION / NOTICE / HINT
- NOTICE:
- ·
When using a vise, place aluminum plates between the part and vise.
·When using a vise, do not overtighten it.
- HINT:
- ·
Use the same procedure for the RH side and LH side.
·The following procedure is for the LH side.
PROCEDURE

 41336K
1.INSTALL REAR DRIVE SHAFT DUST COVER
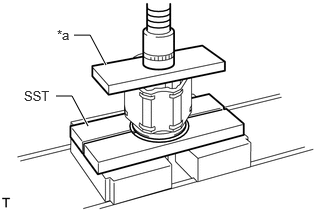
| *a | Steel Plate |
Using SST, a steel plate and a press, install a new rear drive shaft dust cover to the rear drive shaft inboard joint assembly.
- SST
- 09527-10011
- NOTICE:
- ·
Make sure to install the rear drive shaft dust cover in the correct direction.
·Do not damage the rear drive shaft dust cover.
·The rear drive shaft dust cover should be installed completely.
42360D
2.INSTALL REAR DRIVE SHAFT INBOARD JOINT ASSEMBLY
Wrap the spline of the rear drive outboard joint shaft assembly with protective tape to prevent the boot from being damaged.
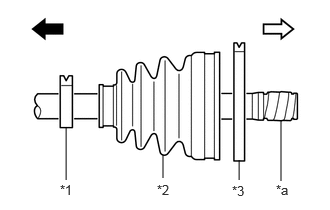
| *1 | Rear Drive Shaft Inboard Joint Boot Clamp |
| *2 | Rear Drive Shaft Inboard Joint Boot |
| *3 | Rear No. 2 Drive Shaft Inboard Joint Boot Clamp |
| *a | Protective Tape |

|
Outboard Joint Side |

|
Inboard Joint Side |
Install new parts to the rear drive outboard joint shaft assembly in the following order:
Rear drive shaft inboard joint boot clamp
Rear drive shaft inboard joint boot
Rear No. 2 drive shaft inboard joint boot clamp
Remove the protective tape.
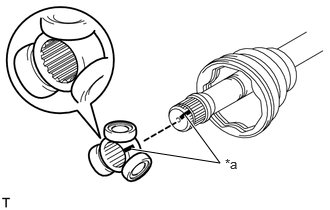
| *a | Matchmark |
Align the matchmarks and install the tripod joint to the rear drive outboard joint shaft assembly.
- NOTICE:
-
Face the serrated side of the tripod joint outward and install it to the outboard joint end.
Using a brass bar and a hammer, install the tripod joint to the rear drive outboard joint shaft assembly.
- NOTICE:
- ·
Do not tap the rollers.
·Keep the tripod joint free of foreign matter.
·Make sure to install the tripod joint in the correct direction.
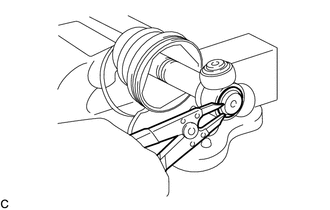
Using a snap ring expander, install a new rear drive shaft snap ring to the rear drive outboard joint shaft assembly.
Pack the rear drive shaft inboard joint assembly and rear drive shaft inboard joint boot with grease.
- Standard Grease Capacity:
134 to 144 g (4.73 to 5.08 oz)
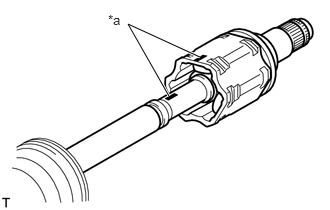
| *a | Matchmark |
Align the matchmarks and install the rear drive shaft inboard joint assembly to the rear drive outboard joint shaft assembly.
3.INSTALL REAR DRIVE SHAFT INBOARD JOINT BOOT
Install the rear drive shaft inboard joint boot to the rear drive shaft inboard joint assembly.
- NOTICE:
- ·
Keep the grooves free of grease.
·Keep the inside of the rear drive shaft inboard joint boot free of foreign matter.
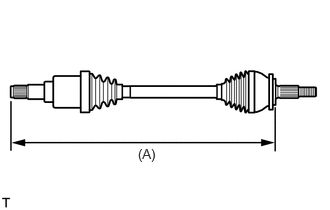
Check whether the dimension (A) of each drive shaft is within specification.
- Dimension (A):
for LH Side 739.4 to 743.4 cm (2.43 to 2.44 ft.) for RH Side 734.4 to 738.4 cm (2.41 to 2.42 ft.)
While keeping dimension (A) within the specified length, equalize the pressure within the inboard joint with atmospheric pressure by slightly lifting the rear drive shaft inboard joint boot from the rear drive shaft inboard joint assembly.
42347D
4.INSTALL REAR DRIVE SHAFT INBOARD JOINT BOOT CLAMP
Install the rear drive shaft inboard joint boot clamp to the rear drive shaft inboard joint boot.
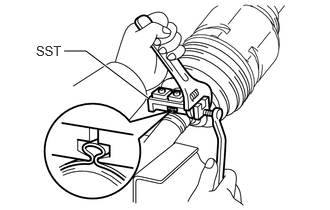
Place SST onto the rear drive shaft inboard joint boot clamp, press it against the boot and slightly tighten SST.
- SST
- 09521-24010
Tighten SST so that the rear drive shaft inboard joint boot clamp is pinched.
- NOTICE:
-
Do not overtighten SST.
Remove SST.
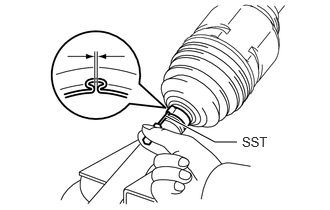
Using SST, measure the clearance of the rear drive shaft inboard joint boot clamp.
- SST
- 09240-00021
- Standard Clearance:
Below 1.3 mm (0.0512 in.)
If the clearance is not as specified, retighten SST.
42347F
5.INSTALL REAR NO. 2 DRIVE SHAFT INBOARD JOINT BOOT CLAMP
Install the rear No. 2 drive shaft inboard joint boot clamp to the rear drive shaft inboard joint boot.
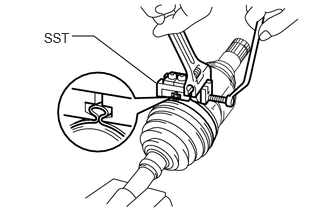
Place SST onto the rear No. 2 drive shaft inboard joint boot clamp, press it against the boot and slightly tighten SST.
- SST
- 09521-24010
Tighten SST so that the rear No. 2 drive shaft inboard joint boot clamp is pinched.
- NOTICE:
-
Do not overtighten SST.
Remove SST.
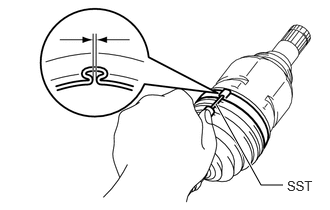
Using SST, measure the clearance of the rear No. 2 drive shaft inboard joint boot clamp.
- SST
- 09240-00021
- Standard Clearance:
Below 2.1 mm (0.0827 in.)
If the clearance is not as specified, retighten SST.
6.INSPECT REAR DRIVE SHAFT ASSEMBLY