FRONT SUSPENSION FRONT SHOCK ABSORBER REMOVAL
CAUTION / NOTICE / HINT
The necessary procedures (adjustment, calibration, initialization, or registration) that must be performed after parts are removed, installed, or replaced during the front shock absorber assembly removal/installation are shown below.
| Replacement Part or Procedure | Necessary Procedure | Effect/Inoperative when not Performed | Link |
|---|---|---|---|
| Front wheel alignment adjustment | for HV Model:
1.
Perform "Reset Memory" 2.
Perform calibration (linear solenoid valve offset learning, SM solenoid valve offset learning, brake pedal stroke sensor assembly zero point calibration, system information memorization, and yaw rate and acceleration sensor zero point calibration) |
·
DTCs are stored ·
ABS warning light illuminates ·
Brake system warning light (yellow indicator) ·
Slip indicator light illuminates ·
VSC disabled or malfunctions |
for TMC Made:
(  ) for TMMF Made: ( )
|
| for Gasoline Model:
Calibration |
·
DTCs are stored ·
ABS warning light illuminates ·
Slip indicator light illuminates ·
VSC disabled or malfunctions |
for TMC Made:
( )
for TMMF Made: ( )
|
|
| except G16E-GTS:
Suspension, tires, etc. (The vehicle height changes because of suspension or tire replacement.) |
·
Ultrasonic sensor detection angle ·
Ultrasonic sensor detection angle registration |
Parking support brake system | ()
|
| Rear television camera assembly optical axis (Back camera position setting) | Parking assist monitor system | ()
|
- HINT:
- ·
Use the same procedure for the RH side and LH side.
·The following procedure is for the LH side.
PROCEDURE

 1.REMOVE FRONT WHEEL
48810
2.SEPARATE FRONT STABILIZER LINK ASSEMBLY
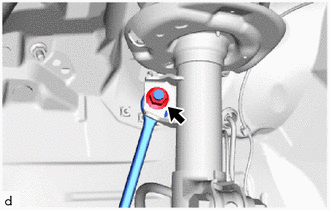
Remove the nut to separate the front stabilizer link assembly from the front shock absorber with coil spring.
- HINT:
-
If the ball joint turns together with the nut, use a 6 mm hexagon socket wrench to hold the stud bolt.
89543
3.SEPARATE FRONT SPEED SENSOR
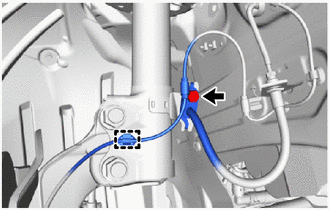
Remove the bolt, disengage the clamp and separate the front speed sensor and front flexible hose from the front shock absorber assembly.
- NOTICE:
-
Be sure to separate the front speed sensor and front flexible hose from the front shock absorber assembly completely.
48684B
4.REMOVE FRONT SUSPENSION SUPPORT DUST COVER
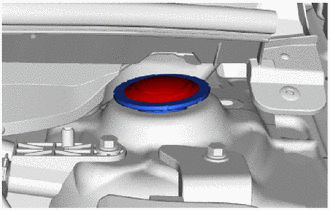
Remove the front suspension support dust cover from the front shock absorber with coil spring.
5.REMOVE FRONT SHOCK ABSORBER WITH COIL SPRING
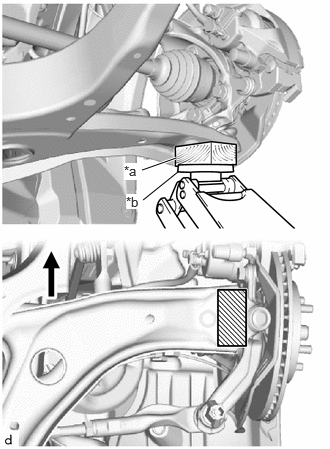
| *a | Wooden Block |
| *b | Jack |

|
Front of the Vehicle |

|
Wooden Block Placement Location |
Support the front lower No. 1 suspension arm sub-assembly using a jack and wooden block.
- NOTICE:
-
Keep the front lower No. 1 suspension arm sub-assembly supported until installation of the front shock absorber with coil spring is complete.
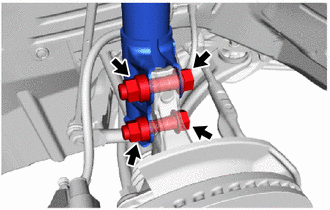
Remove the 2 bolts and 2 nuts, to separate the front shock absorber with coil spring from the steering knuckle.
- NOTICE:
- ·
When removing the nuts, keep the bolts from rotating.
·Use wire or an equivalent tool to hang the separated steering knuckle.
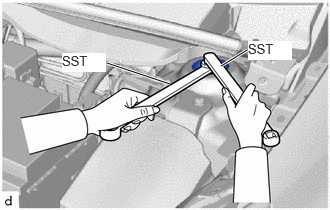
Using SST, fix the front shock absorber rod and remove the nut.
- SST
- 09729-00170
09729-38060
Remove the front No. 2 suspension support.
Remove the front shock absorber with coil spring from the vehicle.
48609E
6.REMOVE FRONT SUPPORT TO FRONT SHOCK ABSORBER NUT
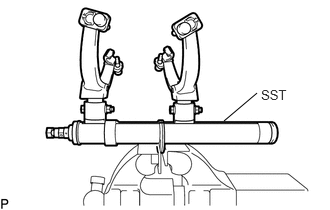
Secure SST in a vise.
- SST
- 09727-30022 (09727-00010, 09727-00022, 09727-00031)
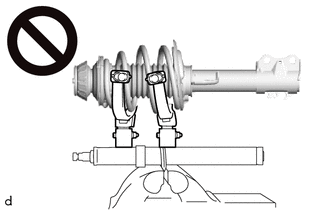
Attach the hooks of each SST arm across the diameter of the front coil spring.
- CAUTION:
- ·
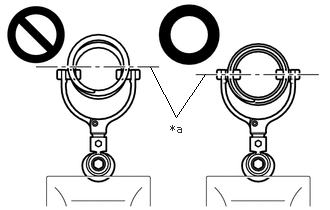 1.563,0.698 1.833,1.219 1.833,1.219 2.135,0.771 false 1.771,1.271 2.083,1.469 0.313,0.198 10 false *a
*a Front Coil Spring Diameter
Do not perform the work without checking to make sure that the claws of the hooks are securely engaged.
·It could cause the hook to slip off and the spring to fly out, which could result in an injury.
·
Do not install SST to the front coil spring unless its top and bottom hook distance is set to the widest condition.
·It could cause the hook to slip off and the spring to fly out, which could result in an injury.
·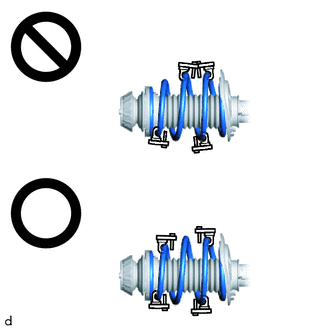
Do not install SST when the distances between the SST arms or the number of coils of the coil spring between the hooks are not the same.
·It could cause the hook to slip off and the spring to fly out, which could result in an injury.
Install the stopper pins to the hooks of SST.
- CAUTION:
- ·
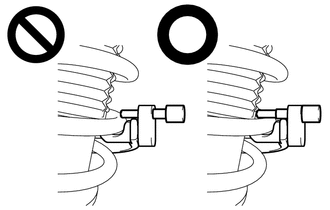
Do not perform the work if the stopper pin is not securely installed.
·It could cause the hook to slip off and the spring to fly out, which could result in an injury.
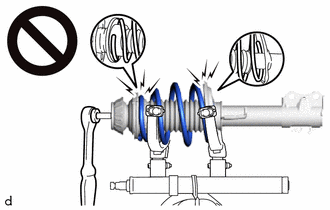
Using SST, compress the front coil spring.
- CAUTION:
- ·
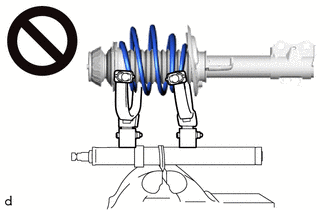
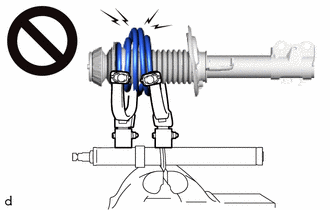
While compressing the spring, if the front coil spring starts to bend into a bow shape, do not continue the work.
·It could cause the hook to slip off and the spring to fly out, which could result in an injury.
·
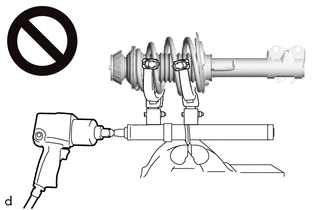
Do not compress the springs so far that the coils of the springs touch each other.
·It could cause the hook to slip off and the spring to fly out, which could result in an injury.
·
Do not use an impact wrench.
·The threads may be stripped, or the sudden compression may result in slack that causes the hooks to slip off, causing the spring to fly out and possibly resulting in injury.
·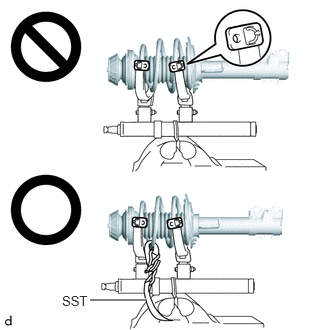 0.938,3.125 1.521,3.125 true 0.646,3.052 1.104,3.25 0.458,0.198 10 false SST
If a stopper pin touches the coil spring while using SST, remove the stopper pin and continue with the procedure.
·If a stopper pin is removed, install a coil spring stopper belt as shown in the illustration.
·If a hook disengages from the coil spring, the coil spring may fly out, resulting in injury.
- SST
- 09727-00110
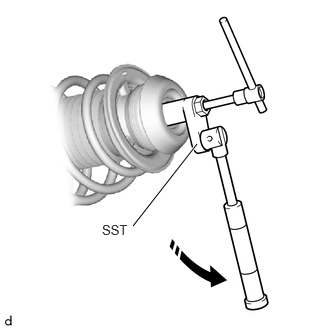
Check that the front coil spring has become free, and using SST and a 6 mm hexagon socket wrench, remove the front support to front shock absorber nut.
- SST
- 09729-97202
- CAUTION:
- ·
If the front coil spring has not become free, do not remove the front support to front shock absorber nut.
·The spring force will cause the components to be scattered, possibly resulting in injury.
48609
7.REMOVE FRONT SUSPENSION SUPPORT SUB-ASSEMBLY
Remove the front suspension support sub-assembly from the front shock absorber assembly.
48619A
8.REMOVE STRUT MOUNTING BEARING
Remove the strut mounting bearing from the front upper coil spring seat.
48471C
9.REMOVE FRONT UPPER COIL SPRING SEAT
Remove the front upper coil spring seat from the front shock absorber assembly.
48559B
10.REMOVE FRONT NO. 1 SHOCK ABSORBER DUST COVER
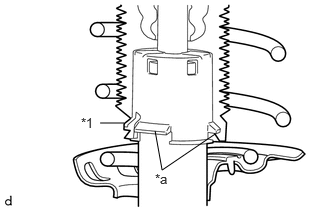
| *1 | Front No. 1 Shock Absorber Dust Cover |
| *a | Claw |
Disengage the end of the front No. 1 shock absorber dust cover from the claws of the front shock absorber assembly.
Remove the front No. 1 shock absorber dust cover with front upper coil spring insulator from the front shock absorber assembly.
48157C
11.REMOVE FRONT UPPER COIL SPRING INSULATOR
Remove the front upper coil spring insulator from the front No. 1 shock absorber dust cover.
48132
12.REMOVE FRONT COIL SPRING
Remove the front coil spring and SST.
- NOTICE:
-
Do not use an impact wrench. It will damage SST.
48331C
13.REMOVE FRONT SPRING BUMPER
Remove the front spring bumper from the front shock absorber assembly.
48158C
14.REMOVE FRONT LOWER COIL SPRING INSULATOR
Remove the front lower coil spring insulator from the front shock absorber assembly.
48510
15.REMOVE FRONT SHOCK ABSORBER ASSEMBLY