EXTERIOR PANELS / TRIM FRONT BUMPER(for 5 Door) REASSEMBLY
PROCEDURE

 52618
1.INSTALL FRONT BUMPER LOWER ABSORBER
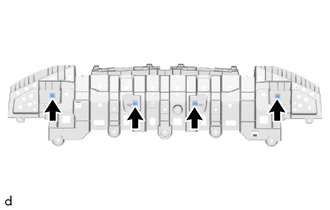
Install the 4 grommets.
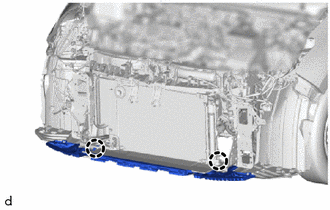
Engage the claws to install the front bumper lower absorber.
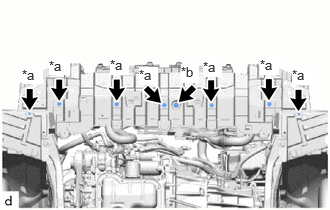
| *a | screw |
| *b | clip |
Install the clip and 7 screws.
51451A
2.INSTALL CENTER ENGINE UNDER COVER
52103A
3.INSTALL FRONT BUMPER EXTENSION SUB-ASSEMBLY LH (for TMMF, TMMCZ Made)
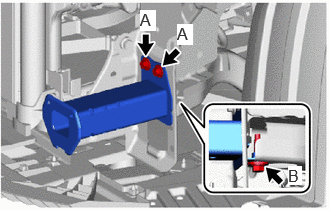
Install the front bumper extension sub-assembly LH with 3 bolts.
- Torque:
- Bolt A : 10 N*m (102 kgf*cm, 7 ft.*lbf)
- Bolt B : 30 N*m (306 kgf*cm, 266 in.*lbf)
52102B
4.INSTALL FRONT BUMPER EXTENSION SUB-ASSEMBLY RH (for TMMF, TMMCZ Made)
- HINT:
-
Use the same procedure as for the LH side.
57014C
5.INSTALL FRONT SIDE MEMBER BRACKET SUB-ASSEMBLY LH
If install a new front side member bracket sub-assembly LH:
Temporarily install the front side member bracket sub-assembly LH with the 5 bolts until the "reference value" and " point-to-point distance" are aligned.
Vehicle Exterior > BODY PANEL > RADIATOR SUPPORT(for 5 Door) > REFERENCE VALUE
Vehicle Exterior > BODY DIMENSIONS > ENGINE COMPARTMENT REFERENCE VALUES(for 5 Door) > POINT-TO-POINT DISTANCE
If reusing the front side member bracket sub-assembly LH:
Temporarily install the front side member bracket sub-assembly LH with the 5 bolts until the matchmarks are aligned.
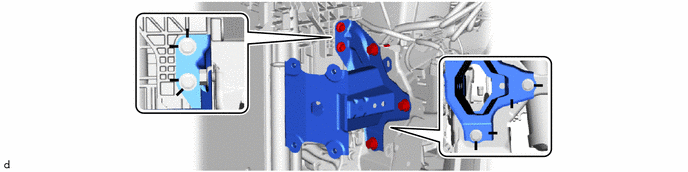
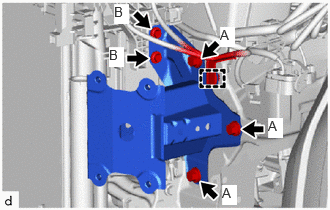
Tighten the 5 bolts.
- Torque:
- Bolt A : 30 N*m (306 kgf*cm, 22 ft.*lbf)
- Bolt B : 7.1 N*m (72 kgf*cm, 63 in.*lbf)
Engage the clamp.
57013D
6.INSTALL FRONT SIDE MEMBER BRACKET SUB-ASSEMBLY RH
If install a new front side member bracket sub-assembly RH:
Temporarily install the front side member bracket sub-assembly RH with the 5 bolts until the "reference value" and " point-to-point distance" are aligned.
Vehicle Exterior > BODY PANEL > RADIATOR SUPPORT(for 5 Door) > REFERENCE VALUE
Vehicle Exterior > BODY DIMENSIONS > ENGINE COMPARTMENT REFERENCE VALUES(for 5 Door) > POINT-TO-POINT DISTANCE
If reusing the front side member bracket sub-assembly RH:
Temporarily install the front side member bracket sub-assembly RH with the 5 bolts until the matchmarks are aligned.
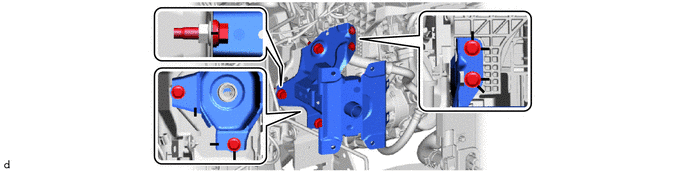
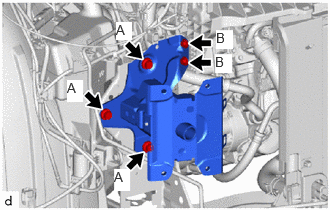
Tighten the 5 bolts.
- Torque:
- Bolt A : 30 N*m (306 kgf*cm, 22 ft.*lbf)
- Bolt B : 7.1 N*m (72 kgf*cm, 63 in.*lbf)
16595D
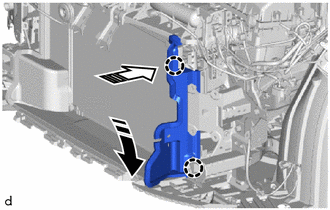
7.INSTALL NO. 1 RADIATOR AIR GUIDE LH

|
Install in this Direction (1) |

|
Install in this Direction (2) |
Engage the claws to Install the No. 1 radiator air guide LH as shown in the illustration.
16561D
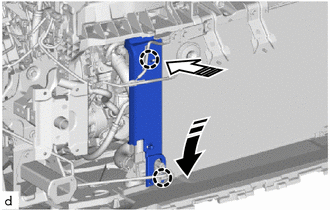
8.INSTALL NO. 1 RADIATOR TO SUPPORT SEAL
|
|
Install in this Direction (1) |
|
|
Install in this Direction (2) |
Engage the claws to install the No. 1 radiator to support seal as shown in the illustration.
16562L
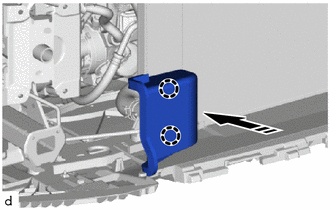
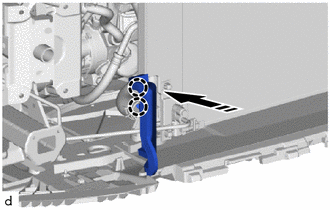
9.INSTALL NO. 2 RADIATOR TO SUPPORT SEAL
for Gasoline Model:
|
|
Install in this Direction |
Engage the claws to install the No. 2 radiator to support seal as shown in the illustration.
for HV Model:
|
|
Install in this Direction |
Engage the claws to install the No. 2 radiator to support seal as shown in the illustration.
16695A
10.INSTALL FRONT RADIATOR SIDE AIR GUIDE PLATE LH
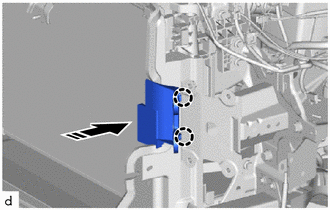
|
|
Install in this Direction |
Engage the claws to install the front radiator side air guide plate LH as shown in the illustration.
16691A
11.INSTALL FRONT RADIATOR SIDE AIR GUIDE PLATE RH
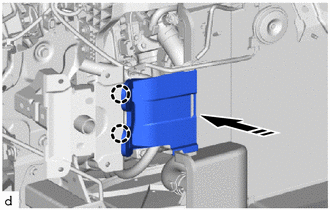
|
|
Install in this Direction |
Engage the claws to install the front radiator side air guide plate RH as shown in the illustration.
52131A
12.INSTALL FRONT BUMPER REINFORCEMENT
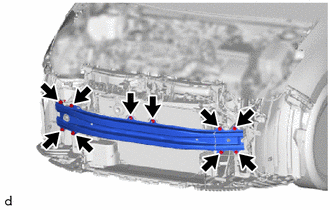
Install the front bumper reinforcement with 8 bolts and 2 nuts.
- Torque:
- Bolt : 30 N*m (306 kgf*cm, 22 ft.*lbf)
- Nut : 7.1 N*m (72 kgf*cm, 63 in.*lbf)
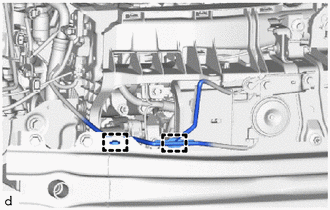
Engage the wire harness clamps.
88790B
13.INSTALL THERMISTOR ASSEMBLY
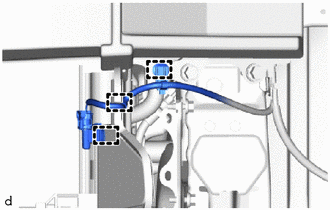
Engage the clamps to install the thermistor assembly.
52611
14.INSTALL FRONT BUMPER ENERGY ABSORBER
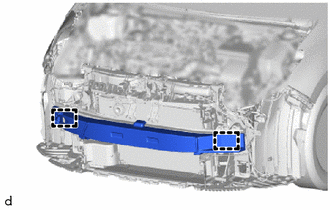
Engage the guides to install the front bumper energy absorber.
16681A
15.INSTALL RADIATOR UPPER AIR GUIDE PLATE
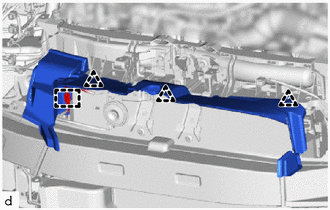
Engage the clips to install the radiator upper air guide plate.
Engage the wire harness clamp.
52536
16.INSTALL FRONT BUMPER SIDE RETAINER LH
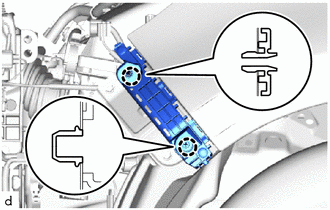
Engage the 2 claws to install the front bumper side retainer LH.
52535
17.INSTALL FRONT BUMPER SIDE RETAINER RH
- HINT:
-
Use the same procedure as for the LH side.
18.INSTALL HEADLIGHT ASSEMBLY LH
for Halogen Headlight:
Click hereVehicle Exterior>LIGHTING (EXT)>HEADLIGHT ASSEMBLY (for Halogen Headlight)>INSTALLATION
for LED Headlight:
Click hereVehicle Exterior>LIGHTING (EXT)>HEADLIGHT ASSEMBLY (for LED Headlight)>INSTALLATION
19.INSTALL HEADLIGHT ASSEMBLY RH
- HINT:
-
Use the same procedure as for the LH side.
53879H
20.INSTALL FRONT FENDER LINER RETAINER
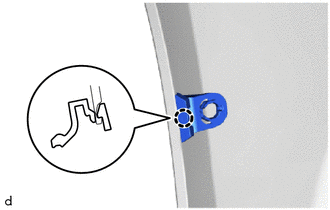
Engage the claw to install the front fender liner retainer.
- HINT:
-
Use the same procedure for the RH side and LH side.
53112E
21.INSTALL NO. 1 LOWER RADIATOR GRILLE
for TMC Made:
Engage the claws to install the No. 1 lower radiator grille.
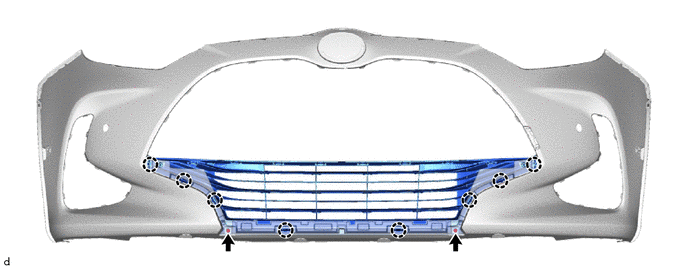
Install the 2 screws.
except TMC Made:
Engage the claws to install the No. 1 lower radiator grille.
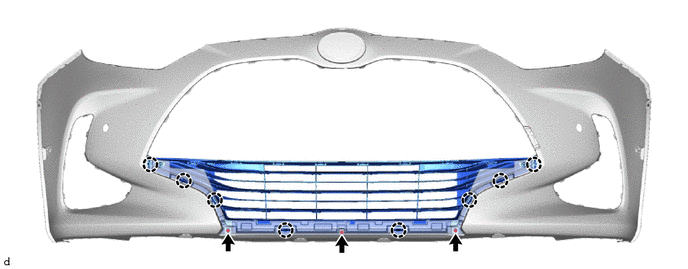
Install the 3 screws.
53101
22.INSTALL RADIATOR GRILLE SUB-ASSEMBLY
for TMC Made:
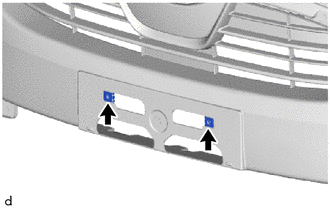
Install the 2 nuts.
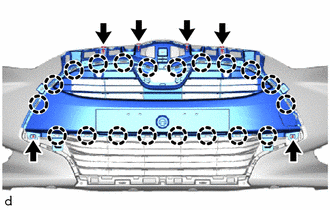
Engage the claws to install the radiator grille sub-assembly.
Install the 4 clips and 2 screws.
53155D
23.INSTALL NO. 1 RADIATOR GRILLE SEAL
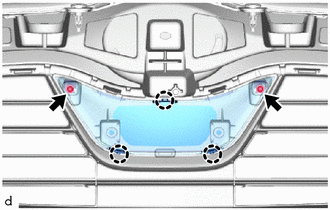
Engage the claws to install the No. 1 radiator grille seal.
Install the 2 screws.
53395E
24.INSTALL HOOD TO FRONT END PANEL SEAL
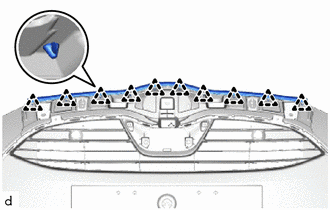
Engage the clips to install the hood to front end panel seal.
52129D
25.INSTALL FRONT BUMPER LOWER COVER
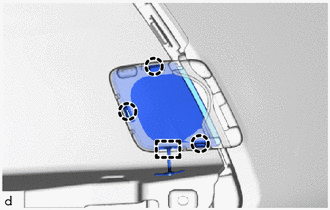
Engage the hook to install the front bumper lower cover.
Engage the claws.
52127C
26.INSTALL FRONT BUMPER HOLE COVER
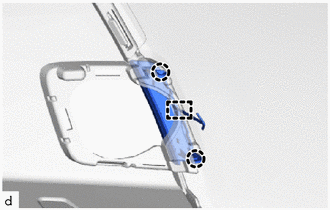
Engage the hook to install the front bumper hole cover.
Engage the claws.
52113D
27.INSTALL FRONT BUMPER EXTENSION LH (w/ Fog Light)
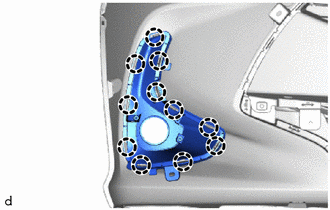
Engage the claws to install the front bumper extension LH.
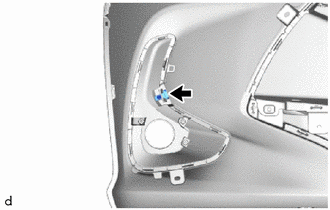
Install the moulding retainer.
52112D
28.INSTALL FRONT BUMPER EXTENSION RH (w/ Fog Light)
- HINT:
-
Use the same procedure as for the LH side.
52113D
29.INSTALL FRONT BUMPER EXTENSION LH (w/o Fog Light)
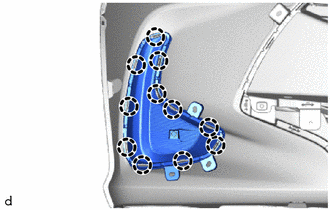
Engage the claws to install the front bumper extension LH.
52112D
30.INSTALL FRONT BUMPER EXTENSION RH (w/o Fog Light)
- HINT:
-
Use the same procedure as for the LH side.
81220
31.INSTALL FOG LIGHT ASSEMBLY LH
for LED Type:
Click hereVehicle Exterior>LIGHTING (EXT)>FOG LIGHT ASSEMBLY (for 5 Door)>INSTALLATION
for Bulb Type:
Click hereVehicle Exterior>LIGHTING (EXT)>FOG LIGHT ASSEMBLY (for 5 Door)>INSTALLATION
81210A
32.INSTALL FOGLIGHT ASSEMBLY RH
- HINT:
-
Use the same procedure as for the LH side.
82824
33.INSTALL WIRING HARNESS CONNECTOR (w/o Parking Support Brake System)
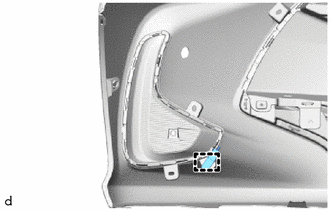
Engage the clamp to install the wiring harness connector.
75311
34.INSTALL RADIATOR GRILLE (OR FRONT PANEL) EMBLEM
- HINT:
-
When installing the radiator grille (or front panel) emblem, heat the front bumper assembly and radiator grille (or front panel) emblem a heat light.
Item Temperature ·Front Bumper Assembly
·Radiator Grille (or front panel) Emblem
20 to 30°C (68 to 86°F)
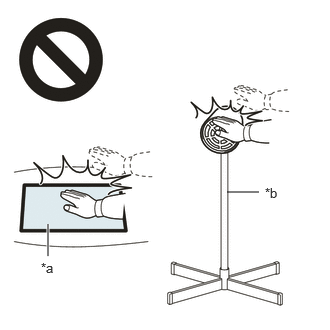
- CAUTION:
-
 2.365,2 2.698,2 false 0.5,2.333 0.5,2.667 true 0.427,2.708 0.74,2.865 0.313,0.156 10 false *a 2.76,1.927 3.073,2.083 0.313,0.156 10 false *b
*a Heated Part *b Heat Light
- ·
Do not touch the heat light and heated parts, touching the heat light may result in burns.
·Touching heated parts for a long time may result in burns.
- NOTICE:
-
Do not heat the front bumper assembly and radiator grille (or front panel) emblem excessively.
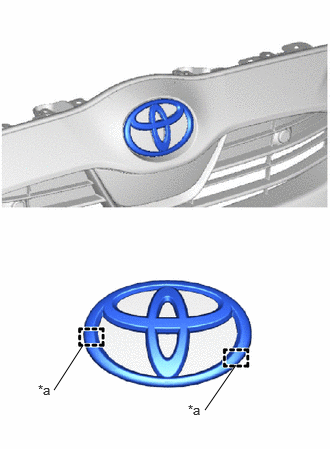
| *a | Location Pin |
Clean the front bumper assembly surface.
Using a heat light, heat the front bumper assembly surface.
Remove any remaining double-sided tape from the front bumper assembly.
Wipe off any tape adhesive residue with cleaner.
Using a heat light, heat the front bumper assembly and a new radiator grille (or front panel) emblem.
Remove the release paper from the radiator grille (or front panel) emblem.
- HINT:
-
After removing the release paper, keep the exposed adhesive free from foreign matter.
Engage the location pins and install the radiator grille (or front panel) emblem as shown in the illustration.
82113
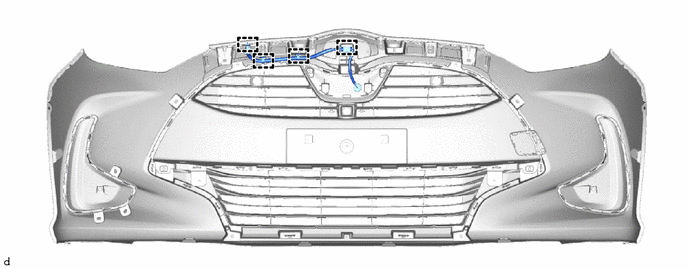
35.INSTALL NO. 3 ENGINE ROOM WIRE (w/ Wire Harness)
for TMC Made with Parking Support Brake System:
Engage the clamps to install the No. 3 engine room wire.
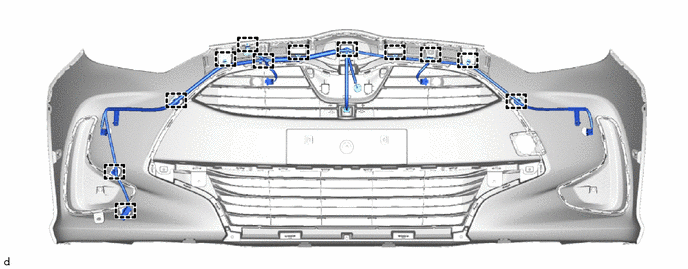
for TMMF, TMMCZ Made with Parking Support Brake System:
Engage the clamps to install the No. 3 engine room wire.
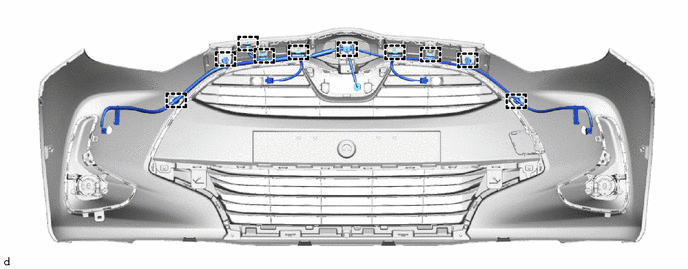
w/o Parking Support Brake System:
Engage the clamps to install the No. 3 engine room wire.
88211B
36.INSTALL MILLIMETER WAVE RADAR SENSOR ASSEMBLY (w/ Toyota Safety Sense 2)
89347B
37.INSTALL FRONT CORNER ULTRASONIC SENSOR RETAINER (w/ Parking Support Brake System)
89341L
38.INSTALL FRONT CENTER ULTRASONIC SENSOR (w/ Parking Support Brake System)
89341K
39.INSTALL FRONT CORNER ULTRASONIC SENSOR (w/ Parking Support Brake System)
89348N
40.INSTALL NO. 1 ULTRASONIC SENSOR CLIP (w/ Parking Support Brake System)