ON-VEHICLE INSPECTION
Inspection · Vehicles built from Aug 2005
| INSPECT SPEEDOMETER |

Check the operation.
Using a speedometer tester, inspect the speedometer and confirm that the speedometer readings are within the acceptable range. Also check the odometer operation.
- Reference:
- km/h (Except Australia):
Standard Indication
Acceptable Range
20 km/h
21 to 25 km/h
40 km/h
41.7 to 46.2 km/h
60 km/h
62.7 to 67.2 km/h
80 km/h
83.4 to 88.4 km/h
100 km/h
104.3 to 109.3 km/h
120 km/h
125.1 to 130.6 km/h
140 km/h
145.8 to 151.8 km/h
160 km/h
166.2 to 173.2 km/h
- mph:
Standard Indication
Acceptable Range
20 mph
21 to 23.5 mph
40 mph
42 to 44.5 mph
60 mph
62.5 to 66 mph
80 mph
83.1 to 87.1 mph
100 mph
103.9 to 108.4 mph
120 mph
124.7 to 129.6 mph
- km/h(Australia):
Standard Indication
Acceptable Range
20 km/h
20.6 to 24.6 km/h
40 km/h
41.1 to 45.1 km/h
60 km/h
61.7 to 65.9 km/h
80 km/h
82.2 to 86.2 km/h
100 km/h
102.8 to 108.8 km/h
120 km/h
123.3 to 129.3 km/h
140 km/h
143.9 to 149.9 km/h
160 km/h
164.4 to 170.4 km/h
180 km/h
185 to 191 km/h
- NOTICE:
- Tire wear and excessively high or low tire pressure affect speedometer indications.
Check the deflection of the speedometer indicator.
- Reference:
- Below 0.5 km/h (0.3 mph)
| INSPECT TACHOMETER |
Connect the intelligent tester to the DLC3.
Turn the ignition switch on (IG) and turn the tester on.
Select the item below from the Data List and read the value displayed on the intelligent tester.
ECM Item
Measurement Item/ Range(Display)
Normal Condition
Diagnostic Note
Engine Rpm
Engine speed / Min.: 0 rpm, Max.: 12,750 rpm
Approximately same as actual engine speed (When engine is running)
-
Compare the engine speed displayed on the tester with the tachometer reading.
- Reference:
Standard Indication
Acceptable Range
[Data in ( ) are for reference]
700 r/min
630 to 770 r/min
1,000 r/min
(900 to 1,100 r/min)
2,000 r/min
(1,850 to 2,150 r/min)
3,000 r/min
2,800 to 3,200 r/min
4,000 r/min
(3,800 to 4,200 r/min)
5,000 r/min
4,800 to 5,200 r/min
6,000 r/min
(5,750 to 6,250 r/min)
7,000 r/min
(67,00 to 7,300 r/min)
| INSPECT FUEL RECEIVER GAUGE |
Disconnect the J5 fuel sender gauge connector.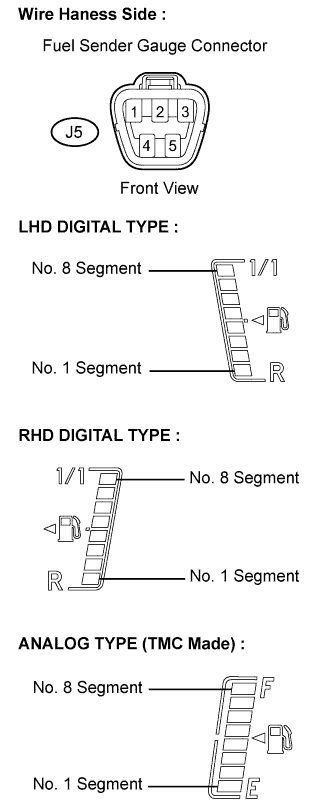

Check the fuel receiver gauge operation when the ignition switch is turned on (IG).
- OK:
- No. 1 segment flashes.
Connect terminals 2 and 3 on the wire harness side connector of the fuel sender gauge.
Check the fuel receiver gauge operation when the ignition switch is turned from off to on (IG).
- OK:
- All segments, from No. 1 to No. 8, illuminate.
Reconnect the fuel sender gauge connector.
| INSPECT FUEL LEVEL WARNING LIGHT |
 |
Disconnect the J5 fuel sender gauge connector.
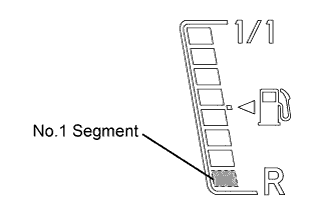
Turn the ignition switch on (IG), and check that the receiver gauge No. 1 segment flashes when the fuel volume is less than 6.3 liters (less than 15 % of the total fuel tank capacity).
- OK:
Fuel Volume
Flashing Speed (Interval)
6.3 liters (Less than 15 % of total fuel tank capacity)
Flashes slowly (1.2 seconds)
4.2 liters (Less than 10 % of total fuel tank capacity)
Flashes quickly (0.6 seconds)
| INSPECT ENGINE OIL PRESSURE WARNING LIGHT |
Disconnect the engine oil pressure switch connector.
Turn the ignition switch on (IG).
Ground the terminal of the wire harness side connector, then check the engine oil pressure warning light.
- OK:
- Engine oil pressure warning light illuminates.
Reconnect the engine oil pressure switch connector.
| INSPECT BRAKE WARNING LIGHT |
Inspect the parking brake warning light.
Disconnect the parking brake switch connector.
Turn the ignition switch on (IG).
Ground the terminal of the wire harness side connector, then check the parking brake warning light.
- OK:
- Brake warning light illuminates.
Reconnect the parking brake switch connector.
Inspect the brake fluid level warning light.
Disconnect the brake fluid level warning switch connector.
Turn the ignition switch on (IG).
Connect a terminal to the other terminal of the wire harness side connector, then check the brake fluid level warning light.
- OK:
- Brake warning light illuminates.
Reconnect the brake fluid level warning switch connector.
| INSPECT BRAKE FLUID LEVEL WARNING SWITCH |
Remove the reservoir tank cap and strainer.
Disconnect the brake fluid level warning switch connector.
Measure the resistance between the terminals.
- Standard resistance:
- Float inside reservoir tank is in high position (switch OFF): 10 kΩ or higher
Use a syphon or a similar tool to drain fluid out of the reservoir tank.
Measure the resistance between the terminals.
- Standard resistance:
- Float inside reservoir tank is in low position (switch ON): Below 1 Ω
Pour the fluid back into the reservoir tank.
Reconnect the brake fluid level warning switch connector.
Reinstall the reservoir tank cap and strainer.
| INSPECT ENGINE COOLANT TEMPERATURE WARNING LIGHT |
Disconnect the engine coolant temperature sensor connector.
Turn the ignition switch on (IG).
Connect a terminal to the other terminal of the wire harness side connector, then check the engine coolant temperature warning light.
- OK:
- Engine coolant temperature warning light illuminates.
Reconnect the engine coolant temperature sensor connector.
- NOTICE:
- DTCs may have been set. Check for DTCs and clear any that have been set.
| INSPECT ENGINE COOLANT TEMPERATURE INDICATOR LIGHT |
Disconnect the engine coolant temperature sensor connector.
Turn the ignition switch on (IG).
- OK:
- Engine coolant temperature indicator light illuminates.
Reconnect the engine coolant temperature sensor connector.
- NOTICE:
- DTCs may have been set. Check for DTCs and clear any that have been set.
| INSPECT OIL MAINTENANCE INDICATOR RESETTING PROCEDURE (for 1ND-TV) |
Set the window display located inside the combination meter to the Trip A indication.
Turn the ignition switch off.
While pressing the ODO/TRIP display change switch (reset switch) (for at least 5 seconds), turn the ignition switch on (IG).
When the reset procedure has been completed successfully, the OIL MAINT indicator light turns off and the ODO/TRIP meter indicates 0 (zero) and then returns to its regular display.
- HINT:
- If the reset fails, the OIL MAINT indicator light remains illuminated. Perform the procedure again.
| INSPECT ENGINE OIL LEVEL WARNING LIGHT (for 1ND-TV) |
Turn the ignition switch on (IG).
Wait until the engine coolant temperature goes over 80°C (176°F)
Turn the ignition switch off.
Disconnect the connector from the engine oil level sensor.
Turn the ignition switch on (IG).
- OK:
- Engine oil level warning light comes on approximately 40 seconds after turning the ignition switch on (IG).
| INSPECT FUEL FILTER WARNING LIGHT (for 1ND-TV) |
Disconnect the connector from the fuel filter warning switch.
Turn the ignition switch on (IG).
Ground the terminal of the wire harness side connector, then check the fuel filter warning light.
- OK:
- Fuel filter warning light comes on when all of the conditions below are detected.
- HINT:
- The ignition switch on (IG).
- The ignition switch on (IG).
- Fuel filter warning switch detects a malfunction.
- Fuel filter warning switch detects a malfunction.
- Accumulated running time is 30 minutes or more.
- Accumulated running time is 30 minutes or more.