Front Passenger Side Door Entry Unlock Function does not Operate
Circuit diagnosis · Vehicles built from Aug 2005
DESCRIPTION
- LHD:
- RHD:
WIRING DIAGRAM
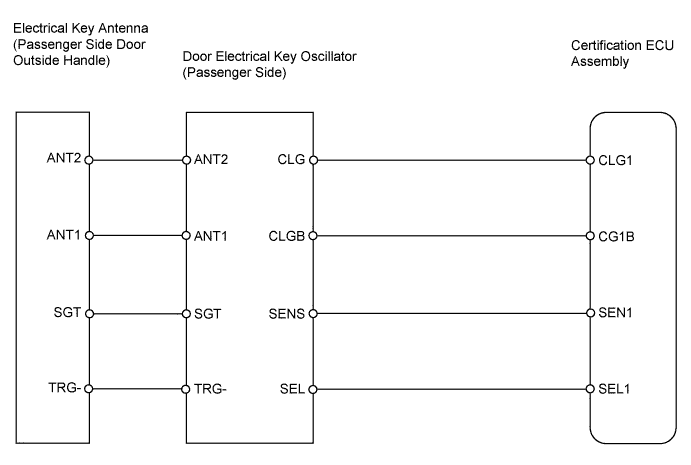

INSPECTION PROCEDURE
| 1. CHECK DTC OUTPUT |

Connect the intelligent tester to the DLC3.
Turn the ignition switch on (IG) and turn the tester ON.
By following the tester screen display, check whether any DTCs are output.
- OK:
- No DTC output.
|
|
||||

| OK | |
 |
| 2. CHECK MANUAL DOOR UNLOCK OPERATION |
Check that the manual door unlock function operates normally.
- OK:
- Manual door unlock function operates normally.
|
|
||||
| OK | |
|
| 3. CHECK WIRELESS DOOR LOCK AND UNLOCK OPERATION |
Check that the wireless door lock and unlock functions operate normally.
- OK:
- Wireless door lock and unlock functions operate normally.
|
|
||||
| OK | |
|
| 4. READ VALUE OF DATA LIST (DOOR COURTESY LIGHT SWITCH (PASSENGER SIDE)) |
Check the Data List for proper functioning of the front passenger side door courtesy switch.
Main body ECU: Item
Measurement Item / Range (Display)
Normal Condition
Diagnostic Note
P Door Courtesy SW
Passenger side courtesy switch / ON or OFF
ON: Courtesy switch is pushed
OFF: Courtesy switch is not pushed
-
- OK:
- ON (door courtesy switch is pushed) appears on the screen.
|
|
||||
| OK | |
|
| 5. READ VALUE OF DATA LIST (LOCK POSITION SWITCH (PASSENGER SIDE)) |
Check the Data List for proper functioning of the door lock position switch.
Main body ECU: Item
Measurement Item / Range (Display)
Normal Condition
Diagnostic Note
P-Door Lock Pos SW
Passenger side door unlock detection switch signal/ ON or OFF
ON: Door is unlocked
OFF: Door is locked
-
- OK:
- ON (door is unlocked) appears on the screen.
|
|
||||
| OK | |
|
| 6. PERFORM ACTIVE TEST BY INTELLIGENT TESTER (FRONT PASSENGER SIDE SELECT) |
Select the Active Test, use the intelligent tester to generate a control command, and then check that the door electrical key oscillator operates.
Certification ECU: Item
Test Details
Diagnostic Note
P Select Sig
Passenger side select ON / OFF
-
- OK:
- ON (P Select Sig is ON) appears on the screen.
|
|
||||
| OK | |
|
| 7. READ VALUE OF DATA LIST (TOUCH SENSOR (PASSENGER SIDE)) |
With "P Select Sig" ON, check the Data List to confirm the operation of the touch sensor.
Certification ECU: Item
Measurement Item / Range (Display)
Normal Condition
Diagnostic Note
P Touch Sensor
Passenger side door touch sensor / ON or OFF
ON: Sensor is touched
OFF: Sensor is not touched
-
- OK:
- When passenger side door touch sensor is set to ON, ON (Sensor is touched) appears on the screen.
|
|
||||

| OK | |
|
| 8. CHECK OPERATION OF OPERATION OF CERTIFICATION ECU ASSEMBLY |
After replacing the certification ECU assembly with a normal one, check that the entry unlock function operates normally.
- OK:
- Entry unlock function operates normally.
|
|
||||
| OK | ||
 |
||
| ||
| 9. CHECK DOOR ELECTRICAL KEY OSCILLATOR (PASSENGER SIDE) |
Measure the voltage of the oscillator connector.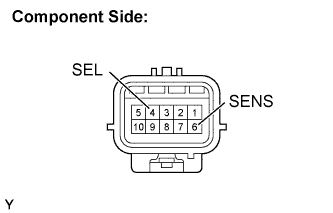
- Standard voltage:
Tester Connection
Condition
Specified Condition
4 (SEL) - Body ground
During Active Test
Below 1 V
6 (SENS) - Body ground
Touch sensor is touched during Active Test
Below 1 V
|
|
||||
| NG | |
|
| 10. CHECK HARNESS AND CONNECTOR (DOOR ELECTRICAL KEY OSCILLATOR - ELECTRICAL KEY ANTENNA) |
Disconnect the R2 or S2 oscillator connector.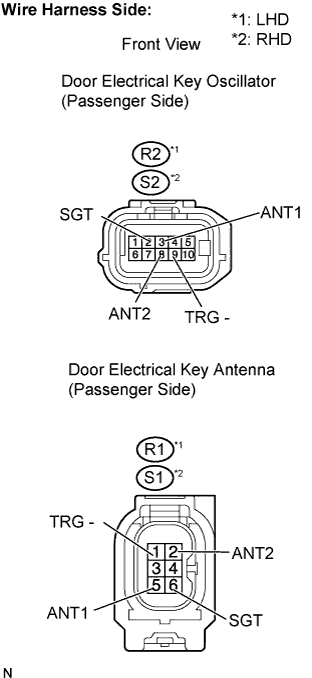
Disconnect the R1 or S1 antenna connector.
Measure the resistance of the wire harness side connectors.
- Standard resistance:
LHD Tester Connection
Specified Condition
R2-2 (SGT) - R1-6 (SGT)
Below 1 Ω
R2-3 (ANT1) - R1-5 (ANT1)
Below 1 Ω
R2-8 (ANT2) - R1-2 (ANT2)
Below 1 Ω
R2-9 (TRG-) - R1-1 (TRG-)
Below 1 Ω
RHD Tester Connection
Specified Condition
S2-2 (SGT) - S1-6 (SGT)
Below 1 Ω
S2-3 (ANT1) - S1-5 (ANT1)
Below 1 Ω
S2-8 (ANT2) - S1-2 (ANT2)
Below 1 Ω
S2-9 (TRG-) - S1-1 (TRG-)
Below 1 Ω
Reconnect the antenna connector.
Reconnect the oscillator connector.
|
|
||||
| OK | |
|
| 11. CHECK HARNESS AND CONNECTOR (CERTIFICATION ECU - DOOR ELECTRICAL KEY OSCILLATOR) |
Disconnect the D60 ECU connector.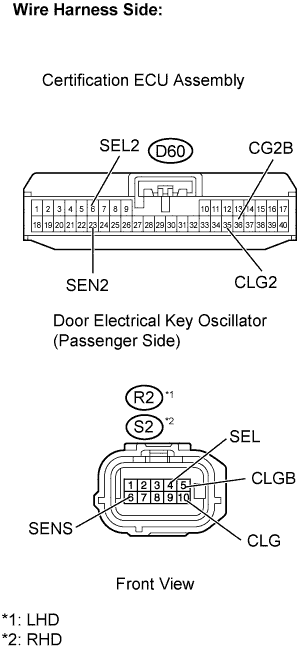
Disconnect the R2 or S2 oscillator connector.
Measure the resistance of the wire harness side connectors.
- Standard resistance:
LHD Tester Connection
Specified Condition
D60-6 (SEL2) - R2-4 (SEL)
Below 1 Ω
D60-23 (SEN2) - R2-6 (SENS)
Below 1 Ω
D60-35 (CLG2) - R2-10 (CLG)
Below 1 Ω
D60-36 (CG2B) - R2-5 (CLGB)
Below 1 Ω
RHD Tester Connection
Specified Condition
D60-6 (SEL2) - S2-4 (SEL)
Below 1 Ω
D60-23 (SEN2) - S2-6 (SENS)
Below 1 Ω
D60-35 (CLG2) - S2-10 (CLG)
Below 1 Ω
D60-36 (CG2B) - S2-5 (CLGB)
Below 1 Ω
Reconnect the oscillator connector.
Reconnect the ECU connector.
|
|
||||
| OK | ||
|
||
| ||