Power Source Mode does not Change
Circuit diagnosis · Vehicles built from Aug 2005
DESCRIPTION
When the certification ECU has detected the electrical key inside the cabin, the power source mode can be changed in the following order sequentially by pressing the ignition switch: Off → On (ACC) → On (IG) → Off.When either one of the DTCs shown in the illustration below is detected, troubleshoot the DTC(s) by following the troubleshooting procedure relevant to the DTC(s). If the power source mode is still not changed normally, despite troubleshooting, one of the following may have occurred:
- The LIN communication line is malfunctioning.
- The certification ECU has determined that no key is inside the cabin.
- The ignition switch is malfunctioning.
- The main body ECU is malfunctioning.
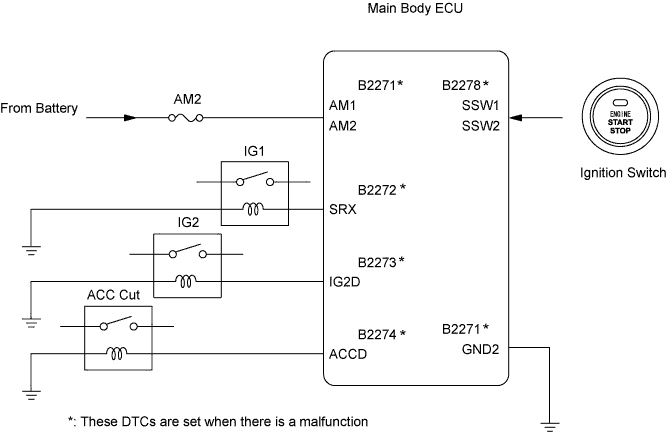

INSPECTION PROCEDURE
| 1. CHECK WHETHER DTC OUTPUT RECURS |

Clear the DTCs.
- HINT:
- After all DTCs are cleared, check if the trouble occurs again 5 seconds after the ignition switch is turned on (IG).
Check for DTCs again.
- OK:
- No DTC is output.
|
|
||||

| OK | |
 |
| 2. CHECK BASIC FUNCTION |
Carry the key into the vehicle.
Depress the clutch pedal (M/T) or brake pedal (except M/T) and check that the ignition switch indicator illuminates in green.
- OK:
- Ignition switch indicator illuminates in green.
|
|
||||

| OK | |
|
| 3. INSPECT FUSE (AM2) |
Remove the AM2 fuse from the engine room R/B and J/B.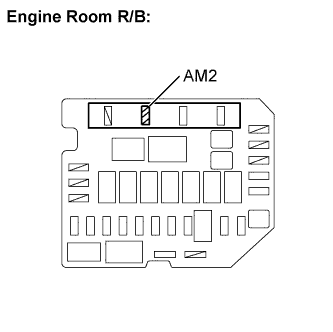
Check the fuse resistance.
- Standard resistance:
- Below 1 Ω
Reinstall the AM2 fuse.
|
|
||||
| OK | |
|
| 4. READ VALUE OF INTELLIGENT TESTER (RELAY MONITOR) |
Connect the intelligent tester to the DLC3.
Turn the ignition switch on (IG) and turn the tester ON.
Select the following menu items: Body/ Main Body ECU/ Data List / IG1 Relay Mon2, IG2 Relay Mon2 and ACC Relay Monitor.
Read the display on the tester.
- Main Body ECU:
Item
Measurement Item / Display (Range)
Normal Condition
IG1 Relay Mon2
IG1 inner relay monitor / ON or OFF
ON: Ignition switch on (IG)
OFF: Ignition switch off
IG2 Relay Mon2
IG2 inner relay monitor / ON or OFF
ON: Ignition switch on (IG)
OFF: Ignition switch off
ACC Relay Monitor
ACC relay monitor / ON or OFF
ON: Ignition switch on (ACC)
OFF: Ignition switch off
- OK:
- ON appears on the screen.
|
|
||||
| NG | |
|
| 5. INSPECT RELAYS (IG1RELAY, IG2 RELAY AND ACC CUT RELAY) |
Inspect the IG1 relay.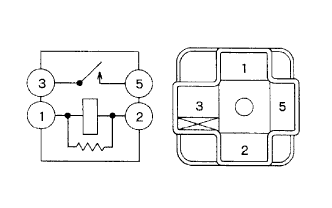
Remove the IG1 relay from the main body ECU.
Check the resistance.
- Standard resistance:
Tester Connection
Specified Condition
3 - 5
10 kΩ or higher
3 - 5
Below 1 Ω
(When battery voltage applied to terminals 1 and 2)
Reinstall the IG1 relay.
Inspect the integration relay (IG2 relay).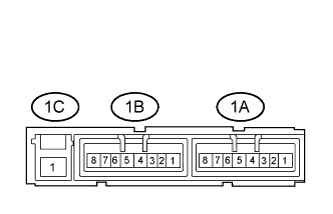
Remove the integration relay from the engine R/B and J/B.
Measure the resistance.
- Standard resistance:
Tester Connection
Specified Condition
1B-4 - 1C-1
10 kΩ or higher
1B-4 - 1C-1
Below 1 Ω
(When battery voltage applied to terminals 1B-2 and 1B-3)
Reinstall the integration relay.
Inspect the ACC cut relay.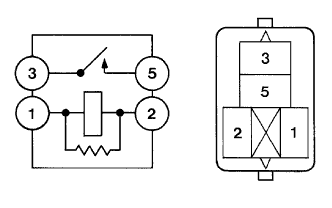
Remove the ACC cut relay.
Check the resistance.
- Standard resistance:
Tester Connection
Specified Condition
3 - 5
10 kΩ or higher
3 - 5
Below 1 Ω
(When battery voltage applied to terminals 1 and 2)
Reinstall the relay.
|
|
||||
| OK | |
|
| 6. CHECK HARNESS AND CONNECTOR (MAIN BODY ECU - INTEGRATION RELAY (IG2 RELAY)) |
Remove the integration relay from the engine R/B and J/B.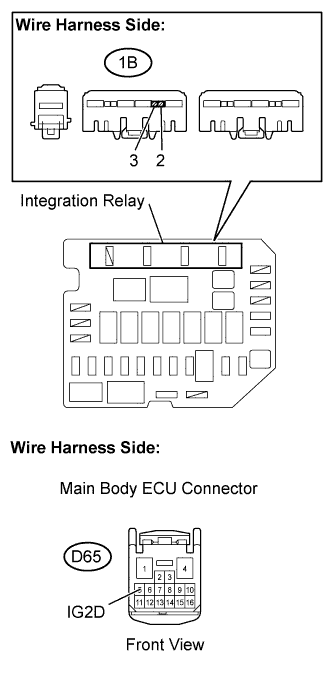
Disconnect the D65 main body ECU connector.
Measure the resistance of the wire harness side connectors.
- Standard resistance:
Tester Connection
Specified Condition
1B-2 (Integration relay) - D65-5 (IG2D)
Below 1 Ω
1B-3 (Integration relay) - Body ground
Below 1 Ω
1B-2 (Integration relay) or D65-5 (IG2D) - Body ground
10 kΩ or higher
Reinstall the integration relay.
Reconnect the ECU connector.
|
|
||||
| OK | |
|
| 7. CHECK HARNESS AND CONNECTOR (MAIN BODY ECU - ACC CUT RELAY) |
Remove the ACC cut relay.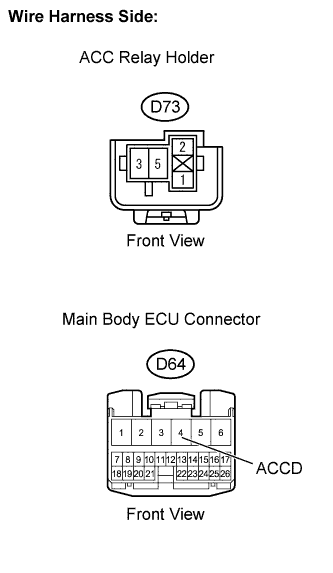
Disconnect the D64 main body ECU connector.
Measure the resistance of the wire harness side connectors.
- Standard resistance:
Tester Connection
Specified Condition
ACC cut relay (D73-2) - ACCD (D64-4)
Below 1 Ω
Reinstall the ACC cut relay.
Reconnect the main body ECU connector.
|
|
||||
| OK | |
|
| 8. INSPECT IGNITION SWITCH ASSEMBLY |
Remove the ignition switch.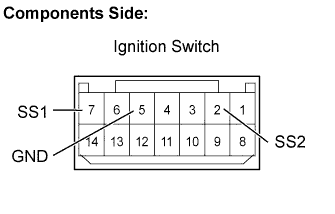
Measure the resistance of the switch.
- Standard resistance:
Tester Connection
Switch Condition
Specified Condition
7 (SS1) - 5 (GND)
Pushed
Below 1 Ω
2 (SS2) - 5 (GND)
Pushed
Below 1 Ω
7 (SS1) - 5 (GND)
Not pushed
10 kΩ or higher
2 (SS2) - 5 (GND)
Not pushed
10 kΩ or higher
Reinstall the ignition switch.
|
|
||||
| OK | |
|
| 9. CHECK HARNESS AND CONNECTOR (MAIN BODY ECU - BATTERY AND BODY GROUND) |
Disconnect the D64 and D65 main body ECU connectors.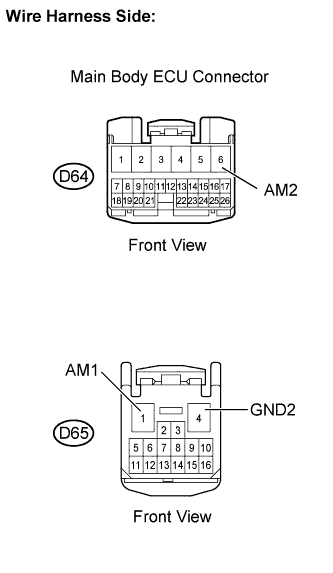
Measure the voltage and resistance of the wire harness side connector.
- Standard voltage:
Tester Connection
Specified Condition
D65-1 (AM1) - Body ground
10 to 14 V
D64-6 (AM2) - Body ground
10 to 14 V
- Standard resistance:
Tester Connection
Specified Condition
D65-4 (GND2) - Body ground
Below 1 Ω
Reconnect the main body ECU connectors.
|
|
||||
| OK | ||
 |
||
| ||
| 10. CHECK WIRELESS DOOR LOCK AND UNLOCK OPERATION |
Check that the wireless door lock and unlock functions operate normally.
- OK:
- Wireless door lock functions operate normally.
|
|
||||
| OK | |
|
| 11. CHECK OPERATION OF ELECTRICAL KEY |
After replacing the electrical key with a normally functioning one, check that the wireless lock and unlock functions operate normally.
- OK:
- Wireless lock and unlock functions operate normally.
|
|
||||
| NG | |
|
| 12. PERFORM ACTIVE TEST BY INTELLIGENT TESTER (INDOOR ELECTRICAL KEY OSCILLATOR) |
Select the Active Test, use the intelligent tester to generate a control command, and then check that the oscillator operates.
- Certification ECU:
Item
Test Details
Diagnostic Note
Fr Transmitter
Indoor electrical key oscillator (front)
ON / OFF
-
- OK:
- Oscillator function operate normally.
|
|
||||
| NG | |
|
| 13. CHECK INDOOR ELECTRICAL KEY OSCILLATOR |
Carry the key into the vehicle.
Replace the indoor electrical key oscillator with a new one.
Depress the clutch pedal (M/T) or brake pedal (except M/T) and check that the ignition switch indicator illuminates in green.
- OK:
- Ignition switch indicator illuminates in green.
|
|
||||
| OK | ||
|
||
| ||