REMOVAL
Removal / installation · Vehicles built from Aug 2005
- CAUTION:
- Some of these service operations affect the SRS airbag system. Read the precautionary notices concerning the SRS airbag system before servicing (Click here).
- NOTICE:
- Always use "Torx" socket wrench E10 when removing the rear seat.
| 1. DISCONNECT CABLE FROM NEGATIVE BATTERY TERMINAL |
| 2. REMOVE PACKAGE TRAY TRIM PANEL ASSEMBLY (w/ Package Tray Trim) |

Remove the 2 package tray trim suspenders.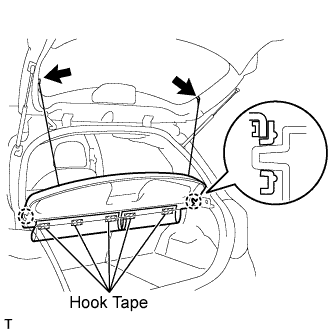

Remove the 5 pieces of hook tape.
Disengage the 2 claws and remove the package tray trim.
| 3. REMOVE DECK BOARD SUB-ASSEMBLY (w/ Deck Board) |
Release the 2 knobs and remove the deck board.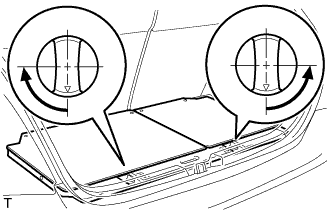
| 4. REMOVE SPARE WHEEL COVER ASSEMBLY (w/ Deck Board) |
Remove the spare wheel cover.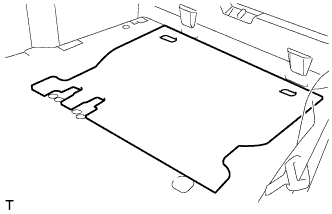
| 5. REMOVE DECK FLOOR BOX RH (w/ Deck Board) |
Release the 2 knobs and remove the deck floor box.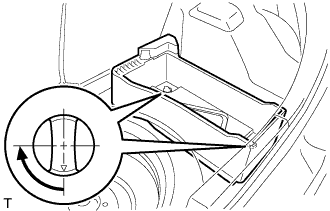
| 6. REMOVE DECK FLOOR BOX LH (w/ Deck Board) |
- HINT:
- Use the same procedure as for the RH side.
| 7. REMOVE REAR FLOOR CARPET ASSEMBLY (w/o Deck Board) |
Remove the rear floor carpet.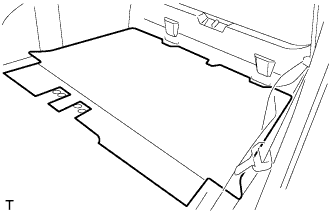
| 8. REMOVE NO. 1 REAR SEAT LEG COVER |
for RH Side:
Remove the No. 1 rear seat leg cover (Click here).
for LH Side:
Remove the No. 1 rear seat leg cover (Click here).
| 9. REMOVE NO. 2 REAR SEAT LEG COVER |
Disengage the 3 claws in the sequence shown in the illustration and remove the No. 1 rear seat leg cover.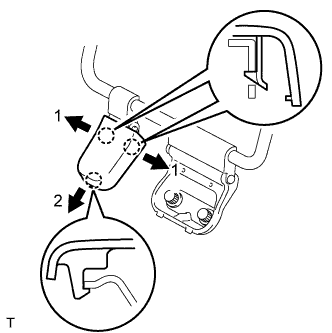
| 10. REMOVE REAR SEAT ASSEMBLY RH |
Using "Torx" socket wrench E10, remove the 2 bolts and pull up the rear seat cushion.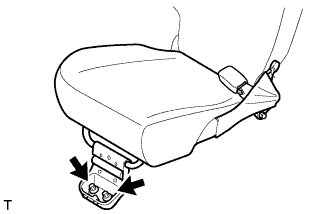
Using "Torx" socket wrench E10, remove the 4 bolts and the rear seat.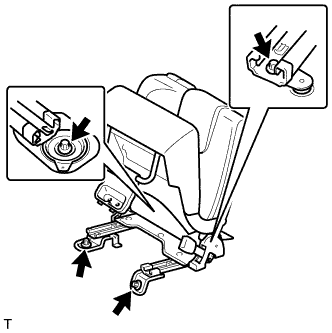
| 11. REMOVE REAR SEAT ASSEMBLY LH |
Using "Torx" socket wrench E10, remove the 3 bolts and pull up the rear seat cushion.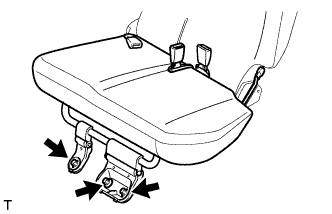
Using "Torx" socket wrench E10, remove the 4 bolts and the rear seat.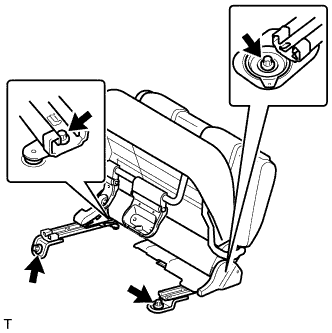
| 12. REMOVE REAR DECK TRIM COVER |
for Temper Spare Tire: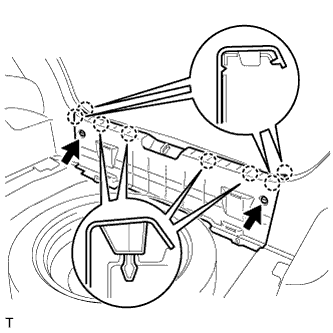
Using a clip remover, remove the 2 clips.
Disengage the 8 claws and remove the rear deck trim cover.
for Grand Tire: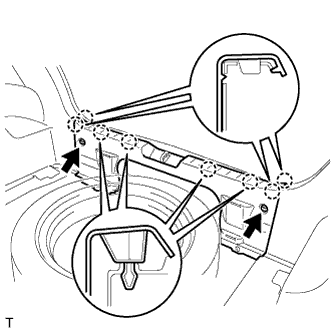
Using a clip remover, remove the 2 clips.
Disengage the 8 claws and remove the rear deck trim cover.
| 13. REMOVE FRONT DOOR SCUFF PLATE RH |
Disengage the 8 claws and remove the front door scuff plate.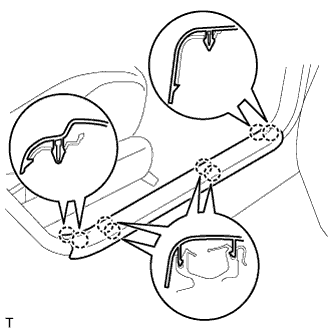
| 14. REMOVE FRONT DOOR SCUFF PLATE LH |
- HINT:
- Use the same procedure as for the RH side.
| 15. REMOVE INSTRUMENT PANEL UNDER COVER SUB-ASSEMBLY RH |
Disengage the 4 claws and remove the instrument panel under cover.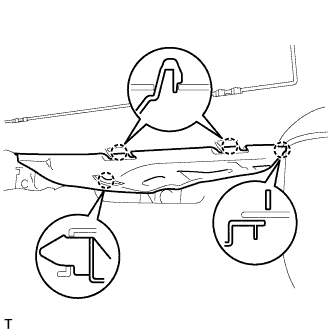
| 16. REMOVE INSTRUMENT PANEL UNDER COVER SUB-ASSEMBLY LH |
Remove the 2 screws.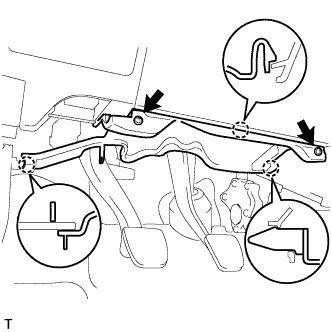
Disengage the 3 claws and remove the instrument panel under cover.
| 17. REMOVE COWL SIDE TRIM BOARD RH |
Disengage the claw and the stud bolt and remove the cowl side trim board.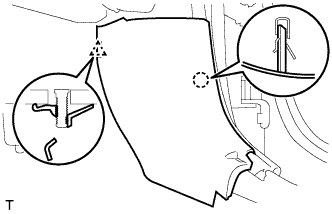
| 18. REMOVE COWL SIDE TRIM BOARD LH |
- HINT:
- Use the same procedure as for the RH side.
| 19. REMOVE FRONT DOOR OPENING TRIM WEATHERSTRIP RH |
Remove the rear door opening trim weatherstrip.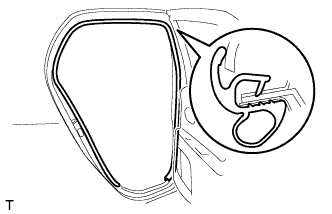
| 20. REMOVE FRONT DOOR OPENING TRIM WEATHERSTRIP LH |
- HINT:
- Use the same procedure as for the RH side.
| 21. REMOVE REAR DOOR SCUFF PLATE RH |
Disengage the 6 claws and remove the rear door scuff plate.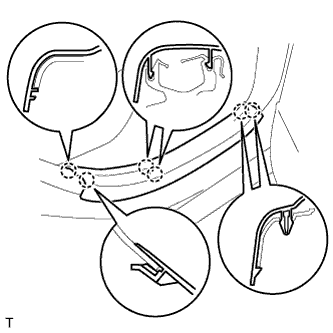
| 22. REMOVE REAR DOOR SCUFF PLATE LH |
- HINT:
- Use the same procedure as for the RH side.
| 23. REMOVE REAR DOOR OPENING TRIM WEATHERSTRIP RH |
Remove the rear door opening trim weatherstrip.
| 24. REMOVE REAR DOOR OPENING TRIM WEATHERSTRIP LH |
- HINT:
- Use the same procedure as for the RH side.
| 25. REMOVE REAR SEAT OUTER BELT ASSEMBLY RH |
Remove the belt.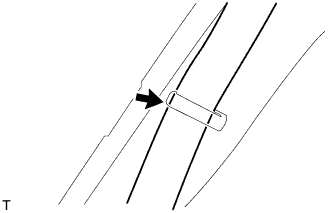
Remove the bolt.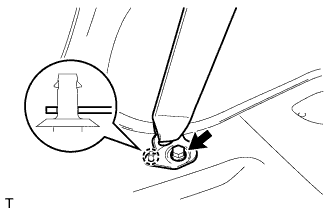
Disengage the clip and remove the anchor plate.
| 26. REMOVE REAR SEAT OUTER BELT ASSEMBLY LH |
- HINT:
- Use the same procedure as for the RH side.
| 27. REMOVE DECK TRIM SIDE PANEL ASSEMBLY RH |
w/ Package Tray Trim: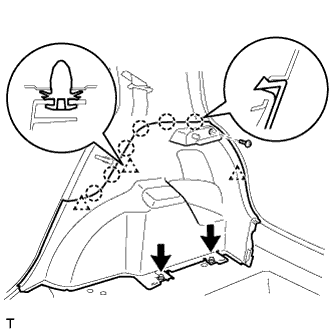
Remove the 3 screws.
Disengage the 3 clips and the 6 claws and remove the deck trim side panel.
w/o Package Tray Trim: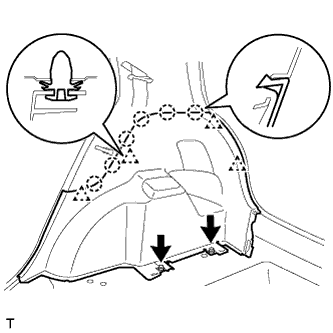
Remove the 3 screws.
Disengage the 4 clips and the 6 claws and remove the deck trim side panel.
| 28. REMOVE DECK TRIM SIDE PANEL ASSEMBLY LH |
w/ Package Tray Trim: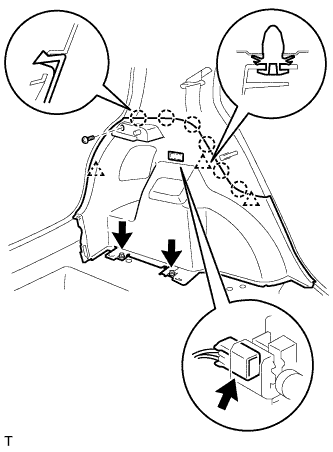
w/ Luggage Compartment Room Light:
- Remove the 3 screws.
- Disengage the 3 clips and the 6 claws.
- Disconnect the luggage compartment room light connector and remove the deck trim side panel.
- Remove the 3 screws.
w/o Luggage Compartment Room Light:
- Remove the 3 screws.
- Disengage the 3 clips and the 6 claws and remove the deck trim side panel.
- Remove the 3 screws.
w/o Package Tray Trim: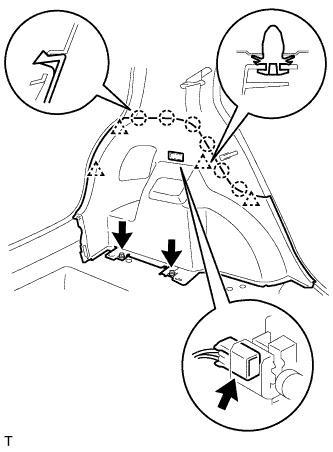
w/ Luggage Compartment Room Light:
- Remove the 2 screws.
- Disengage the 4 clips and the 6 claws.
- Disconnect the luggage compartment room light connector and remove the deck trim side panel.
- Remove the 2 screws.
w/o Luggage Compartment Room Light:
- Remove the 2 screws.
- Disengage the 4 clips and the 6 claws and remove the deck trim side panel.
- Remove the 2 screws.
| 29. REMOVE REAR CENTER SEAT OUTER BELT ASSEMBLY (for 3 Point Type Rear Center Seat Belt) |
Remove the 2 tongue plates.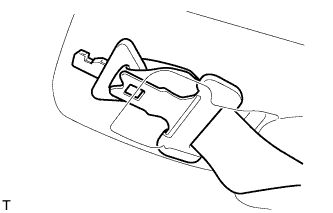
Using a screwdriver with its tip wrapped in protective tape, disengage the 2 claws and open the slip joint cover.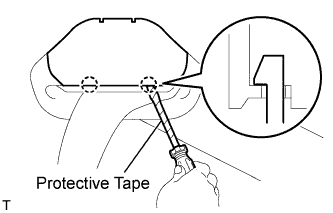
Remove the bolt and the through anchor.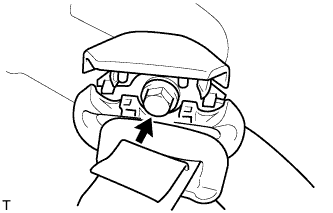
Using a screwdriver with its tip wrapped in protective tape, disengage the 4 claws and remove the center belt guide.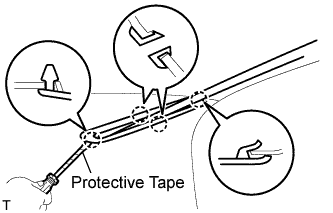
| 30. REMOVE ROOF SIDE GARNISH INNER RH |
w/ Curtain Shield Airbag: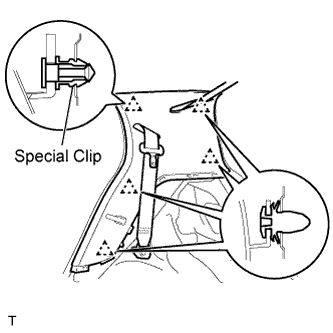
- NOTICE:
- Replace the special clip with a new one when the roof side inner garnish is removed.
for 3 Point Type Rear Center Seat Belt:
- Disengage the 5 clips.
- Pass the rear seat outer belt and the rear center seat outer belt through the slit in the roof side inner garnish and remove the roof side inner garnish.
- Disengage the 5 clips.
for 2 Point Type Rear Center Seat Belt:
- Disengage the 5 clips.
- Pass the rear seat outer belt through the slit in the roof side inner garnish and remove the roof side inner garnish.
- Disengage the 5 clips.
w/o Curtain Shield Airbag: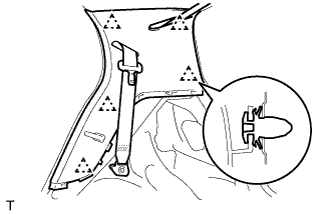
for 3 Point Type Rear Center Seat Belt:
- Disengage the 5 clips.
- Pass the rear seat outer belt and the rear center seat outer belt through the slit in the roof side inner garnish and remove the roof side inner garnish.
- Disengage the 5 clips.
for 2 Point Type Rear Center Seat Belt:
- Disengage the 5 clips.
- Pass the rear seat outer belt through the slit in the roof side inner garnish and remove the roof side inner garnish.
- Disengage the 5 clips.
| 31. REMOVE ROOF SIDE GARNISH INNER LH |
w/ Curtain Shield Airbag: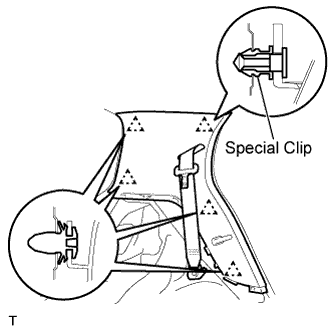
- NOTICE:
- Replace the special clip with a new one when the roof side inner garnish is removed.
Disengage the 5 clips.
Pass the rear seat outer belt through the slit in the roof side inner garnish and remove the roof side inner garnish.
w/o Curtain Shield Airbag: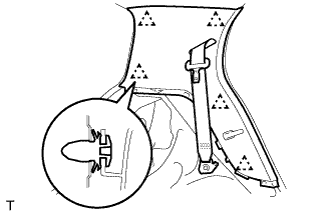
Disengage the 5 clips.
Pass the rear seat outer belt through the slit in the roof side inner garnish and remove the roof side inner garnish.
| 32. REMOVE SEAT BELT ANCHOR COVER CAP |
Pull portion A, shown in the illustration, toward you, remove the 2 claws on the lower side followed by the claw on the upper side. Then remove the seat belt anchor cover cap.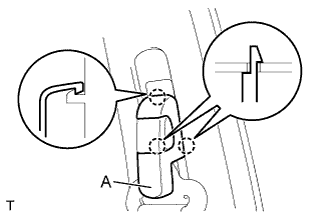
| 33. REMOVE FRONT SEAT OUTER BELT ASSEMBLY RH |
Remove the bolt and the through anchor.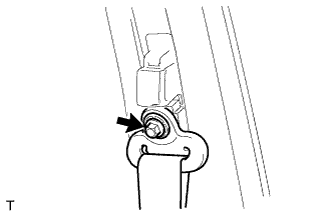
| 34. REMOVE FRONT SEAT OUTER BELT ASSEMBLY LH |
- HINT:
- Use the same procedure as for the RH side.
| 35. REMOVE CENTER PILLAR LOWER GARNISH RH |
Disengage the 2 clips and the 2 claws and remove the center pillar lower garnish.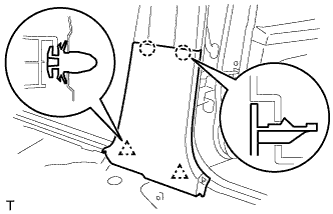
| 36. REMOVE CENTER PILLAR LOWER GARNISH LH |
- HINT:
- Use the same procedure as for the RH side.
| 37. REMOVE CENTER PILLAR UPPER GARNISH RH |
Disengage the 3 clips and the 2 hooks and remove the center pillar upper garnish.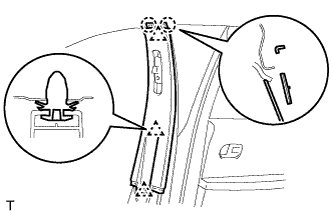
| 38. REMOVE CENTER PILLAR UPPER GARNISH LH |
- HINT:
- Use the same procedure as for the RH side.
| 39. REMOVE SEAT BELT ANCHOR COVER (for 3 Point Type Rear Center Seat Belt) |
Using a moulding remover, disengage the 4 claws and remove the seat belt anchor cover.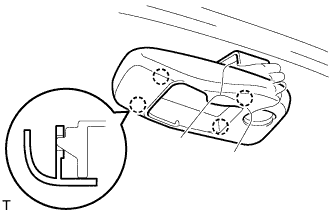
| 40. REMOVE ROOF HEADLINING SERVICE HOLE COVER (w/o Curtain Shield Airbag) |
 |
- HINT:
- The number of the roof headlining service hole covers varies with the specifications.
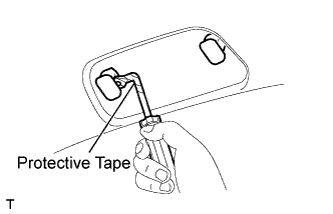
Using a clip remover with its tip wrapped in protective tape, remove the 6 roof headlining service hole covers.
| 41. REMOVE COAT HOOK (w/ Coat Hook) |
Using a screwdriver with its tip wrapped in protective tape, disengage the 2 claws and open the cover.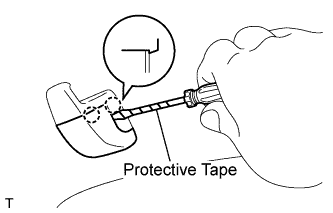
Using a clip remover with its tip wrapped in protective tape, disengage the 2 claws and remove the coat hook.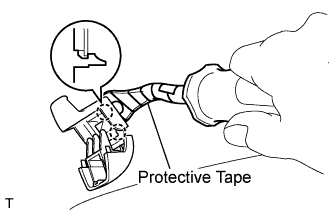
| 42. REMOVE ASSIST GRIP SUB-ASSEMBLY |
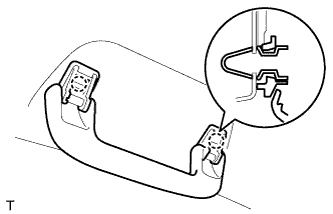 |
- HINT:
- The number of the assist grips varies with the specifications.
Disengage the 2 springs and remove the assist grip.
| 43. REMOVE VISOR ASSEMBLY RH |
Using a screwdriver with its tip wrapped in protective tape, disengage the 4 claws and remove the visor bracket cover.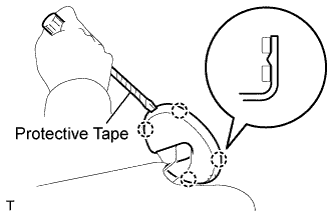
Remove the visor shaft from the visor holder.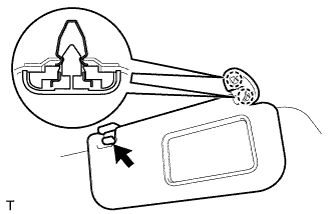
Disengage the 2 springs and remove the visor.
| 44. REMOVE VISOR ASSEMBLY LH |
- HINT:
- Use the same procedure as for the RH side.
| 45. REMOVE VISOR HOLDER RH |
Disengage the 2 claws by turning the visor counterclockwise between 60 to 120° and remove the visor holder.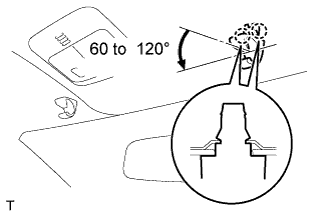
- HINT:
- The claw may be damaged during removal. However, it is reusable because this does not effect its function.
| 46. REMOVE VISOR HOLDER LH |
- HINT:
- Use the same procedure as for the RH side.
| 47. REMOVE ROOM LIGHT ASSEMBLY |
Using a screwdriver with its tip wrapped in protective tape, disengage the 4 claws and remove the room light lens.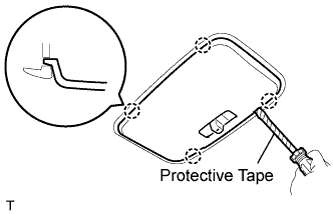
Using a screwdriver with its tip wrapped in protective tape, disengage the 4 claws and remove the 2 covers.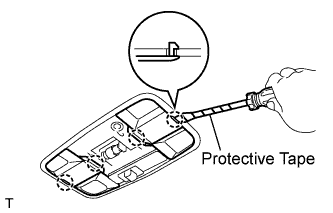
Using a screwdriver with its tip wrapped in protective tape, disengage the 4 claws.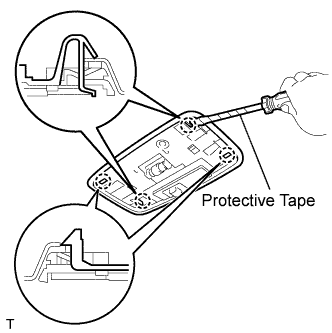
Remove the roof wire from the claw of the room light.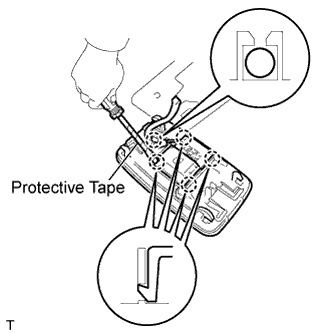
Using a screwdriver with its tip wrapped in protective tape, disengage the 4 claws and remove the room light switch base and the room light.
| 48. REMOVE MAP LIGHT ASSEMBLY |
Using a roof moulding remover, disengage the 4 claws.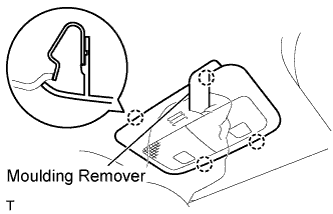
Disconnect the map light connector and remove the map light.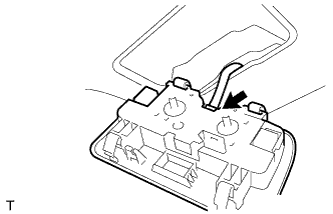
| 49. REMOVE FRONT PILLAR GARNISH RH |
w/ Curtain Shield Airbag: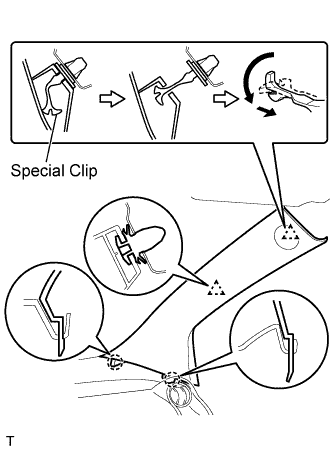
- NOTICE:
- Install a protective cover onto the curtain shield airbag as soon as the front pillar garnish is removed.
- Replace the special clip with a new one when the front pillar garnish is removed.
- Install a protective cover onto the curtain shield airbag as soon as the front pillar garnish is removed.
Disengage the 2 clips and the 2 claws and remove the front pillar garnish.
w/o Curtain Shield Airbag: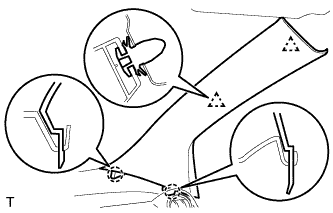
Disengage the 2 clips and the 2 claws and remove the front pillar garnish.
Disconnect the connector.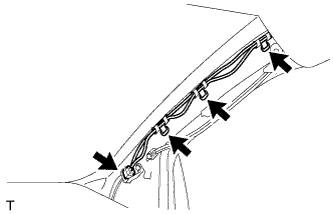
Using a clip remover, remove the 3 antenna cord clamps.
w/ Front No. 2 Speaker: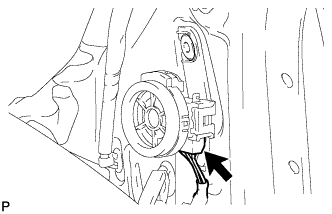
Disconnect the speaker connector.
Using a screwdriver with its tip wrapped in protective tape, disengage the clip and hook and remove the front No. 2 speaker.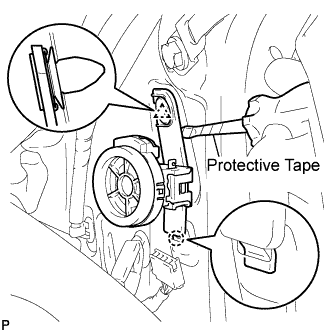
w/ Curtain Shield Airbag:
Completely cover the curtain shield airbag with a piece of cloth or nylon and fix the ends of the fabric with adhesive tape, as shown in the illustration.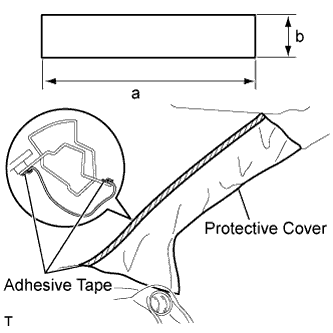
Protective cover size: Area
Measurement
a
700 mm (27.56 in.)
b
120 mm (4.72 in.)
| 50. REMOVE FRONT PILLAR GARNISH LH |
w/ Curtain Shield Airbag: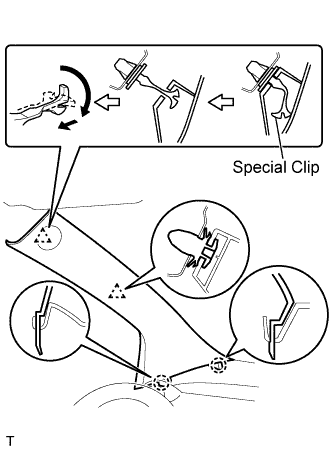
- NOTICE:
- Install a protective cover onto the curtain shield airbag as soon as the front pillar garnish is removed.
- Replace the special clip with a new one when the front pillar garnish is removed.
- Install a protective cover onto the curtain shield airbag as soon as the front pillar garnish is removed.
Disengage the 2 clips and the 2 claws and remove the front pillar garnish.
w/o Curtain Shield Airbag: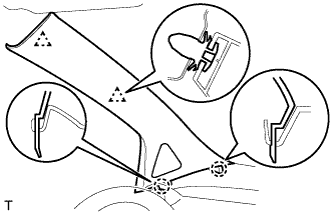
Disengage the 2 clips and the 2 claws and remove the front pillar garnish.
Using a clip remover, remove the 4 wire harness clamps.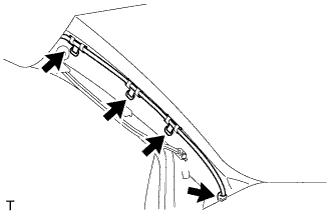
w/ Front No. 2 Speaker: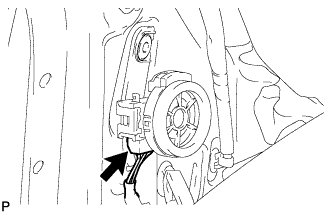
Disconnect the speaker connector.
Using a screwdriver with its tip wrapped in protective tape, disengage the clip and hook and remove the front No. 2 speaker.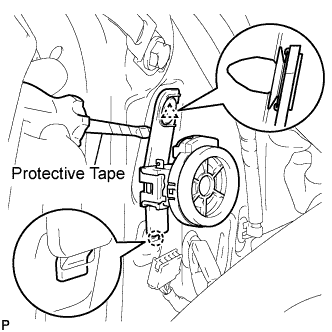
w/ Curtain Shield Airbag: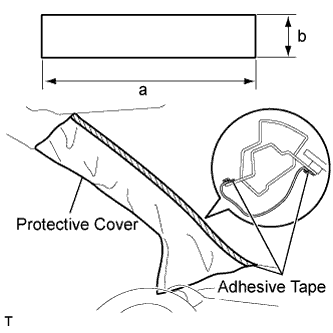
Completely cover the curtain shield airbag with a piece of cloth or nylon and fix the ends of the fabric with adhesive tape, as shown in the illustration.
Protective cover size: Area
Measurement
a
700 mm (27.56 in.)
b
120 mm (4.72 in.)
| 51. REMOVE INSTRUMENT PANEL FINISH PANEL END LH |
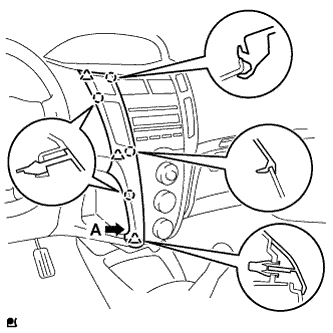 |
with CD player
Pull the instrument panel finish panel end LH rearward and disengage the 4 claws and 3 clips.
- NOTICE:
- To avoid damaging the radio receiver and the air conditioning panel, remove the instrument panel finish panel end without using any tool.
- HINT:
- Grip portion A of the instrument panel finish panel end and remove the instrument panel finish panel end from the lower side.
Disconnect the connector and remove the instrument panel finish panel end LH.
Except CD player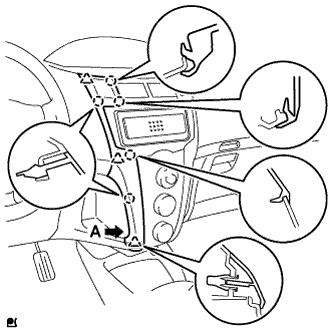
Pull the instrument panel finish panel end LH rearward and disengage the 5 claws and 3 clips.
- NOTICE:
- To avoid damaging the instrument cluster finish panel center and the air conditioning panel, remove the instrument panel finish panel end without using any tool.
- HINT:
- Grip portion A of the instrument panel finish panel end and remove the instrument panel finish panel end from the lower side.
Disconnect the connector and remove the instrument panel finish panel end LH.
| 52. REMOVE INSTRUMENT PANEL FINISH PANEL END RH |
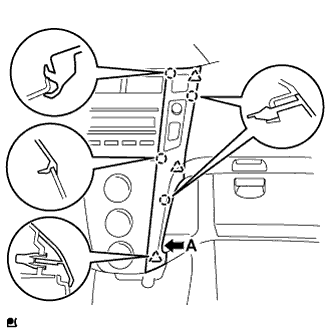 |
with CD player
Pull the instrument panel finish panel end RH and disengage the 4 claws and 3 clips.
- NOTICE:
- To avoid damaging the radio receiver and the air conditioning panel, remove the instrument panel finish panel end without using any tool.
- HINT:
- Grip portion A of the instrument panel finish panel end and remove the instrument panel finish panel end from the lower side.
Disconnect the connector and remove the instrument panel finish panel end RH.
Except CD player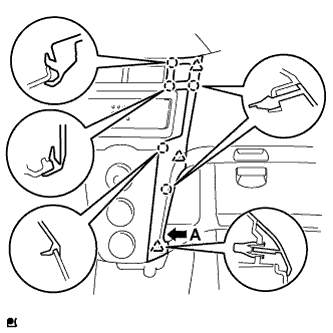
Pull the instrument panel finish panel end RH rearward and disengage the 5 claws and 3 clips.
- NOTICE:
- To avoid damaging the instrument cluster finish panel center and the air conditioning panel, remove the instrument panel finish panel end without using any tool.
- HINT:
- Grip portion A of the instrument panel finish panel end and remove the instrument panel finish panel end from the lower side.
Disconnect the connector and remove the instrument panel finish panel end RH.
| 53. REMOVE INSTRUMENT CLUSTER FINISH PANEL |
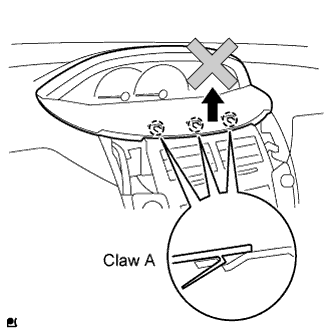 |
- NOTICE:
- Follow the procedure below to remove the instrument cluster finish panel. Claw A will break if the instrument cluster finish panel is raised carelessly.
Disengage the 2 claws and 5 clips.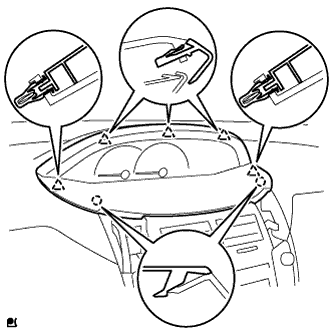
After removing the instrument panel finish panel end, insert your finger into the opening as shown, push the upper portion of the instrument cluster finish panel center and the 2 B claws of the instrument cluster finish panel, and then disengage the claws B.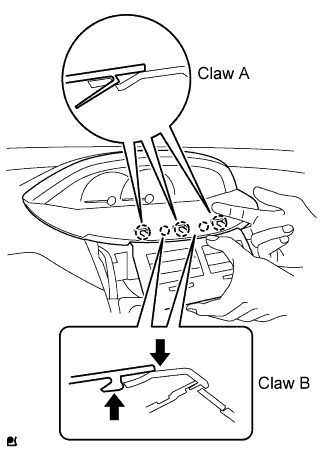
Disengage the 3 A claws and remove the instrument cluster finish panel.
| 54. REMOVE COMBINATION METER ASSEMBLY |
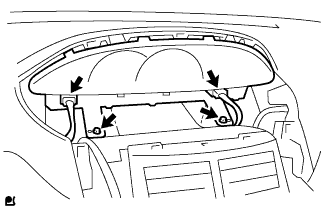 |
Disconnect the 2 connectors.
Remove the 2 screws and pull the combination meter rearward to remove it.
| 55. REMOVE NO. 1 SWITCH HOLE BASE |
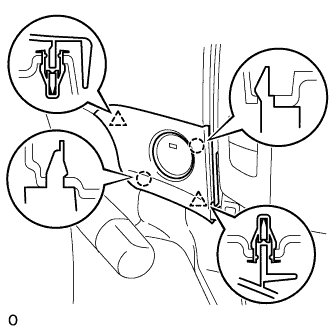 |
Disengage the 2 clips and 2 claws and remove the switch hole base.
| 56. REMOVE GLOVE COMPARTMENT DOOR ASSEMBLY |
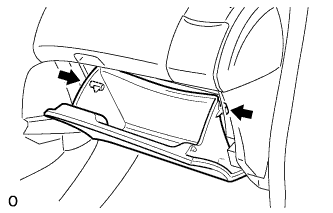 |
Slightly deform the upper part of the glove compartment door assembly to release the 2 stoppers and open the glove compartment door assembly until it becomes horizontal.
Pull the glove compartment door assembly out horizontally to disengage the hinge portion and remove the glove compartment door assembly.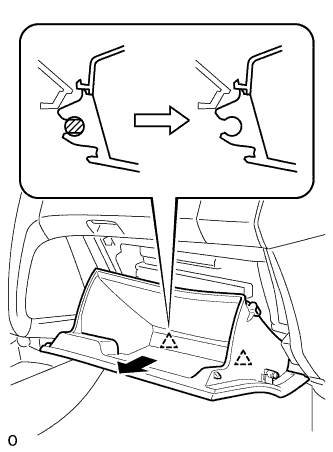
- NOTICE:
- Pull the glove compartment door out horizontally, otherwise, installation failure caused by excessive play around the hinge portion will result.
| 57. REMOVE UPPER INSTRUMENT PANEL SUB-ASSEMBLY |
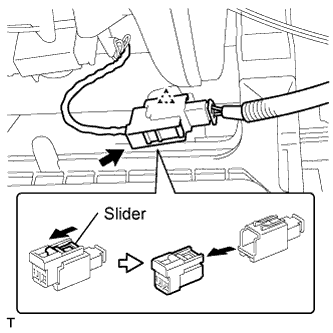 |
Slide the slider and disconnect the passenger airbag connector.
Disconnect the clamp.
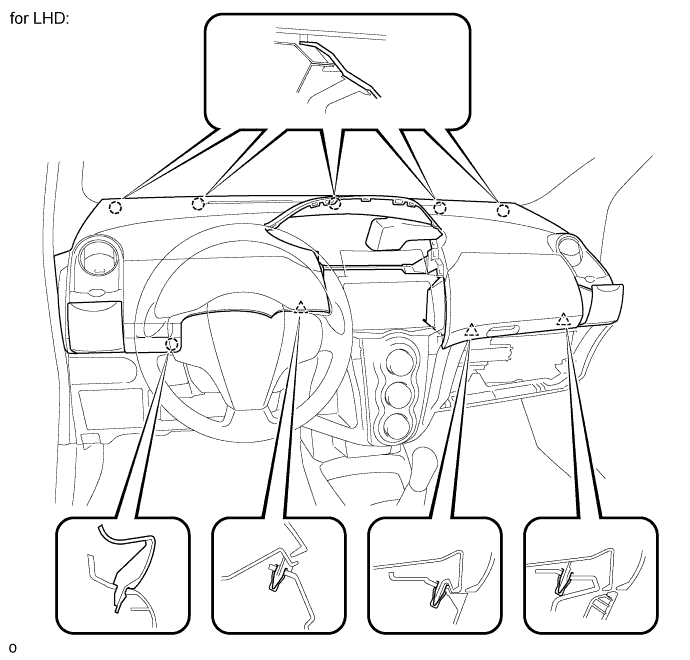
Remove the 2 <C> bolts and 4 <B> screws.
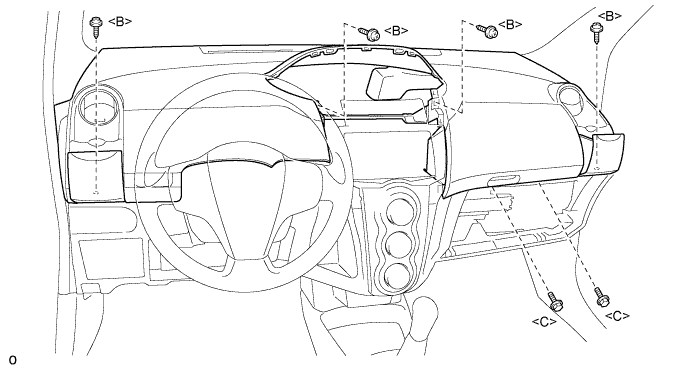
Disconnect the connectors.
Disengage the claw and 3 clips while lifting the rear instrument panel up.
While lifting the instrument panel, slide it toward the rear of the vehicle. Disengage the 5 claws of the front side of the instrument panel and remove the instrument panel.
| 58. REMOVE NO. 2 ANTENNA CORD SUB-ASSEMBLY |
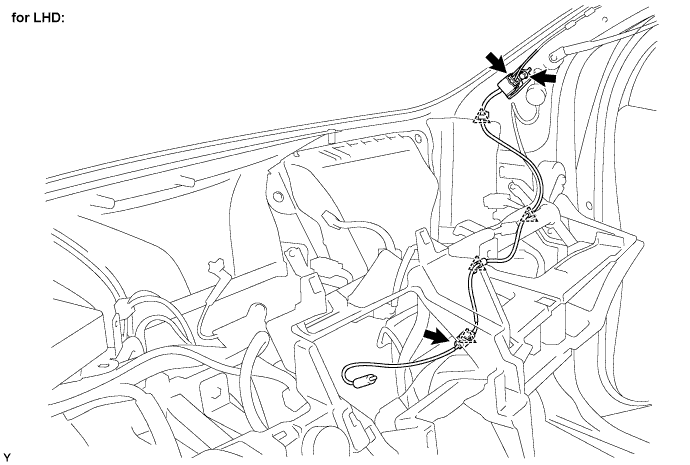
for LHD:
Disconnect the 2 connectors.
Remove the bolt.
Disengage the 4 clamps and remove the No. 2 antenna cord.
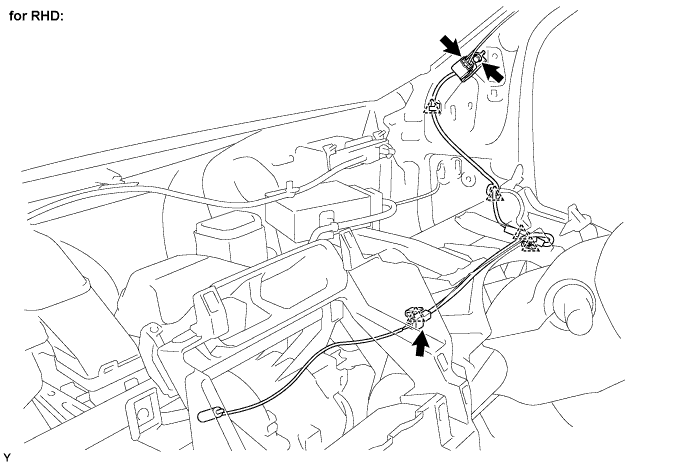
for RHD:
Disengage the 2 connectors.
Remove the bolt.
Disengage the 5 clamps and remove the No. 2 antenna cord.
| 59. REMOVE INSTRUMENT PANEL BOX |
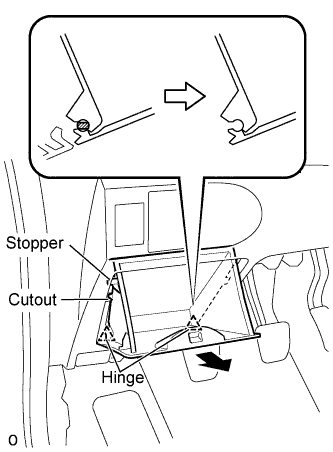 |
Open the instrument panel box.
Pull the hinge side of the instrument panel box out horizontally with the instrument panel open and disengage the 2 hinges.
Remove the stopper of the instrument panel box from the cutout of the instrument panel lower and remove the instrument panel box.
| 60. REMOVE ROOF HEADLINING ASSEMBLY |
for LHD: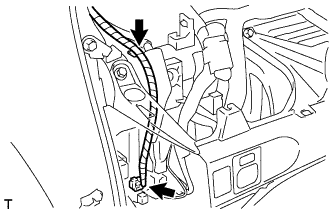
Using a screwdriver, remove the wiring harness clamp.
Disconnect the connector.
for RHD: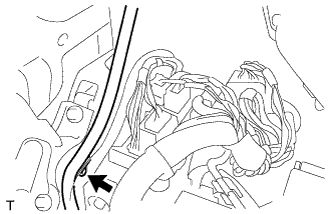
Using a screwdriver, remove the wiring harness clamp.
Remove the No. 1 roof wire from the claw of the junction block.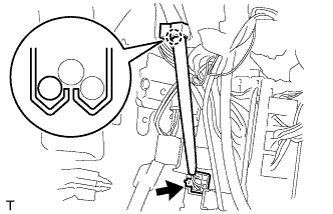
Disconnect the connector.
Remove the antenna cord from the antenna cord clamp.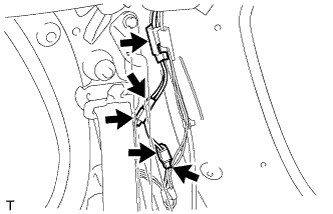
Disconnect the 2 connectors.
Using a clip remover, remove the 2 connectors.
w/ Curtain Shield Airbag:
for 3 Point Type Rear Center Seat Belt:
- Using a clip remover, remove the clip.
- Disengage the 4 hooks.
- Using a clip remover, remove the clip.
for 2 Point Type Rear Center Seat Belt:
- Using a clip remover, remove the 2 clips.
- Disengage the 4 hooks.
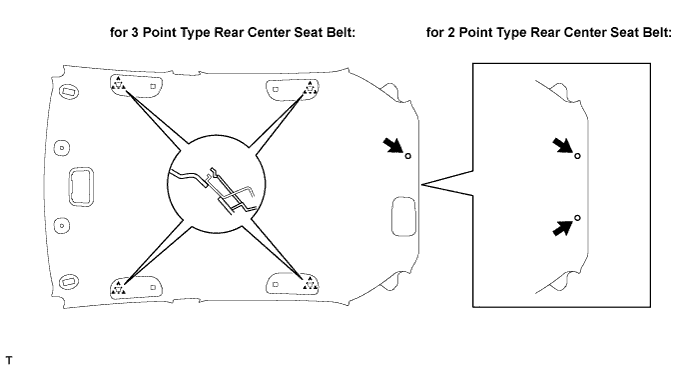
- Using a clip remover, remove the 2 clips.
w/o Curtain Shield Airbag:
for 3 Point Type Rear Center Seat Belt:
- Using a clip remover, remove the clip.
- Disengage the 2 claws and the 4 hooks.
- Using a clip remover, remove the clip.
for 2 Point Type Rear Center Seat Belt:
- Using a clip remover, remove the 2 clips.
- Disengage the 2 claws and the 4 hooks.
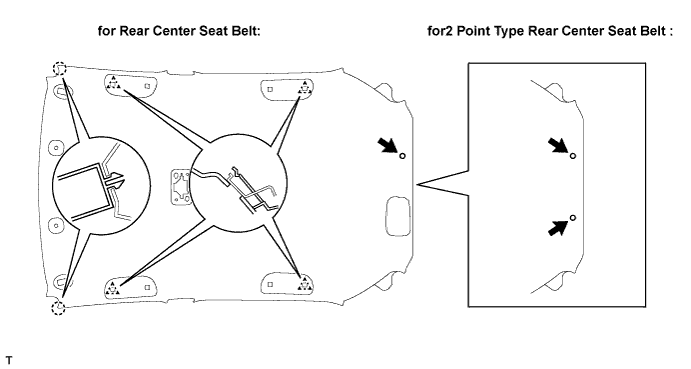
- Using a clip remover, remove the 2 clips.
Remove the roof headlining from the back door.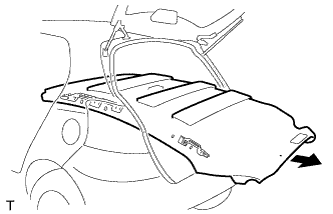
| 61. REMOVE ANTENNA CORD SUB-ASSEMBLY |
w/ Curtain Shield Airbag:
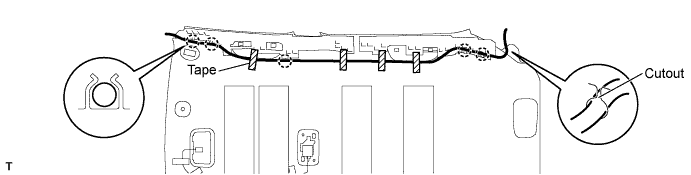
Remove the 6 pieces of tape.
Remove the antenna cord from the cutout of the roof headlining.
Remove the antenna cord from the 3 claws of the side rail spacer.
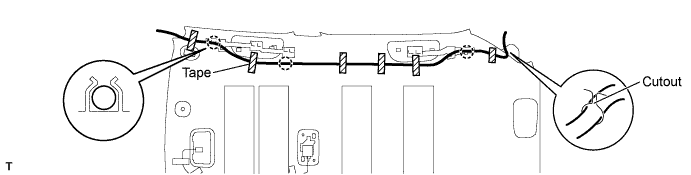
w/o Curtain Shield Airbag:
Remove the 4 pieces of tape.
Remove the antenna cord from the cutout of the roof headlining.
Remove the antenna cord from the 5 claws of the side rail spacer.