INSTALLATION
Removal / installation · Vehicles built from Aug 2005
| 1. INSTALL TRANSMISSION OIL FILLER TUBE SUB-ASSEMBLY |

Apply ATF to a new O-ring, and install it onto the oil filler tube.
Install the oil filler tube onto the automatic transaxle with the bolt.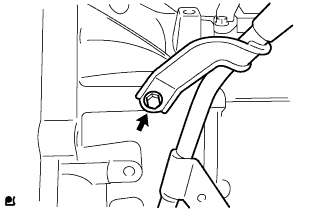

- Torque:
- 5.5 N*m{ 56 kgf*cm , 49 in.*lbf }
| 2. INSTALL TRANSMISSION OIL LEVEL GAGE SUB-ASSEMBLY |
Install the oil level gauge into the oil filler tube.
| 3. INSTALL OIL COOLER TUBE CLAMP NO. 1 |
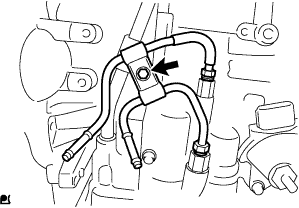 |
Provisionally install oil cooler outlet tube No. 1 into the oil cooler tube union.
Provisionally install oil cooler inlet tube No. 1 into the oil cooler tube union.
Provisionally install oil cooler tube clamp No. 1 onto the oil level gauge with the bolt.
- Torque:
- 5.5 N*m{ 56 kgf*cm , 49 in.*lbf }
| 4. INSTALL OIL COOLER OUTLET TUBE NO.1 |
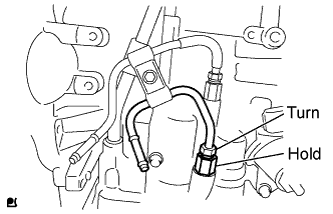 |
Using SST, install oil cooler outlet tube No. 1 while holding the oil cooler tube union with a spanner.
- SST
- 09023-12701
- Torque:
- 34 N*m{ 347 kgf*cm , 25 ft.*lbf }
| 5. INSTALL OIL COOLER INLET TUBE NO.1 |
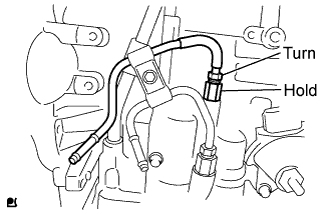 |
Using SST, install oil cooler inlet tube No. 1 while holding the oil cooler tube union with a spanner.
- SST
- 09023-12701
- Torque:
- 34 N*m{ 347 kgf*cm , 25 ft.*lbf }
| 6. INSTALL TRANSMISSION CONTROL CABLE BRACKET NO.1 |
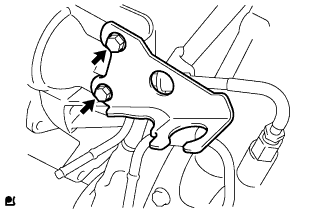 |
Install transmission control cable bracket No. 1 onto the automatic transaxle with the 2 bolts.
| 7. INSPECT TORQUE CONVERTER CLUTCH ASSEMBLY |
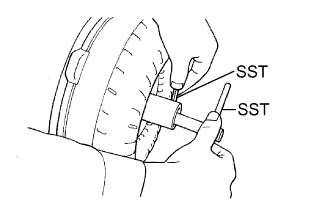 |
Inspect the one-way clutch.
Install SST so that it fits into notch of the converter hub and the notch of the outer race of the one-way clutch.
- SST
- 09350-32014
(09351-32010, 09351-32020)
Press on the serrations of the stator with a finger and rotate it.
Check that it rotates smoothly when turned clockwise and locks up when turned counterclockwise.- SST
- 09350-32014
(09351-32010, 09351-32020)
Replace the converter if the one-way clutch still does not operate as specified.
Check the condition of the torque converter clutch assembly.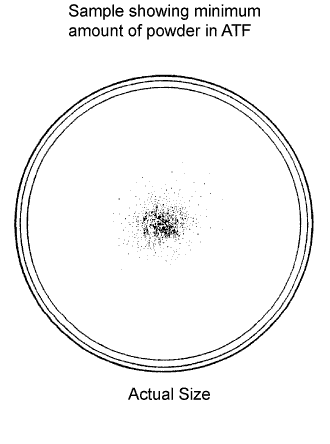
If the inspection result of the torque converter clutch assembly meets any of the cases mentioned below, replace the torque converter clutch.
- Malfunction Item:
- Any metallic sound is heard from the torque converter clutch during stall test or when the shift lever is in the N position.
The one-way clutch is released or locked in both directions.
Fine powder exceeding the sample limit is identified in ATF.
(See the sample.)
- HINT:
- The sample shows approximately. 0.25 liters (0.26 US qts, 0.22 lmp. qts) of ATF that is taken out from the removed torque converter clutch.
Replace the ATF in the torque converter clutch.
If the ATF is discolored and/or has a foul odor, completely stir the ATF in the torque converter clutch and drain it with the installation surface facing up.
Clean and check the oil cooler and oil pipe line.
If the torque converter clutch is inspected or the ATF is changed, clean the oil cooler and oil pipe line.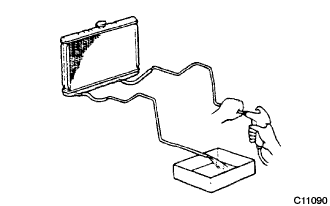
- HINT:
- Spray compressed air of 196 kpa (2 kgf/cm2, 28 psi) from the inlet hose.
- If excessive fine powder is found in the ATF, add new ATF using a bucket pump and clean it again.
- Spray compressed air of 196 kpa (2 kgf/cm2, 28 psi) from the inlet hose.
If the ATF is cloudy, inspect the oil cooler (radiator).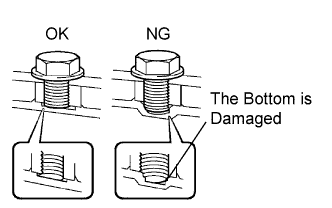
| 8. INSTALL TORQUE CONVERTER CLUTCH ASSEMBLY |
Using vernier calipers, measure dimension A between the transaxle fitting part of the engine and the converter fitting part of the drive plate.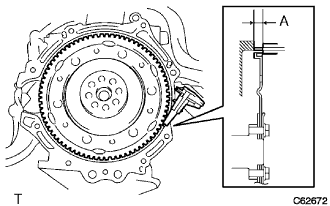
Set the key at the top of the front oil pump drive gear and put a mark on the housing.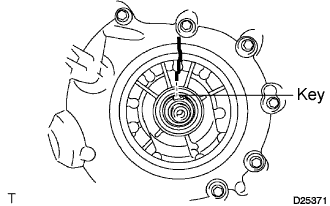
Put a mark on the torque converter so that its groove is clearly indicated.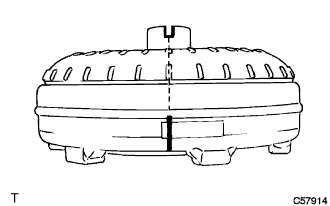
Align the mark on the case with the one on the converter and fit the spline of the input shaft to the spline of the turbine runner.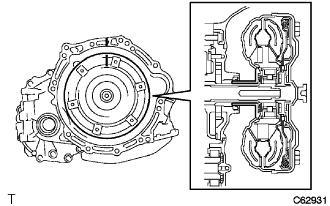
Rotating the converter, fit the spline of the stator shaft with that of the stator.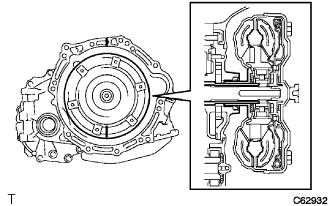
- HINT:
- Rotate it approximately 180 degrees.
Rotating the converter, align the mark on the case with the one on the converter again and fit the key of the oil pump drive gear into the keyway of the converter.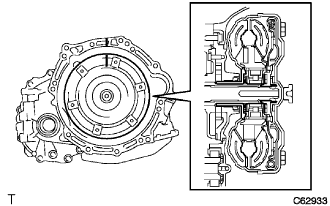
- NOTICE:
- Do not push the converter excessively when rotating it.
Using vernier calipers and a straight edge, measure dimension B shown in the illustration and check that dimension B is greater than dimension A, which was measured in step (a).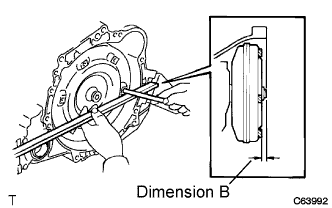
- Standard:
- A + 1 mm (0.04 in.) or more
- NOTICE:
- Subtract the thickness of the straight edge from the measured value to gain dimension B.
| 9. INSTALL AUTOMATIC TRANSAXLE ASSEMBLY |
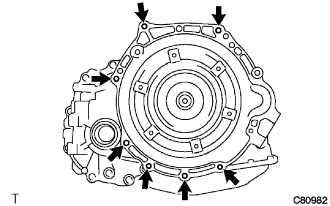 |
Install the automatic transaxle onto the engine with the 7 bolts.
- Torque:
- 30 N*m{ 306 kgf*cm , 22 ft.*lbf }
Install the 6 torque converter set bolts while holding the crankshaft pulley bolt with a wrench.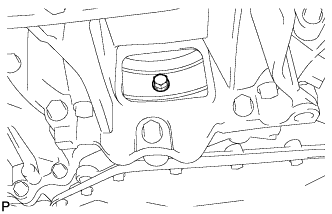
- Torque:
- 27 N*m{ 280 kgf*cm , 20 ft.*lbf }
Install the flywheel housing under cover.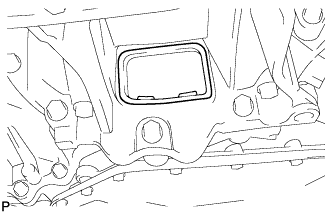
| 10. INSTALL ENGINE MOUNTING BRACKET LH |
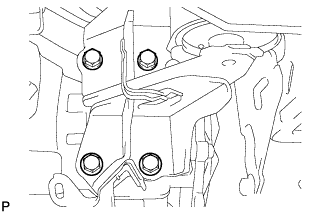 |
Install the engine mounting bracket LH onto the automatic transaxle with the 4 bolts.
- Torque:
- 64 N*m{ 653 kgf*cm , 47 ft.*lbf }
| 11. INSTALL ENGINE MOUNTING INSULATOR LH |
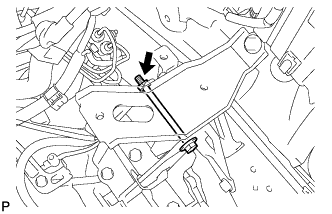 |
Install the engine mounting insulator LH and the engine mounting bracket LH with the bolt and nut.
- Torque:
- 52 N*m{ 530 kgf*cm , 38 ft.*lbf }
| 12. INSTALL ENGINE MOVING CONTROL ROD BRACKET |
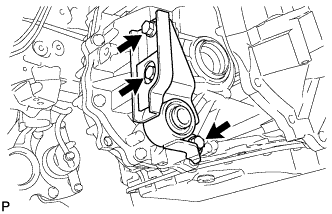 |
Install the engine moving control bracket onto the automatic transaxle with the 3 bolts.
- Torque:
- 39 N*m{ 398 kgf*cm , 29 ft.*lbf }
| 13. INSTALL FRONT SUSPENSION CROSSMEMBER SUB-ASSEMBLY |
Support the front suspension crossmember with a transmission jack.
Provisionally install the front suspension crossmember onto the body with the 6 bolts.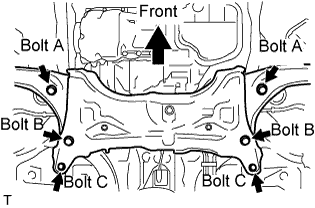
Bolt
Underhead Length (mm)
A
38
B
99
C
41
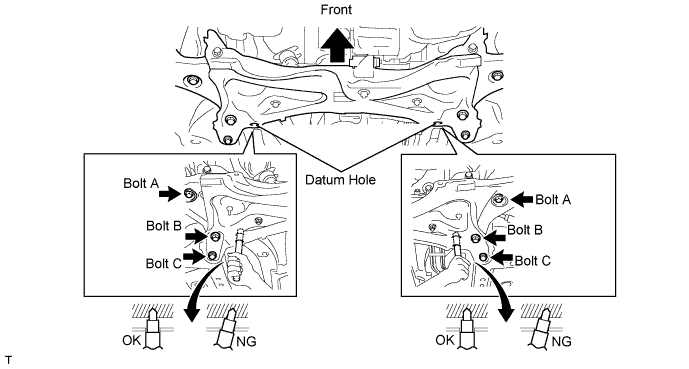
By inserting SST into the datum holes in the front suspension crossmembers RH and LH alternately, tighten bolts A, B and C on both sides to the specified torque, in several steps.
- SST
- 09670-00011
- Torque:
- 70 N*m{ 714 kgf*cm , 52 ft.*lbf } for Bolt A
- 160 N*m{ 1,631 kgf*cm , 118 ft.*lbf } for Bolt B
- 95 N*m{ 969 kgf*cm , 70 ft.*lbf } for Bolt C
- NOTICE:
- Insert SST into the datum hole in a vertical orientation.
- If SST can not be inserted into the datum hole vertically, loosen all the bolts and then insert SST again.
- Insert SST into the datum hole in a vertical orientation.
Install the engine moving control rod with the bolt.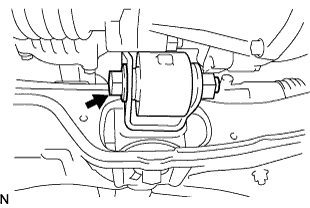
- Torque:
- 120 N*m{ 1,224 kgf*cm , 89 ft.*lbf }
| 14. INSTALL ENGINE MOVING CONTROL ROD |
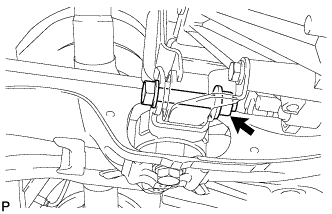 |
Install the engine moving control rod and the engine moving control bracket with the bolt and nut.
- Torque:
- 120 N*m{ 1224 kgf*cm , 89 ft.*lbf }
| 15. INSTALL OIL COOLER OUTLET HOSE |
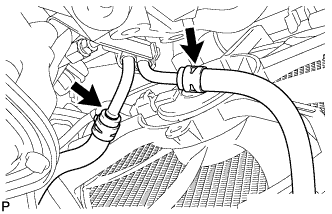 |
Install the oil cooler outlet hose onto the oil cooler outlet tube.
| 16. INSTALL OIL COOLER INLET HOSE |
Install the oil cooler inlet hose onto the oil cooler inlet tube.
| 17. INSTALL FRONT DRIVE SHAFT ASSEMBLY LH |
for Automatic Transaxle:
Coat the spline of the inboard joint with ATF.
for Manual Transaxle:
Coat the spline of the inboard joint with gear oil.
Align the inboard joint splines and install the drive shaft with a screwdriver and hammer.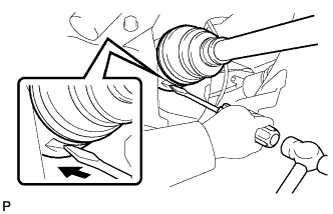
- NOTICE:
- Face the cut area of the front drive inboard joint hole snap ring downward.
- Do not damage the oil seal.
- Do not damage the inboard joint boot.
- Face the cut area of the front drive inboard joint hole snap ring downward.
- HINT:
- Confirm whether the drive shaft is securely driven in by checking the reaction force and sound.
| 18. INSTALL FRONT DRIVE SHAFT ASSEMBLY RH |
- HINT:
- The installation procedure for the RH side is the same as that for the LH side.
| 19. INSTALL FRONT SUSPENSION ARM SUB-ASSEMBLY LOWER NO.1 LH |
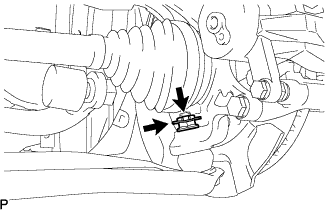 |
Install the lower arm onto the steering knuckle with a new castle nut.
- Torque:
- 98 N*m{ 1,000 kgf*cm , 72 ft.*lbf }
- NOTICE:
- If the holes for the clip are not aligned, tighten the nut by a further turn of up to 60°.
Install a new clip.
| 20. INSTALL FRONT SUSPENSION ARM SUB-ASSEMBLY LOWER NO.1 RH |
- HINT:
- The installation procedure for the RH side is the same as that for the LH side.
| 21. INSTALL TIE ROD END SUB-ASSEMBLY LH |
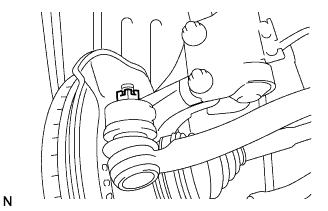 |
Install the tie rod end onto the steering knuckle with a new castle nut.
- Torque:
- 49 N*m{ 500 kgf*cm , 36 ft.*lbf }
- NOTICE:
- If the holes for the clip are not aligned, tighten the nut by a further turn of up to 60°.
Install a new cotter pin.
| 22. INSTALL TIE ROD END SUB-ASSEMBLY RH |
- HINT:
- The installation procedure for the RH side is the same as that for the LH side.
| 23. INSTALL FRONT STABILIZER LINK ASSEMBLY LH |
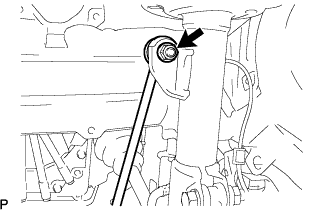 |
Install the stabilizer link with the nut.
- Torque:
- 74 N*m{ 755 kgf*cm , 55 ft.*lbf }
- HINT:
- If the ball joint turns together with the nut, use a socket hexagon wrench 6 to hold the stud.
| 24. INSTALL FRONT STABILIZER LINK ASSEMBLY RH |
- HINT:
- The installation procedure for the RH side is the same as that for the LH side.
| 25. INSTALL SPEED SENSOR FRONT LH |
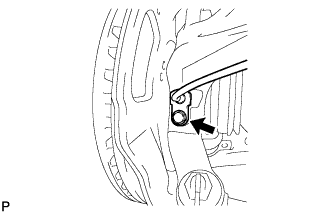 |
Install the speed sensor onto the steering knuckle with the bolt.
- Torque:
- 8.5 N*m{ 87 kgf*cm , 75 in.*lbf }
- NOTICE:
- Check that the speed sensor tip and installation portion are free of foreign matter.
- Install the speed sensor without turning it from its original installation angle.
- Check that the speed sensor tip and installation portion are free of foreign matter.
Install the flexible hose and speed sensor with the bolt.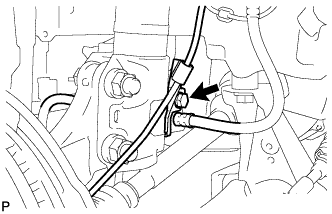
- Torque:
- 29 N*m{ 300 kgf*cm , 22 ft.*lbf }
- NOTICE:
- Install the flexible hose and speed sensor without twisting them.
| 26. INSTALL SPEED SENSOR FRONT RH |
- HINT:
- The installation procedure for the RH side is the same as that for the LH side.
| 27. INSTALL FRONT AXLE HUB NUT LH |
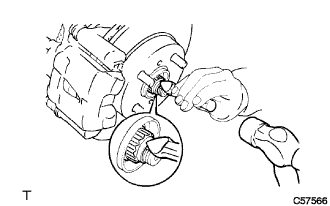 |
Using a 30 mm socket wrench, install a new axle hub nut.
- Torque:
- 216 N*m{ 2,203 kgf*cm , 160 ft.*lbf }
Using a chisel and hammer, caulk the axle hub nut.
| 28. INSTALL FRONT AXLE HUB NUT RH |
- HINT:
- The installation procedure for the RH side is the same as that for the LH side.
| 29. INSTALL STARTER ASSEMBLY |
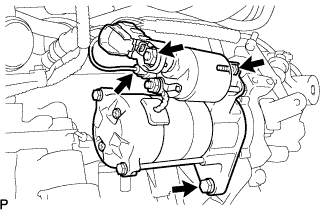 |
Install the starter assembly with the 2 bolts.
- Torque:
- 37 N*m{ 377 kgf*cm , 27 ft.*lbf }
Connect the connector.
Connect terminal 30 with the nut.
- Torque:
- 9.8 N*m{ 100 kgf*cm , 7.2 ft.*lbf }
Close the terminal cap.
| 30. CONNECT WIRE HARNESS |
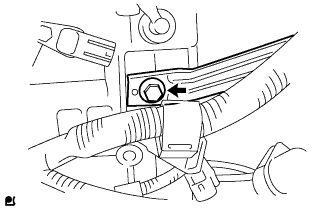 |
Install the wire harness clamp bracket onto the automatic transaxle with a bolt.
- Torque:
- 5.0 N*m{ 51 kgf*cm , 44 in.*lbf }
Install the 2 wire harness clamp brackets onto the automatic transaxle with the 2 bolts.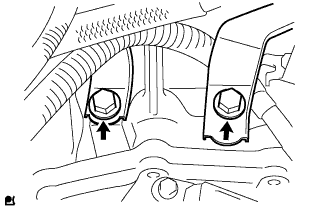
- Torque:
- 5.0 N*m{ 51 kgf*cm , 44 in.*lbf }
| 31. CONNECT CONNECTOR |
Connect the transmission revolution sensor connector.
Connect the transmission wire connector.
Connect the park neutral position switch connector.
| 32. INSTALL ENGINE WIRE NO.3 |
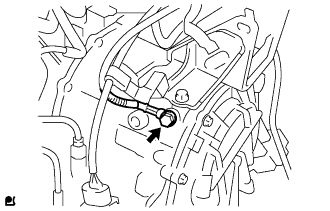 |
Install engine wire No. 3 onto the automatic transaxle with the bolt.
- Torque:
- 7.4 N*m{ 75 kgf*cm , 65 in.*lbf }
Install the 2 clamps onto the engine mount insulator.
| 33. INSTALL TRANSMISSION CONTROL CABLE ASSEMBLY |
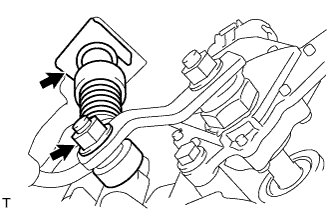 |
Install the transmission control cable onto the control shaft lever with the nut.
- Torque:
- 12 N*m{ 122 kgf*cm , 9 ft.*lbf }
Install the transmission control cable into the bracket with the new clip.
| 34. INSTALL BATTERY CARRIER |
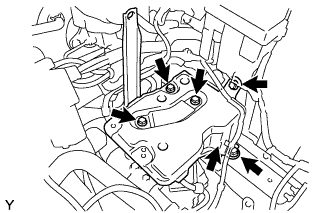 |
Install the battery carrier with the 5 bolts.
- Torque:
- 17 N*m{ 173 kgf*cm , 13 ft.*lbf }
Install the clamp.
| 35. INSTALL AIR CLEANER BRACKET |
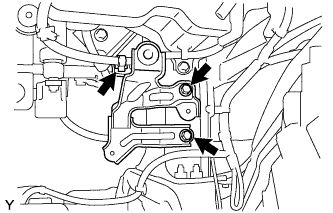 |
Install the air cleaner bracket with the 2 bolts.
- Torque:
- 19 N*m{ 194 kgf*cm , 14 ft.*lbf }
Connect the wire harness clamp to the air cleaner bracket.
| 36. INSTALL AIR CLEANER ASSEMBLY |
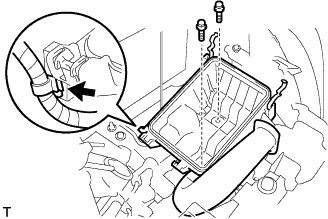 |
Install the air cleaner case with air cleaner inlet No. 1 with the 2 bolts.
- Torque:
- 7.8 N*m{ 80 kgf*cm , 69 in.*lbf }
Connect the wire harness to the air cleaner case.
Install the air cleaner element.
Install and lock the air cleaner cap and air cleaner hose and then tighten the air cleaner hose clamp.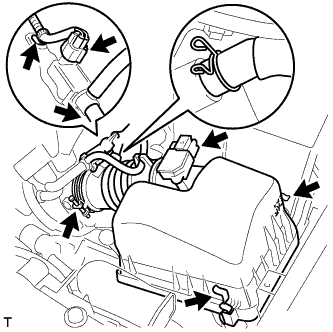
- Torque:
- 4.0 N*m{ 41 kgf*cm , 35 in.*lbf }
Connect the ventilation hose to the air cleaner hose.
Connect the vacuum switching valve connector and wire harness clamp.
Connect the fuel vapor feed hose and fuel vapor feed hose No. 1 to the vacuum switching valve assembly.
Connect the intake air flow meter connector and wire harness clamp.
| 37. INSTALL CYLINDER HEAD COVER NO.2 |
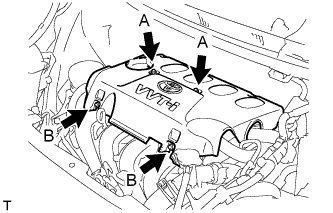 |
Tighten 2 A nuts, then 2 B nuts.
- Torque:
- 7.0 N*m{ 71 kgf*cm , 62 in.*lbf }
| 38. INSTALL COWL TOP PANEL OUTER |
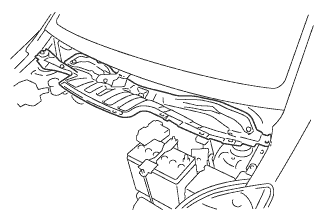 |
Install the cowl top panel with the 9 bolts.
- Torque:
- 6.5 N*m{ 66 kgf*cm , 57 in.*lbf }
Connect the wire harness clamp.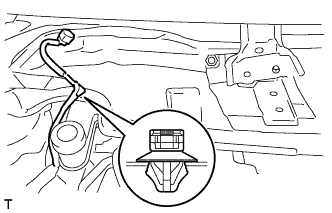
| 39. INSTALL COWL TO REGISTER DUCT SUB-ASSEMBLY RH |
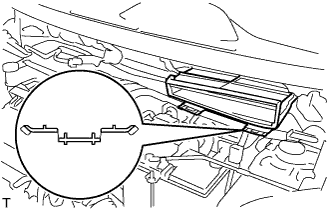 |
Engage the claw to install cowl to register duct No. 2.
| 40. INSTALL FRONT WIPER MOTOR AND LINK |
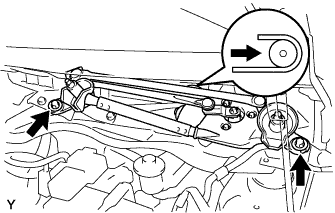 |
Connect the connector.
Slide the wiper link as shown in the illustration and engage the rubber pin with the body.
Install the front wiper motor and link with the 2 bolts.
- Torque:
- 5.5 N*m{ 56 kgf*cm , 49 in.*lbf }
| 41. INSTALL COWL TOP VENTILATOR LOUVER LH |
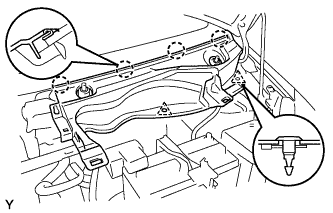 |
Engage the 4 claws and install the cowl top ventilator louver LH.
Install the 2 clips.
| 42. INSTALL COWL TOP VENTILATOR LOUVER SUB-ASSEMBLY |
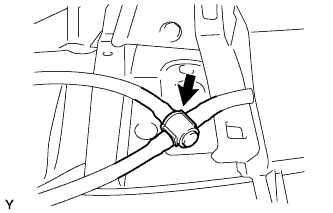 |
Connect the washer hose.
Engage the 11 claws and install the cowl top ventilator louver sub-assembly.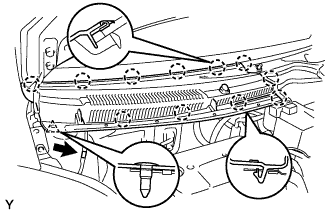
Install the clip.
Connect the washer hose.
Engage the 2 hooks and install cowl top ventilator louver center No. 1.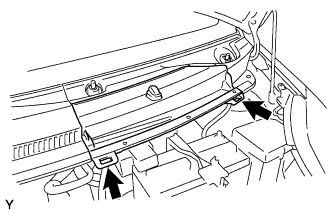
| 43. INSTALL HOOD TO COWL TOP SEAL |
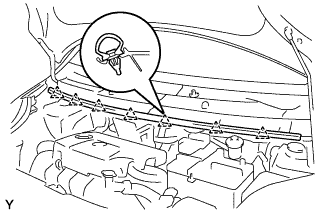 |
Engage the 7 clips and install the hood to cowl top seal.
| 44. INSTALL FRONT WIPER ARM LH |
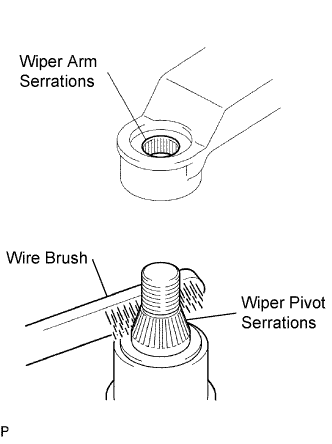 |
Scrape any metal powder off the serrated part of the wiper arm with a round file or the equivalent (when reinstalling).
Clean the wiper pivot serrations with a wire brush.
Operate the wiper, then stop the windshield wiper motor in the automatic stop position.
Align the blade tip with the mark on the windshield glass, as shown in the illustration.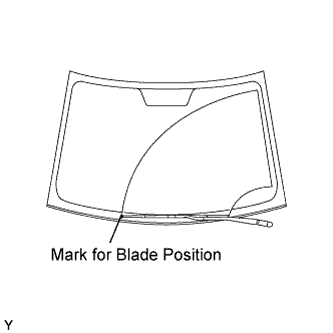
Tighten the nut of the front wiper arm.
- Torque:
- 26 N*m{ 265 kgf*cm , 19 ft.*lbf }
| 45. INSTALL FRONT WIPER ARM RH |
|
|
Scrape any metal powder off the serrated part of the wiper arm with a round file or the equivalent (when reinstalling).
Clean the wiper pivot serrations with a wire brush.
Operate the wiper, then stop the windshield wiper motor in the automatic stop position.
Align the blade tip with the mark on the windshield glass, as shown in the illustration.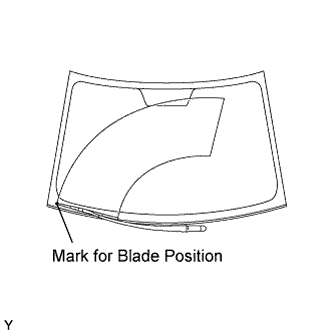
Tighten the nut of the front wiper arm.
- Torque:
- 26 N*m{ 265 kgf*cm , 19 ft.*lbf }
| 46. INSTALL FRONT WIPER ARM HEAD CAP |
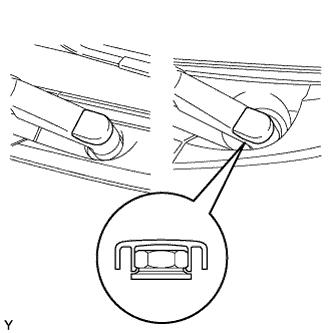 |
Engage the claw and install the 2 front wiper arm head caps.
| 47. TEMPORARILY TIGHTEN HOOD SUB-ASSEMBLY |
Provisionally install the hood with the 4 bolts.
- HINT:
- Tighten the bolts to the specified torque after inspecting the hood.
| 48. INSPECT HOOD SUB-ASSEMBLY |
Check that the clearance measurements are within the standard ranges.
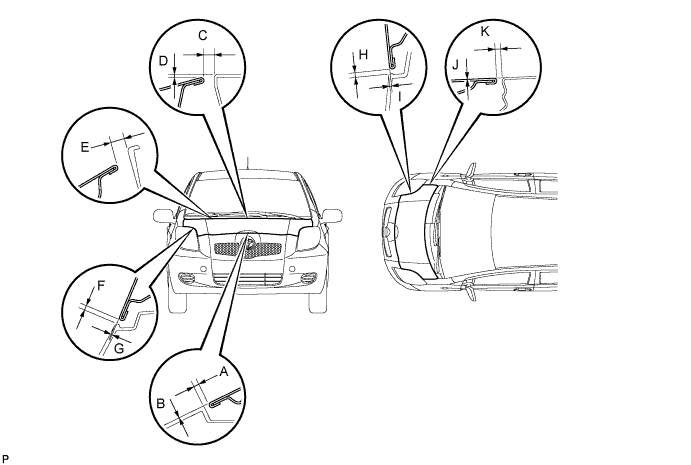
- Standard:
Area
Measurement
Area
Measurement
A
1.7 to 5.7 mm
(0.067 to 0.224 in.)
G
-1.55 to 2.45 mm
(-0.061 to 0.096 in.)
B
-2 to 2 mm
(-0.079 to 0.079 in.)
H
1.75 to 5.75 mm
(0.067 to 0.226 in.)
C
4.45 to 10.45 mm
(0.175 to 0.411 in.)
I
-1.25 to 2.75 mm
(-0.049 to 0.108 in.)
D
-0.95 to 5.05 mm
(-0.037 to 0.199 in.)
J
-1.5 to 1.5 mm
(-0.059 to 0.059 in.)
E
7.55 to 13.55 mm
(0.297 to 0.533 in.)
K
2.0 to 5.0 mm
(0.079 to 0.197 in.)
F
1.65 to 5.65 mm
(0.065 to 0.222 in.)
-
-
| 49. ADJUST HOOD SUB-ASSEMBLY |
Loosen the hood side hinge bolts.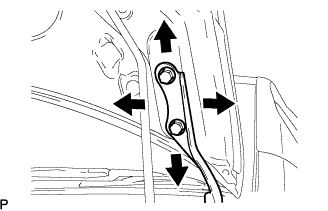
Move the hood to adjust the clearance to within the standard range.
Tighten the hood side hinge bolts after the adjustment.
- Torque:
- 13 N*m{ 133 kgf*cm , 10 ft.*lbf }
Adjust the height of the hood front end by turning the cushion rubber.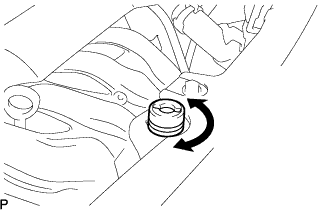
- HINT:
- The cushion rubber can be raised and lowered by turning it.
Adjust the hood lock.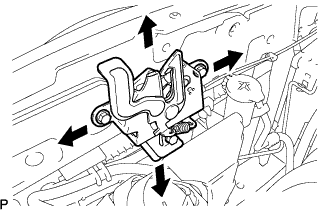
Loosen the 3 bolts.
Adjust the hood lock position so that the striker can enter it smoothly.
Tighten the 3 bolts after the adjustment.
- Torque:
- 7.5 N*m{ 76 kgf*cm , 66 in.*lbf }
| 50. INSTALL FRONT WHEELS |
- Torque:
- 103 N*m{ 1050 kgf*cm , 76 ft.*lbf }
| 51. INSTALL STEERING COLUMN HOLE COVER SUB-ASSEMBLY NO.1 |
Install clip B onto the body portion and install column No. 1 onto the body portion with clip A.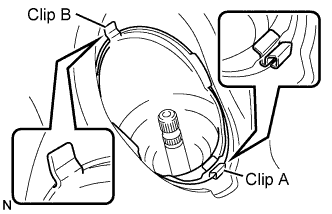
- NOTICE:
- Make sure that the lip portion of hole cover No. 1 is not damaged.
| 52. INSTALL STEERING SLIDING YOKE SUB-ASSEMBLY |
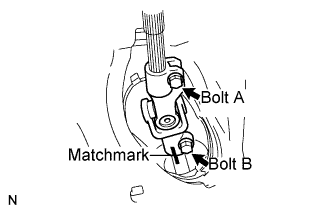 |
Align the matchmarks and install the sliding yoke onto the intermediate shaft.
- Torque:
- 28 N*m{ 290 kgf*cm , 21 ft.*lbf }
Tighten bolt A.
- Torque:
- 28 N*m{ 290 kgf*cm , 21 ft.*lbf }
| 53. INSTALL COLUMN HOLE COVER SILENCER SHEET |
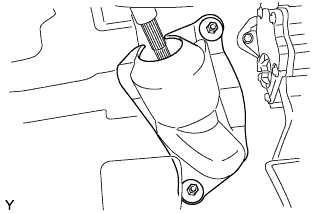 |
Install the column hole cover silencer sheet with the 2 clips.
Install the floor carpet.
| 54. INSTALL BATTERY TRAY |
| 55. INSTALL BATTERY |
Install the battery onto the vehicle with the battery clamp.
- Torque:
- 3.5 N*m{ 36 kgf*cm , 31 in.*lbf }
Connect the cable to the battery terminal.
- Torque:
- 5.4 N*m{ 55 kgf*cm , 48 in.*lbf }
| 56. ADD AUTOMATIC TRANSAXLE FLUID |
- Fluid type:
- T-IV
- Capacity:
- 2.0 liters (2.1 US qts, 1.7 lmp. qts)
| 57. INSPECT AUTOMATIC TRANSAXLE FLUID |
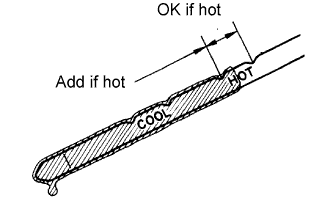 |
- HINT:
- Drive the vehicle until the engine and transaxle are at normal operating temperature.
- Fluid temperature:
- 70 to 80 °C (158 to 176 °F)
Park the vehicle on a level surface and engage the parking brake.
With the engine idling and the brake pedal depressed, shift the shift lever into all positions from P to L, and then return it to the P position.
Pull out the oil level gauge and wipe it clean.
Push it fully back into the pipe.
Pull it out and check that the fluid level is within the HOT range.
If there is any leakage, repair or replace O-rings, FIPGs, oil seals, plugs or other parts.
| 58. CHECK AUTOMATIC TRANSAXLE FLUID LEAKAGE |
| 59. ADJUST SHIFT LEVER POSITION |
Shift the shift lever to the N position.
Slide the adjuster case cover in the direction shown in the illustration and pull out the lock piece.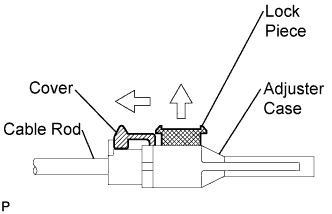
Gently pull the cable rod toward the rear of the vehicle by hand to pull the cable taut.
Press the lock piece into the adjuster case and lock it.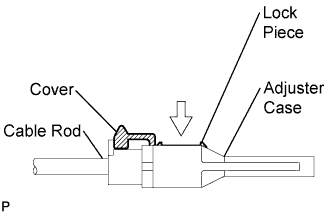
Slide the cover in the direction shown in the illustration.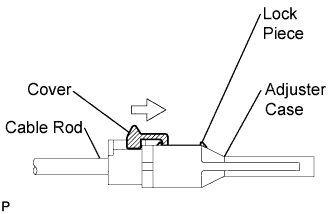
- NOTICE:
- Slide the cover past the protrusion of the lock piece.
Inspect the operation after the adjustment.
| 60. INSPECT SHIFT LEVER POSITION |
When shifting the lever from P to the R position with the ignition switch ON and the brake pedal depressed, make sure that the shift lever moves smoothly and moves correctly into position.
Start the engine and make sure that the vehicle moves forward when shifting the lever from N to the D position and moves rearward when shifting the lever to the R position.
If the operation cannot be performed as specified, inspect the park/neutral position switch assembly and check the shift lever assembly installation condition.
| 61. INSPECT FRONT WHEEL ALIGNMENT |
| 62. INSTALL ENGINE UNDER COVER RH |
| 63. INSTALL ENGINE UNDER COVER LH |