REASSEMBLY
Removal / installation · Vehicles built from Aug 2005
| 1. BEARING POSITION |

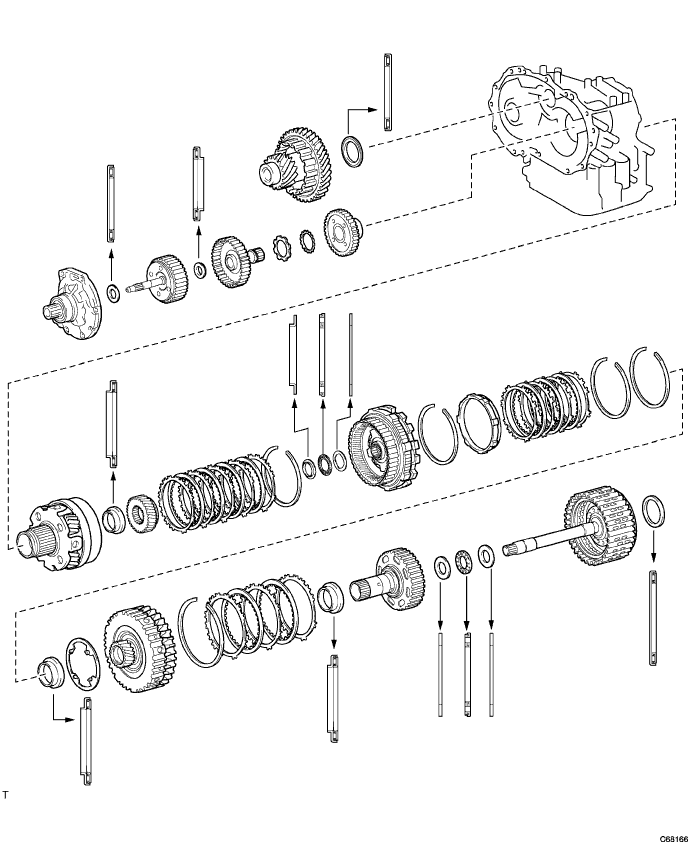

| 2. INSPECT DIFFERENTIAL CASE TAPERED ROLLER BEARING PRELOAD |
 |
Coat the front differential case and bearing with ATF and install them onto the transaxle case.
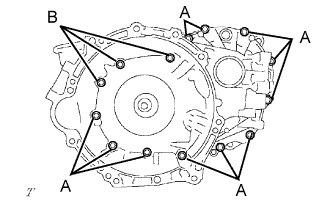
Install the transaxle housing with the 14 bolts.
- Torque:
- Bolt A:
- 29 N*m{ 300 kgf*cm , 22 ft.*lbf }
- Bolt B:
- 22 N*m{ 225 kgf*cm , 16 ft.*lbf }
Using SST and a small torque wrench, measure the preload of the differential gear.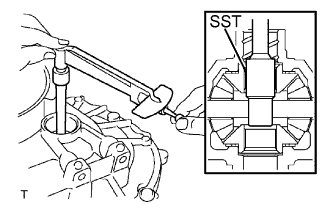
- SST
- 09564-32011
- Preload:
Bearing
Standard
New
0.98 to 1.57 N*m (10.0 to 16.0 kgf*cm 8.7 to 13.9 in.*lbf)
Used
0.49 to 0.78 N*m (5.0 to 8.0 kgf*cm 4.3 to 6.9 in.*lbf)
Select a new transaxle case side adjusting shim in accordance with the following table.- Adjusting shim thickness:
Mark
Thickness mm (in.)
Mark
Thickness mm (in.)
01
1.90 (0.0748)
11
2.40 (0.0945)
02
1.95 (0.0768)
12
2.45 (0.0965)
03
2.00 (0.0787)
13
2.50 (0.0984)
04
2.05 (0.0807)
14
2.55 (0.1004)
05
2.10 (0.0827)
15
2.60 (0.1024)
06
2.15 (0.0846)
16
2.65 (0.1043)
07
2.20 (0.0866)
17
2.70 (0.1063)
08
2.25 (0.0885)
18
2.75 (0.1082)
09
2.30 (0.0906)
19
2.80 (0.1102)
10
2.35 (0.0925)
-
()
| 3. INSTALL TRANSAXLE CASE OIL SEAL |
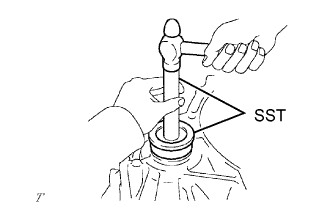 |
Coat the lip of a new oil seal with MP grease.
Using SST and a hammer, drive in a new oil seal.
- SST
- 09554-14010
09950-70010 (09951-07100)
- Oil seal drive in depth:
- 1.5 to 2.5 mm (0.059 to 0.098 in.)
| 4. INSTALL FRONT TRANSAXLE CASE OIL SEAL |
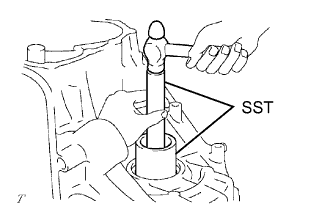 |
Coat the lip of a new oil seal with MP grease.
Using SST and a hammer, drive in a new oil seal.
- SST
- 09726-27012
(09726-02041)
09950-70010 (09951-07150)
- Oil seal drive in depth:
- 5.4 to 6.4 mm (0.213 to 0.252 in.)
| 5. INSTALL FRONT DRIVE PINION REAR TAPERED ROLLER BEARING |
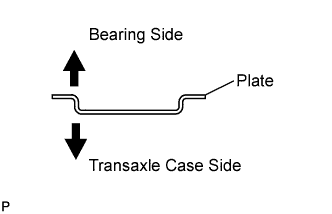 |
Install transaxle case plate No. 1 onto the transaxle case.
Using SST and a hammer, install the front drive pinion rear tapered roller bearing onto the transaxle case.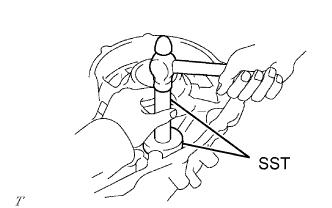
- SST
- 09950-60010
(09951-00610)
09950-70010 (09951-07150)
| 6. INSTALL FRONT DRIVE PINION FRONT TAPERED ROLLER BEARING |
Install the thrust bearing onto the transaxle housing.
Using SST and a press, install a new front drive pinion front tapered roller bearing onto the transaxle housing.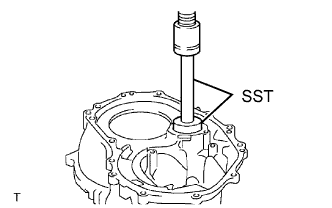
- SST
- 09950-60010
(09951-00650)
09950-70010 (09951-07150)
| 7. INSTALL DIFFERENTIAL GEAR LUBE APPLY TUBE |
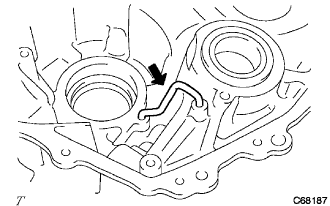 |
Install the differential gear lube apply tube onto the transaxle housing.
| 8. INSTALL BEARING LOCK PLATE |
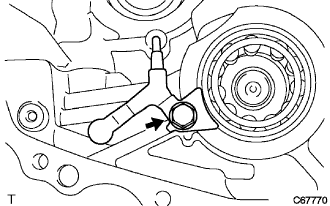 |
Install the bearing lock plate onto the transaxle housing with the bolt.
- Torque:
- 11 N*m{ 115 kgf*cm , 8 ft.*lbf }
| 9. INSTALL COUNTER DRIVE GEAR HOLE SNAP RING |
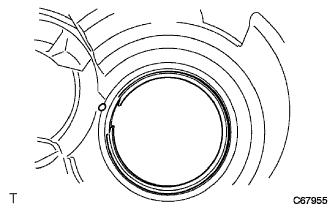 |
Using a screwdriver, install the counter drive gear hole snap ring onto the transaxle case.
| 10. INSTALL COUNTER DRIVE GEAR BEARING |
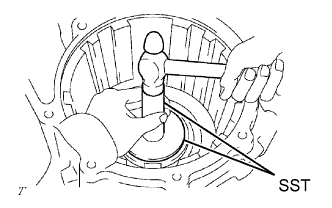 |
Using SST and a hammer, install the counter drive gear bearing LH outer race onto the transaxle case.
- SST
- 09950-60020
(09951-00890)
09950-70010 (09951-07150)
Using SST and a hammer, install the counter drive gear bearing RH outer race onto the transaxle case.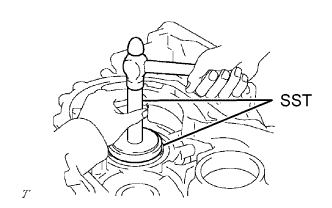
- SST
- 09950-60020
(09951-00890)
09950-70010 (09951-07150)
Install the counter drive gear bearing onto the transaxle case.
| 11. INSTALL MANUAL VALVE LEVER SHAFT OIL SEAL |
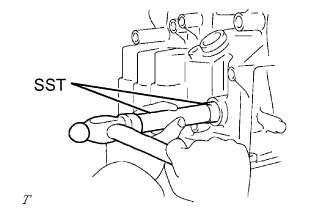 |
Coat the lip of a new oil seal with MP grease.
Using SST and a hammer, install a new manual valve lever shaft oil seal.
- SST
- 09950-60010
(09951-00220)
09950-70010 (09951-07100)
- Oil seal drive in depth:
- -0.5 to 0.5 mm (-0.020 to 0.020 in.)
| 12. INSTALL DIFFERENTIAL DRIVE PINION |
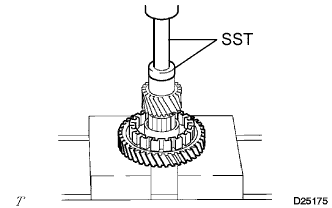 |
Using SST and a press, install the differential drive pinion onto the counter driven gear.
- SST
- 09950-60010
(09951-00350)
09950-70010 (09951-07150)
- NOTICE:
- When replacing the counter driven gear, replace the counter drive gear in the transaxle case as well.
- Press the differential drive pinion in until it comes into contact with the counter driven gear.
| 13. INSTALL FRONT DIFFERENTIAL DRIVE PINION PLUG |
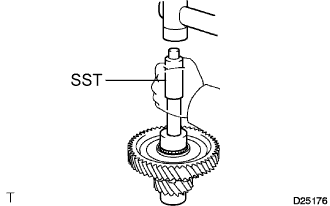 |
Using SST and a plastic hammer, install a new differential drive pinion plug onto the differential drive pinion.
- SST
- 09221-25026
(09221-00071)
- Standard clearance:
- 2.5 to 2.6 mm (0.0984 to 0.1023 in.)
| 14. INSTALL COUNTER DRIVEN GEAR |
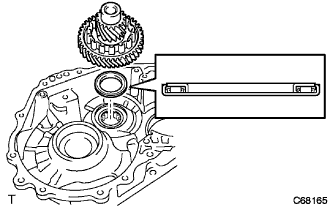 |
Install the counter driven gear and drive pinion thrust bearing onto the transaxle case.
| 15. INSTALL PARKING LOCK PAWL |
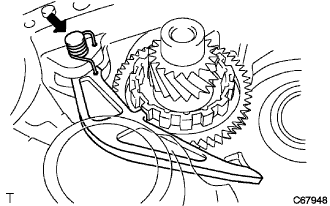 |
Coat the parking lock pawl shaft with ATF.
Install the parking lock pawl, parking lock pawl shaft torsion spring and parking lock pawl shaft onto the transaxle case.
- NOTICE:
- Check that the parking lock pawl moves smoothly.
| 16. INSTALL MANUAL VALVE LEVER SHAFT |
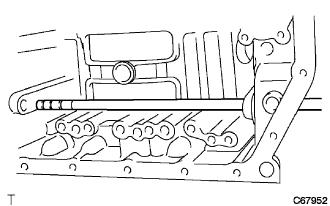 |
Install the manual valve lever shaft onto the transaxle case.
- NOTICE:
- Do not damage the oil seal lip.
| 17. INSTALL PARKING LOCK ROD SUB-ASSEMBLY |
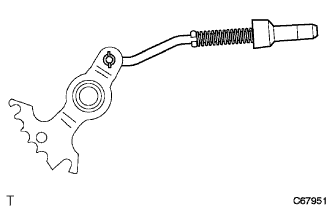 |
Install the parking lock rod onto the manual valve lever.
| 18. INSTALL MANUAL VALVE LEVER SUB-ASSEMBLY |
Coat the manual valve lever sub-assembly with ATF.
Install the manual valve lever and a new manual valve lever spacer onto the manual valve lever shaft.
Using a pin punch and hammer, drive in the pin.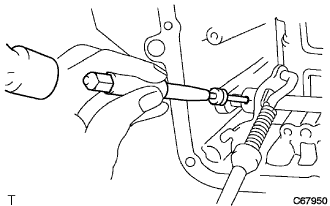
Turn the spacer and lever shaft to align the small hole for locating the staking position in the spacer with the staking position mark on the lever shaft.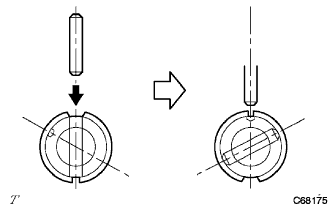
Using a pin punch, stake the spacer through the small hole.
Check that the spacer does not turn.
| 19. INSTALL MANUAL VALVE LEVER SHAFT RETAINER SPRING |
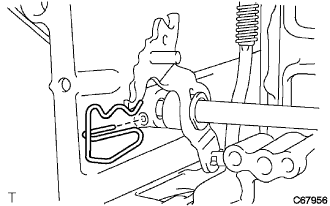 |
Install the manual valve lever shaft retainer spring onto the manual valve lever shaft.
| 20. INSTALL PARKING LOCK PAWL BRACKET |
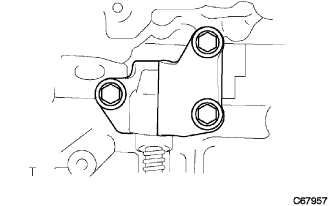 |
Install the parking lock pawl bracket, parking lock rod and cam guide sleeve onto the transaxle case with the 3 bolts.
- Torque:
- 20 N*m{ 205 kgf*cm , 15 ft.*lbf }
| 21. INSTALL COUNTER DRIVE GEAR |
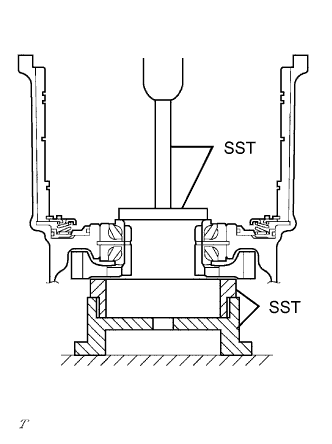 |
Using SST and a press, install the counter drive gear onto the transaxle case.
- SST
- 09223-15030
09527-17011
09950-60010 (09951-00650)
09950-70010 (09951-07150)
| 22. INSTALL PLANETARY GEAR ASSEMBLY |
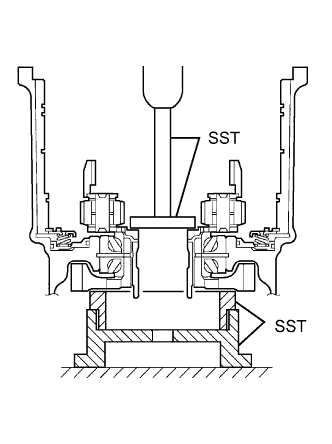 |
Using SST and a press, install the planetary gear assembly onto the transaxle case.
- SST
- 09950-60010
(09951-00480)
09223-15030
09527-17011
09950-70010 (09951-07150)
| 23. INSTALL COUNTER DRIVE GEAR NUT |
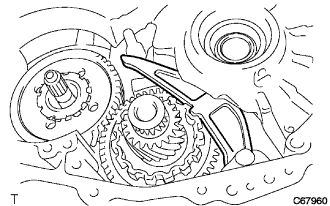 |
Fix the counter driven gear with the parking lock pawl.
Using SST, install a new lock washer and nut.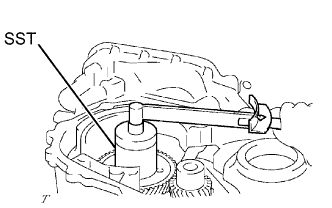
- SST
- 09387-00120
- Torque:
- 280 N*m{ 2,855 kgf*cm , 207 ft.*lbf }
Using SST and a small torque wrench, measure the rotating torque while turning the counter drive gear at 60 turns per minute.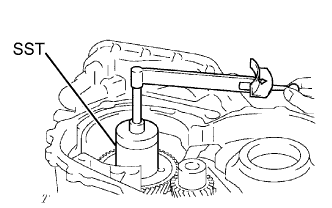
- SST
- 09387-00120
- Rotating torque:
- 0.20 to 0.49 N*m (2 to 5 kgf*cm, 2 to 4 in.*lbf)
Using SST and a hammer, stake the lock nut washer.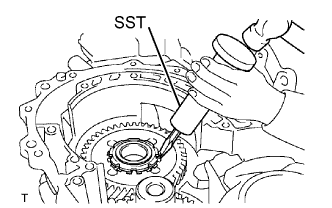
- SST
- 09930-00010
| 24. INSTALL 1ST AND REVERSE BRAKE PISTON NO. 2 O-RING |
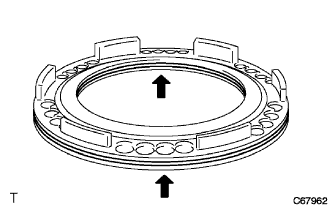 |
Coat 2 new O-rings with ATF, and install them onto brake piston No. 2.
| 25. INSTALL 1ST AND REVERSE BRAKE PISTON NO. 2 |
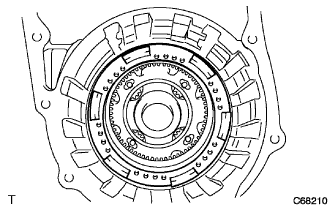 |
Coat 1st and reverse brake piston No. 2 with ATF, and install it into the transaxle case.
- NOTICE:
- Do not damage the oil seal lip.
| 26. INSTALL 1ST AND REVERSE BRAKE RETURN SPRING SUB-ASSEMBLY |
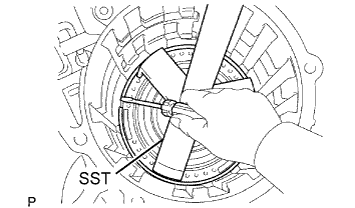 |
Install the 1st and reverse brake return spring sub-assembly onto the transaxle case.
Using SST, a press and a screwdriver, install the snap ring.
- SST
- 09387-00070
| 27. INSTALL 1ST AND REVERSE BRAKE DISC |
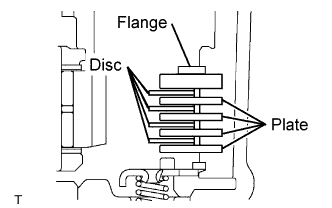 |
Install the 4 plates, 4 discs and flange onto the transaxle case.
Using a screwdriver, install the snap ring.
| 28. INSPECT PACK CLEARANCE OF FIRST AND REVERSE BRAKE |
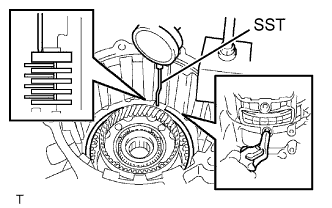 |
Using SST and a dial indicator, measure the first and reverse brake clearance while pressing the disc and plate from the rear side.
- SST
- 09350-36010
(09350-06110)
- Pack clearance:
- 0.806 to 1.206 mm (0.0317 to 0.0475 in.)
- NOTICE:
- If the clearance is outside the specifications, select a new brake flange.
- HINT:
- There are 4 different flange thicknesses.
- Flange thickness:
Mark
Thickness mm (in.)
Mark
Thickness mm (in.)
-
3.4 (0.134)
2
3.8 (0.150)
1
3.6 (0.142)
3
4.0 (0.157)
Check that the 1st and reverse brake piston moves when compressed air (392 kPa, 4.0 kgf*cm2, 57 psi) is applied to the oil hole.
| 29. INSTALL FRONT PLANETARY SUN GEAR |
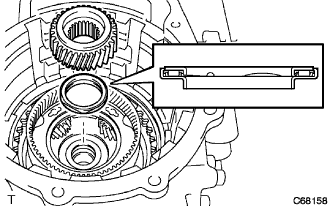 |
Install the planetary sun gear and needle roller bearing onto the planetary gear assembly.
| 30. INSTALL OUTER RACE RETAINER |
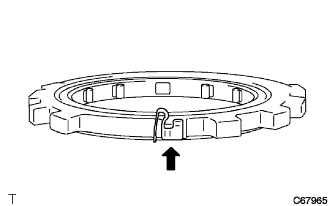 |
Install the outer retainer onto 1-way clutch No. 2.
| 31. INSTALL 1-WAY CLUTCH NO. 2 |
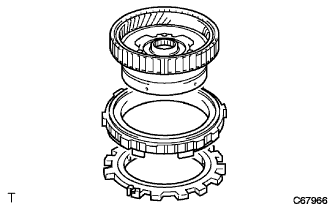 |
Install the 1-way clutch and 2nd brake piston assembly onto the rear planetary gear assembly.
| 32. INSTALL PLANETARY GEAR REAR THRUST NEEDLE ROLLER BEARING |
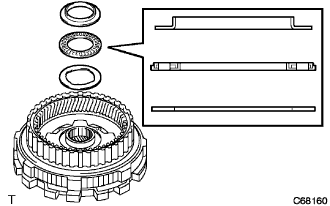 |
Install thrust bearing race No. 2, the planetary gear thrust needle roller bearing and thrust bearing race onto the rear planetary gear assembly.
| 33. INSTALL REAR PLANETARY GEAR ASSEMBLY |
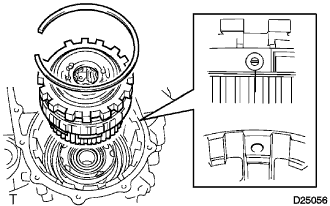 |
Install the rear planetary gear assembly onto the transaxle case.
Using a screwdriver, install the snap ring.
| 34. INSPECT 1-WAY CLUTCH NO. 2 |
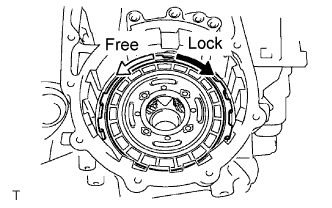 |
Check that the rear planetary gear turns freely counterclockwise and locks when turned clockwise.
| 35. INSTALL 2ND BRAKE PISTON SLEEVE |
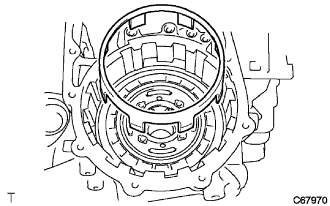 |
Install the 2nd brake piston sleeve onto the transaxle case.
| 36. INSTALL 2ND BRAKE BRAKE DISC |
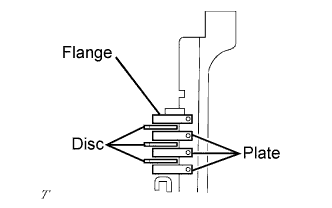 |
Install the 3 discs, 3 plates and flange onto the transaxle case.
Using a screwdriver, install a snap ring onto the transaxle case.
| 37. INSPECT PACK CLEARANCE OF 2ND BRAKE |
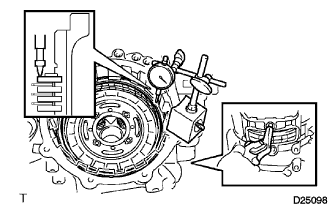 |
Using a dial indicator, measure the 2nd brake pack clearance while applying and releasing compressed air (392 to 785 kPa, 4 to 8 kgf/cm2, 57 to 114 psi).
- Pack clearance:
- 0.847 to 1.247 mm (0.0333 to 0.0491 in.)
- NOTICE:
- If the clearance is outside the specifications, select a new brake flange.
- HINT:
- There are 4 different flange thicknesses.
- Flange thickness:
Mark
Thickness mm (in.)
Mark
Thickness mm (in.)
-
3.0 (0.118)
2
3.4 (0.134)
1
3.2 (0.126)
3
3.6 (0.142)
| 38. INSTALL 2ND COAST AND OVERDRIVE BRAKE FLANGE HOLE SNAP RING |
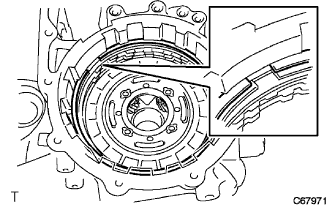 |
Using a screwdriver, install a snap ring onto the transaxle case.
| 39. INSTALL 1-WAY CLUTCH ASSEMBLY |
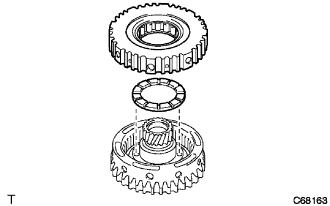 |
Install thrust washer No. 2 onto the rear planetary gear assembly.
Install 1-way clutch assembly onto the rear planetary sun gear assembly.
| 40. INSPECT 1-WAY CLUTCH ASSEMBLY |
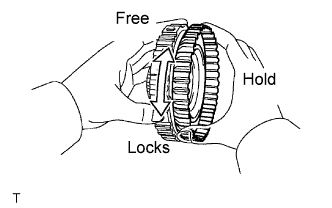 |
Hold the rear planetary sun gear and turn the 1-way clutch and check that the 1-way clutch turns freely counterclockwise and locks when turned clockwise.
| 41. INSTALL REAR PLANETARY SUN GEAR THRUST NEEDLE ROLLER BEARING |
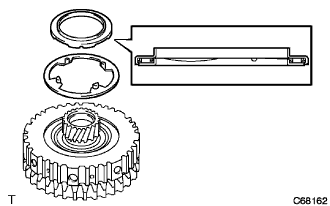 |
Install the thrust bearing and a washer onto the rear planetary sun gear.
| 42. INSTALL REAR PLANETARY SUN GEAR ASSEMBLY |
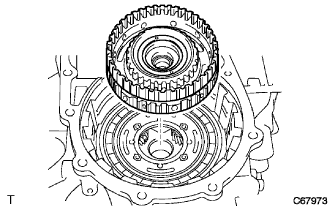 |
Install the rear planetary sun gear assembly.
| 43. INSTALL REAR PLANETARY SUN GEAR NO. 2 THRUST NEEDLE ROLLER BEARING |
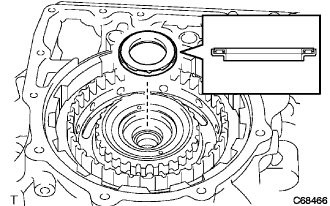 |
Install the thrust bearing onto the rear planetary sun gear.
| 44. INSTALL DIRECT CLUTCH HUB |
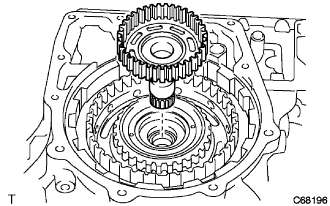 |
Install the direct clutch hub.
| 45. INSTALL THRUST NEEDLE ROLLER BEARING |
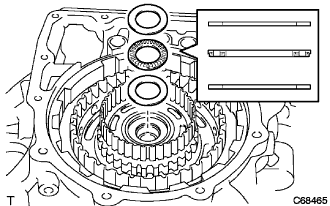 |
Install thrust bearing race No. 3, the thrust needle roller bearing and the C-2 hub thrust bearing race onto the direct clutch hub.
| 46. INSTALL 2ND COAST AND OVERDRIVE BRAKE DISC |
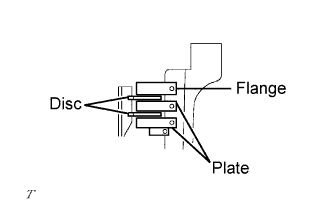 |
Install the 2 discs, 2 plates and flange onto the transaxle case.
| 47. INSTALL INTERMEDIATE SHAFT ASSEMBLY |
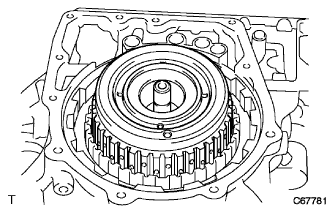 |
Install the intermediate shaft assembly onto the transaxle case.
| 48. INSPECT 2ND COAST AND OVERDRIVE BRAKE CLEARANCE |
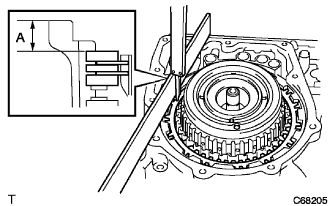 |
As shown in the illustration, place a straight edge on the transaxle case and measure the distance between the 2nd coast and O/D brake flange and straight edge using vernier calipers. (Dimension A)
As shown in the illustration, place a straight edge on the O/D brake piston and measure the distance between the transaxle rear cover and straight edge using vernier calipers. (Dimension B)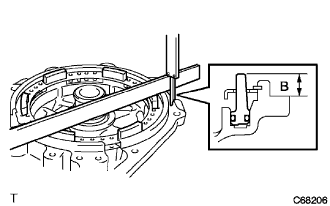
Calculate the piston stroke value using the following formula. Select a flange which meets the piston stroke value and install it.- Pack clearance:
- 2.091 to 2.491 mm (0.0823 to 0.0981 in.)
- NOTICE:
- If the clearance is outside the specifications, select a new brake flange.
- HINT:
- There are 4 different flange thicknesses.
- Flange thickness:
Mark
Thickness mm (in.)
Mark
Thickness mm (in,)
4
4.0 (0.1575)
6
4.4 (0.1732)
5
4.2 (0.1654)
7
4.6 (0.1811)
| 49. INSTALL REAR CLUTCH DRUM THRUST NEEDLE ROLLER BEARING |
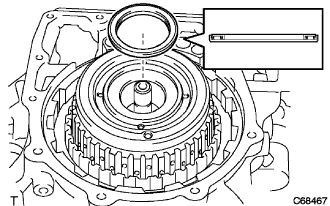 |
Install the bearing onto the intermediate shaft.
| 50. INSPECT INTERMEDIATE SHAFT ASSEMBLY |
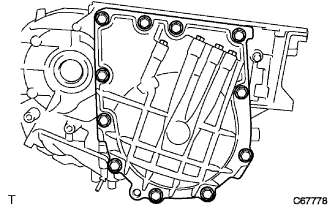 |
Install the transaxle rear cover with the 11 bolts.
- Torque:
- 25 N*m{ 250 kgf*cm , 18 ft.*lbf }
Using a dial indicator, measure the clearance of the intermediate shaft.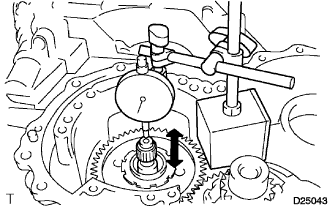
- Standard clearance:
- 0.204 to 0.966 mm (0.008 to 0.038 in.)
Remove the 11 bolts and the transaxle rear cover.
| 51. INSTALL TRANSAXLE CASE GASKET |
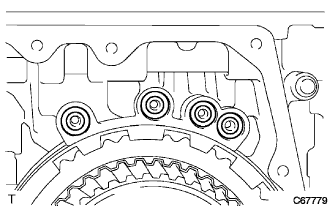 |
Install 4 new gaskets onto the transaxle case.
| 52. INSTALL TRANSAXLE REAR COVER ASSEMBLY |
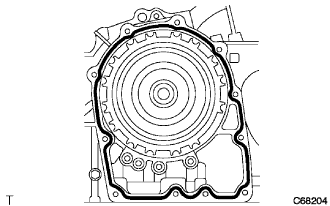 |
Apply FIPG to the transaxle case.
- FIPG:
- Toyota Genuine Seal Packing 1281, Three Bond 1281 or Equivalent
Install the transaxle rear cover with the 11 bolts.
- Torque:
- 25 N*m{ 250 kgf*cm , 18 ft.*lbf }
| 53. INSTALL FORWARD CLUTCH HUB SUB-ASSEMBLY |
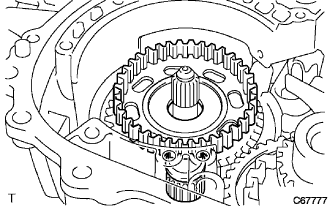 |
Install the forward clutch hub sub-assembly onto the transaxle case.
| 54. INSTALL FORWARD CLUTCH HUB THRUST NEEDLE ROLLER BEARING |
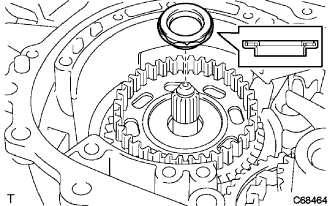 |
Install the bearing onto the forward clutch hub.
| 55. INSTALL STATOR SHAFT THRUST NEEDLE ROLLER BEARING |
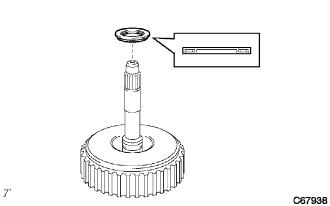 |
Install the bearing onto the input shaft assembly.
| 56. INSTALL INPUT SHAFT ASSEMBLY |
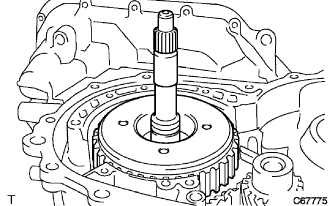 |
Install the input shaft assembly onto the transaxle case.
| 57. INSTALL OVERDRIVE BRAKE GASKET |
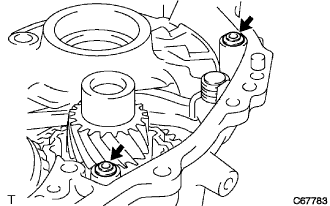 |
Install 2 new gaskets onto the transaxle case.
| 58. INSTALL DIFFERENTIAL GEAR ASSEMBLY |
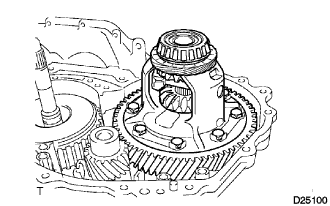 |
Install the differential gear assembly onto the transaxle case.
| 59. INSTALL OIL PUMP ASSEMBLY |
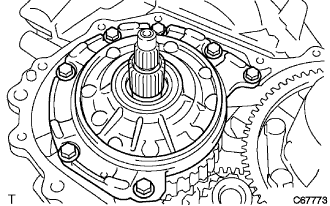 |
Install the oil pump with the 7 bolts.
- Torque:
- 22 N*m{ 225 kgf*cm , 16 ft.*lbf }
| 60. INSPECT INPUT SHAFT ASSEMBLY |
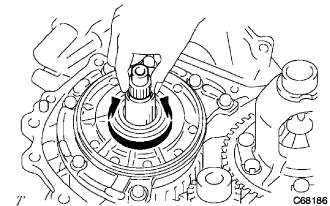 |
Make sure that the input shaft turns smoothly.
| 61. INSPECT INPUT SHAFT END PLAY |
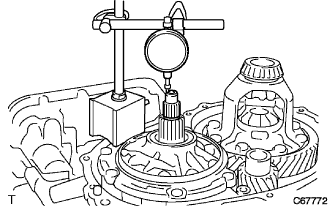 |
Measure the end play in the axial direction.
- End play:
- 0.37 to 1.29 mm (0.0146 to 0.0508 in.)
| 62. INSTALL TRANSAXLE HOUSING |
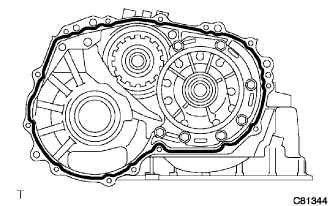 |
Apply FIPG to the transaxle case.
- FIPG:
- Toyota Genuine Seal Packing 1281, Three Bond 1281 or Equivalent
Install the transaxle housing with the 14 bolts.
- Torque:
- Bolt A:
- 29 N*m{ 300 kgf*cm , 22 ft.*lbf }
- Bolt B:
- 22 N*m{ 225 kgf*cm , 16 ft.*lbf }
| 63. INSTALL C-2 ACCUMULATOR PISTON |
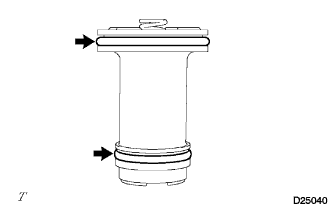 |
Coat 2 new O-rings with ATF and install them onto the C-2 accumulator piston.
- NOTICE:
- Do not damage the O-rings.
Install the spring and C-2 accumulator piston.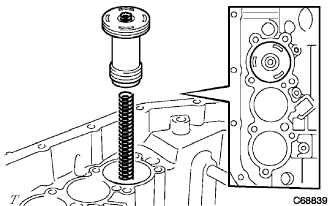
- Accumulator spring:
Spring
Free length/
Outer diameter mm (in.)
Color
C-2
66.90 (2.6339)
17.20 (0.6772)
-
| 64. INSTALL C-3 ACCUMULATOR PISTON |
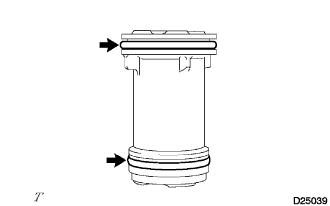 |
Coat 2 new O-rings with ATF and install them onto the C-3 accumulator piston.
- NOTICE:
- Do not damage the O-rings.
Install the spring and C-3 accumulator piston.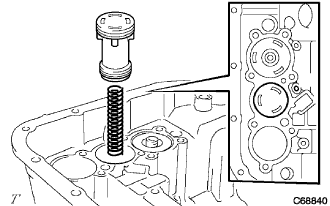
- Accumulator spring:
Spring
Free length/
Outer diameter mm (in.)
Color
C-3
80.20 (3.1575)
18.70 (0.7362)
Blue
| 65. INSTALL B-2 ACCUMULATOR PISTON |
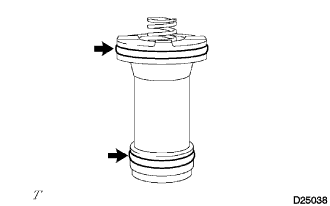 |
Coat 2 new O-rings with ATF and install them onto the B-2 accumulator piston.
- NOTICE:
- Do not damage the O-rings.
Install the spring and B-2 accumulator piston.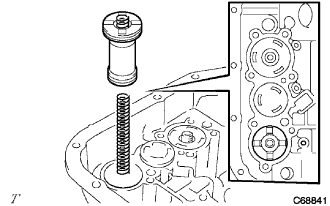
- Accumulator spring:
Spring
Free length/
Outer diameter mm (in.)
Color
B-2
66.90 (2.6339)
15.50 (0.6102)
Green
| 66. INSTALL CHECK BALL BODY |
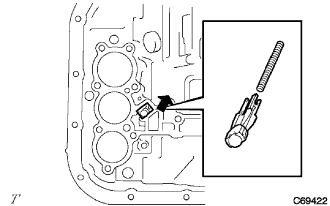 |
Install the spring and check ball body.
| 67. INSTALL BRAKE DRUM GASKET |
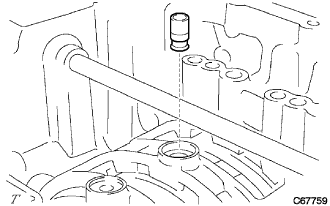 |
Install a new brake drum gasket.
| 68. INSTALL TRANSAXLE CASE GASKET |
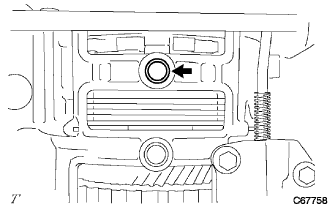 |
Coat a new transaxle case gasket with ATF, and install it onto the transaxle case.
| 69. INSTALL TRANSAXLE CASE 2ND BRAKE GASKET |
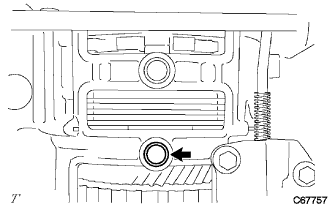 |
Coat a new transaxle case 2nd brake gasket with ATF, and install it onto the transaxle case.
| 70. INSTALL TRANSMISSION WIRE |
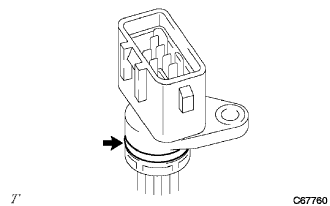 |
Coat a new O-ring with ATF, and install it onto the transmission wire.
Insert the transmission wire into the transaxle.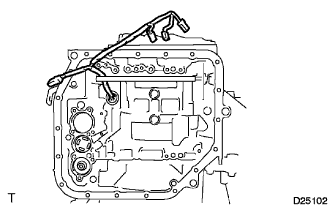
Install the transmission wire with the bolt.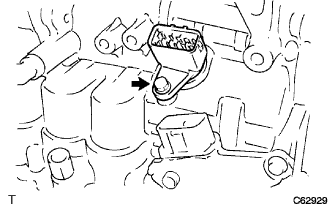
- Torque:
- 5.4 N*m{ 55 kgf*cm , 48 in.*lbf }
| 71. INSTALL TRANSMISSION VALVE BODY ASSEMBLY |
Align the groove of the manual valve with the pin of the manual valve lever.
Provisionally install the valve body with the 13 bolts.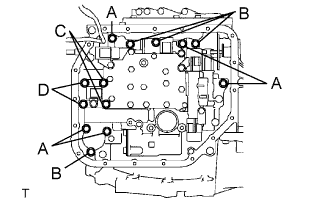
- Bolt length:
- Bolt A: 32 mm (1.26 in.)
Bolt B: 22 mm (0.87 in.)
Bolt C: 55 mm (2.17 in.)
Bolt D: 45 mm (1.77 in.)
Provisionally install the detent spring and detent spring cover with the 2 bolts.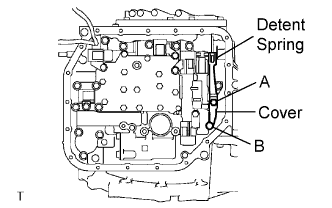
- Bolt length:
- Bolt A: 14 mm (0.55 in.)
Bolt B: 45 mm (1.77 in.)
Check that the manual valve lever is in contact with the center of the roller at the tip of the detent spring.
Tighten the 15 bolts.
- Torque:
- 11 N*m{ 110 kgf*cm , 8 ft.*lbf }
Connect the 5 solenoid connectors.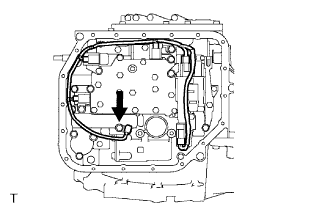
Install the ATF temperature sensor with the lock plate and bolt.
- Torque:
- 11 N*m{ 110 kgf*cm , 8 ft.*lbf }
- Bolt length:
- 55 mm (2.17 in.)
| 72. INSTALL VALVE BODY OIL STRAINER ASSEMBLY |
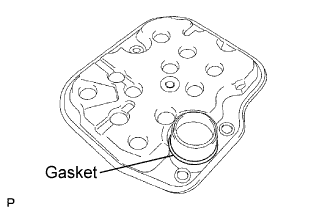 |
Coat a new O-ring with ATF, and install it into the oil strainer.
Install the valve body oil strainer assembly onto the automatic transaxle with the 3 bolts.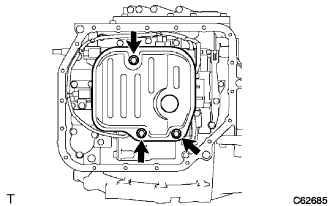
- Torque:
- 11 N*m{ 110 kgf*cm , 8 ft.*lbf }
| 73. INSTALL AUTOMATIC TRANSAXLE OIL PAN SUB-ASSEMBLY |
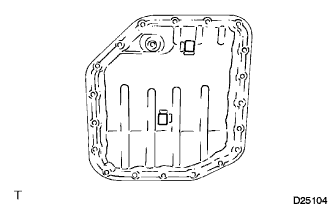 |
Install the 2 magnets onto the oil pan.
Install a new oil pan gasket onto the oil pan.
Install the oil pan with the 19 bolts.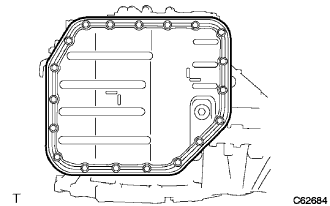
- Torque:
- 7.8 N*m{ 80 kgf*cm , 69 in.*lbf }
| 74. INSTALL BREATHER PLUG HOSE |
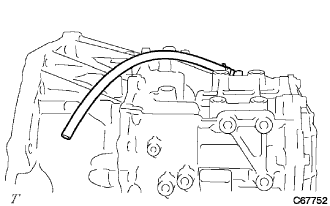 |
Install the breather plug hose onto the transaxle case.
| 75. INSTALL TRANSAXLE CASE NO. 1 PLUG |
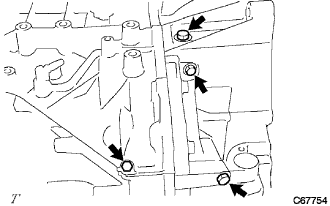 |
Coat 5 new O-rings with ATF, and install them onto the screw plugs.
Install the 4 screw plugs onto the transaxle housing and transaxle case.
- Torque:
- 7.4 N*m{ 75 kgf*cm , 65 in.*lbf }
Install the screw plug onto the transaxle case.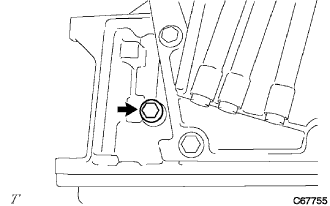
- Torque:
- 7.4 N*m{ 75 kgf*cm , 65 in.*lbf }
| 76. INSTALL OIL COOLER TUBE UNION |
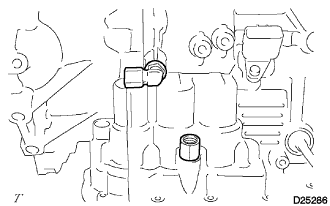 |
Coat 2 new O-rings with ATF, and install them into the 2 oil cooler tube unions.
Install the 2 oil cooler tube unions onto the transaxle case.
- Torque:
- 27 N*m{ 275 kgf*cm , 20 ft.*lbf }
| 77. INSTALL TRANSMISSION REVOLUTION SENSOR |
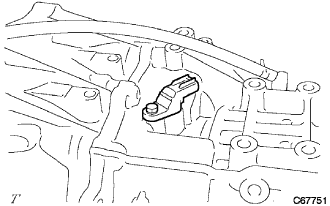 |
Coat a new O-ring with ATF, and install it into the transmission revolution sensor.
Install the transmission revolution sensor onto the transaxle case with the bolt.
- Torque:
- 5.4 N*m{ 55 kgf*cm , 48 in.*lbf }
| 78. INSTALL PARK/NEUTRAL POSITION SWITCH ASSEMBLY |
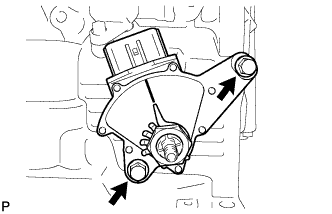 |
Install the park/neutral position switch assembly onto the manual transaxle.
Provisionally install the 2 bolts.
Replace the lock plate with a new one and tighten the manual valve shaft nut.
- Torque:
- 6.9 N*m{ 70 kgf*cm , 61 in.*lbf }
Provisionally install the control shaft lever.
Turn the lever counterclockwise until it stops, then turn it clockwise 2 notches.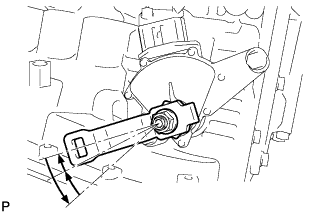
Remove the control shaft lever.
Align the groove with the neutral basic line.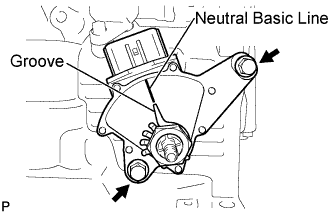
Hold the switch in this position and tighten the 2 bolts.
- Torque:
- 5.4 N*m{ 55 kgf*cm , 48 in.*lbf }
Using a screwdriver, stake the nut with the lock plate.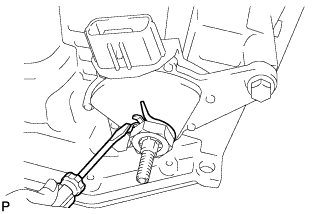
Install the control shaft lever with the nut and washer.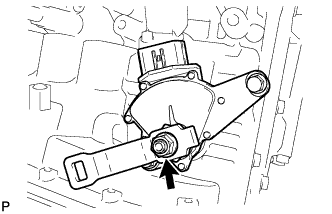
- Torque:
- 13 N*m{ 130 kgf*cm , 9 ft.*lbf }
| 79. INSTALL SPEEDOMETER DRIVEN HOLE COVER |
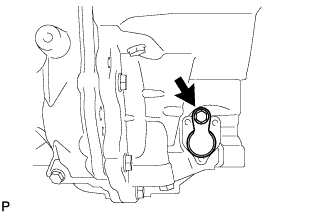 |
Coat a new O-ring with ATF and install it into the speedometer driven hole cover.
Install the speedometer driven hole cover onto the transaxle housing.