INSTALLATION
Removal / installation · Vehicles built from Aug 2005
| 1. INSTALL MANUAL TRANSAXLE ASSEMBLY |

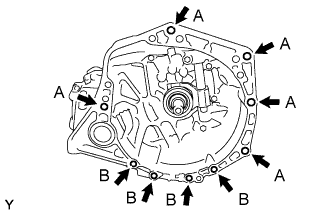  |
Align the input shaft with the clutch disc and install the manual transaxle onto the engine.
Install the 9 bolts.
- Torque:
- 64 N*m{ 653 kgf*cm , 47 ft.*lbf } for bolt A
- 39 N*m{ 398 kgf*cm , 29 ft.*lbf } for bolt B
- NOTICE:
- Insert dowel pins into dowel holes securely so that the end face of transaxle assembly fits close against engine assembly before tightening the bolts between the engine and transaxle.
- Make sure that the dowel pins are not loose, bent, damaged or scratched and then install the transaxle onto the engine with the contact surfaces of the engine and transaxle flat against each other.
- Insert dowel pins into dowel holes securely so that the end face of transaxle assembly fits close against engine assembly before tightening the bolts between the engine and transaxle.
| 2. INSTALL SHIFT LEVER DAMPER |
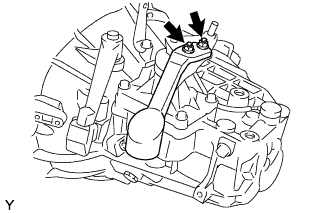 |
Install the shift lever damper with the 2 nuts.
- Torque:
- 20 N*m{ 204 kgf*cm , 15 ft.*lbf }
| 3. INSTALL TRANSVERSE ENGINE ENGINE MOUNTING BRACKET |
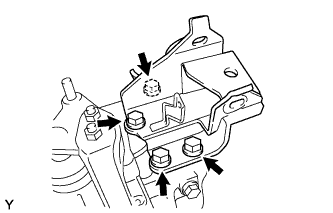 |
Install the engine mounting bracket LH with the 4 bolts.
- Torque:
- 64 N*m{ 653 kgf*cm , 47 ft.*lbf }
| 4. INSTALL TRANSVERSE ENGINE ENGINE MOUNTING INSULATOR |
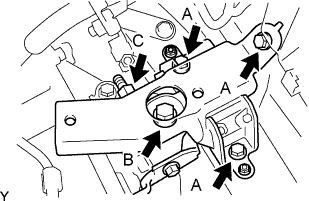 |
Install the engine mounting insulator LH with the 4 bolts.
- Torque:
- 52 N*m{ 530 kgf*cm , 38 ft.*lbf } for bolt A
- 64 N*m{ 653 kgf*cm , 47 ft.*lbf } for bolt B
Install the engine mounting bracket LH and engine mounting insulator LH with the bolt and nut.
- Torque:
- 52 N*m{ 530 kgf*cm , 38 ft.*lbf } for nut C
| 5. INSTALL TRANSVERSE ENGINE ENGINE MOUNTING CONTROL BRACKET |
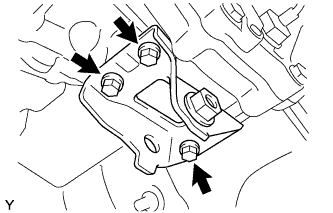 |
Install the engine mounting control bracket with the 3 bolts.
- Torque:
- 39 N*m{ 398 kgf*cm , 29 ft.*lbf }
| 6. INSTALL FRONT SUSPENSION CROSSMEMBER SUB-ASSEMBLY |
Support the front suspension crossmember with a transmission jack.
Provisionally install the front suspension crossmember onto the body with the 6 bolts.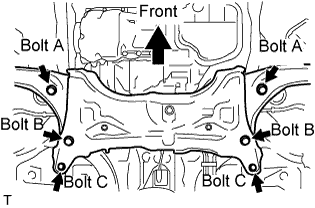
Bolt
Underhead Length (mm)
A
38
B
99
C
41
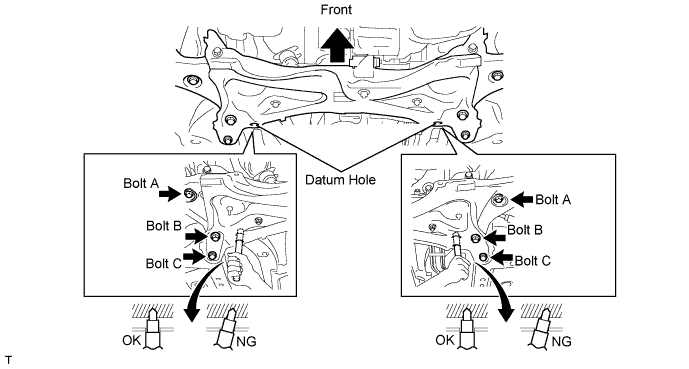
By inserting SST into the datum holes in the front suspension crossmembers RH and LH alternately, tighten bolts A, B and C on both sides to the specified torque, in several steps.
- SST
- 09670-00011
- Torque:
- 70 N*m{ 714 kgf*cm , 52 ft.*lbf } for Bolt A
- 160 N*m{ 1,631 kgf*cm , 118 ft.*lbf } for Bolt B
- 95 N*m{ 969 kgf*cm , 70 ft.*lbf } for Bolt C
- NOTICE:
- Insert SST into the datum hole in a vertical orientation.
- If SST can not be inserted into the datum hole vertically, loosen all the bolts and then insert SST again.
- Insert SST into the datum hole in a vertical orientation.
Install the engine moving control rod with the bolt.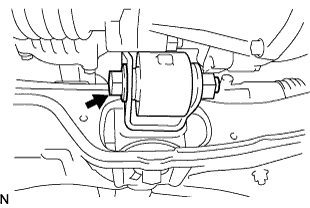
- Torque:
- 120 N*m{ 1,224 kgf*cm , 89 ft.*lbf }
| 7. INSTALL FRONT EXHAUST PIPE ASSEMBLY |
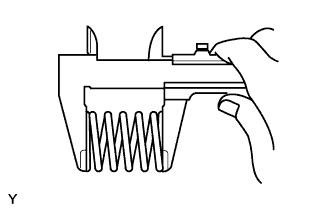 |
Using vernier calipers, measure the free length of the compression spring.
- Minimum length (Front Side):
- 40.5 mm (1.594 in.)
- Minimum length (Rear Side):
- 38.5 mm (1.516 in.)
Using a plastic hammer and a wooden block, tap in a new exhaust pipe gasket until its surface is flush with the exhaust manifold.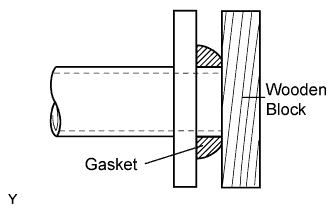
- NOTICE:
- Install the exhaust pipe gasket in the correct direction.
- Do not damage the outer surface of the exhaust pipe gasket.
- Do not reuse the exhaust pipe gasket.
- Do not push in the gasket with the exhaust pipe when connecting it.
- Install the exhaust pipe gasket in the correct direction.
Install the 3 exhaust pipe support No. 4.
Install the exhaust front pipe assembly and a new exhaust pipe gasket with the 4 compression springs and 4 bolts.
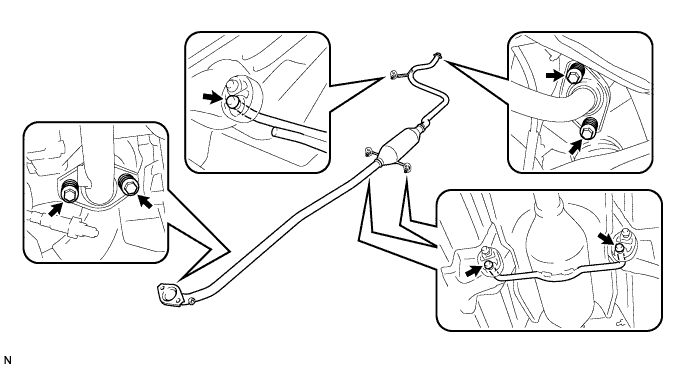
- Torque:
- 43 N*m{ 439 kgf*cm , 32 ft.*lbf }
| 8. CONNECT OXYGEN SENSOR CONNECTOR |
| 9. INSTALL FRONT DRIVE SHAFT ASSEMBLY LH |
for Automatic Transaxle:
Coat the spline of the inboard joint with ATF.
for Manual Transaxle:
Coat the spline of the inboard joint with gear oil.
Align the inboard joint splines and install the drive shaft with a screwdriver and hammer.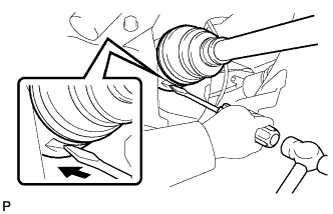
- NOTICE:
- Face the cut area of the front drive inboard joint hole snap ring downward.
- Do not damage the oil seal.
- Do not damage the inboard joint boot.
- Face the cut area of the front drive inboard joint hole snap ring downward.
- HINT:
- Confirm whether the drive shaft is securely driven in by checking the reaction force and sound.
| 10. INSTALL FRONT DRIVE SHAFT ASSEMBLY RH |
- HINT:
- The installation procedure for the RH side is the same as that for the LH side.
| 11. INSTALL FRONT AXLE ASSEMBLY LH |
Push the front axle out of the vehicle to align the spline of the drive shaft with the front axle and insert the front axle.
- NOTICE:
- Do not push the front axle further out of the vehicle than is necessary.
- Do not damage the outboard joint boot.
- Check for any foreign matter on the speed sensor rotor and insertion part.
- Do not damage the speed sensor rotor.
- Do not push the front axle further out of the vehicle than is necessary.
| 12. INSTALL FRONT AXLE ASSEMBLY RH |
- HINT:
- The installation procedure for the RH side is the same as that for the LH side.
| 13. INSTALL FRONT STABILIZER LINK ASSEMBLY LH |
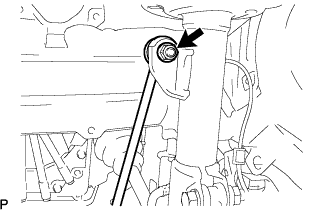 |
Install the stabilizer link with the nut.
- Torque:
- 74 N*m{ 755 kgf*cm , 55 ft.*lbf }
- HINT:
- If the ball joint turns together with the nut, use a socket hexagon wrench 6 to hold the stud.
| 14. INSTALL FRONT STABILIZER LINK ASSEMBLY RH |
- HINT:
- The installation procedure for the RH side is the same as that for the LH side.
| 15. INSTALL TIE ROD END SUB-ASSEMBLY LH |
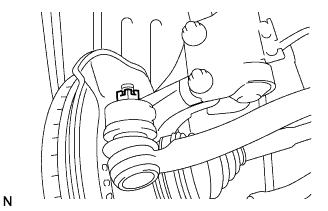 |
Install the tie rod end onto the steering knuckle with a new castle nut.
- Torque:
- 49 N*m{ 500 kgf*cm , 36 ft.*lbf }
- NOTICE:
- If the holes for the clip are not aligned, tighten the nut by a further turn of up to 60°.
Install a new cotter pin.
| 16. INSTALL TIE ROD END SUB-ASSEMBLY RH |
- HINT:
- The installation procedure for the RH side is the same as that for the LH side.
| 17. INSTALL FRONT SUSPENSION ARM SUB-ASSEMBLY LOWER NO.1 LH |
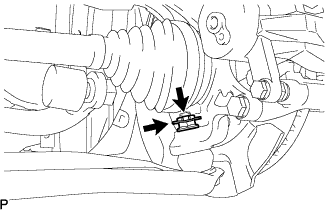 |
Install the lower arm onto the steering knuckle with a new castle nut.
- Torque:
- 98 N*m{ 1,000 kgf*cm , 72 ft.*lbf }
- NOTICE:
- If the holes for the clip are not aligned, tighten the nut by a further turn of up to 60°.
Install a new clip.
| 18. INSTALL FRONT SUSPENSION ARM SUB-ASSEMBLY LOWER NO.1 RH |
- HINT:
- The installation procedure for the RH side is the same as that for the LH side.
| 19. INSTALL SPEED SENSOR FRONT LH |
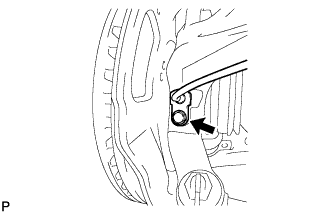 |
Install the speed sensor onto the steering knuckle with the bolt.
- Torque:
- 8.5 N*m{ 87 kgf*cm , 75 in.*lbf }
- NOTICE:
- Check that the speed sensor tip and installation portion are free of foreign matter.
- Install the speed sensor without turning it from its original installation angle.
- Check that the speed sensor tip and installation portion are free of foreign matter.
Install the flexible hose and speed sensor with the bolt.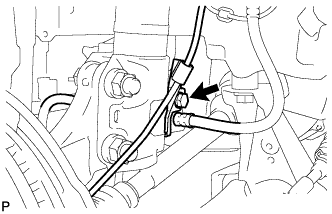
- Torque:
- 29 N*m{ 300 kgf*cm , 22 ft.*lbf }
- NOTICE:
- Install the flexible hose and speed sensor without twisting them.
| 20. INSTALL SPEED SENSOR FRONT RH |
- HINT:
- The installation procedure for the RH side is the same as that for the LH side.
| 21. INSTALL FRONT AXLE SHAFT LH NUT |
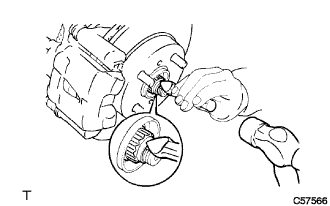 |
Using a 30 mm socket wrench, install a new axle hub nut.
- Torque:
- 216 N*m{ 2,203 kgf*cm , 160 ft.*lbf }
Using a chisel and hammer, caulk the axle hub nut.
| 22. INSTALL FRONT AXLE SHAFT RH NUT |
- HINT:
- The installation procedure for the RH side is the same as that for the LH side.
| 23. INSTALL STARTER ASSEMBLY |
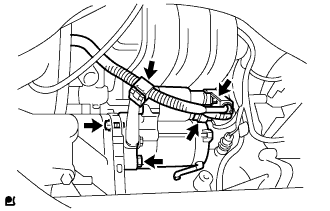 |
Install the starter assembly with the 2 bolts.
- Torque:
- 37 N*m{ 377 kgf*cm , 27 ft.*lbf }
Connect the connector.
Connect terminal 30 with the nut.
- Torque:
- 9.8 N*m{ 100 kgf*cm , 7.2 ft.*lbf }
Close the terminal cap.
Install the wire harness bracket with the bolt.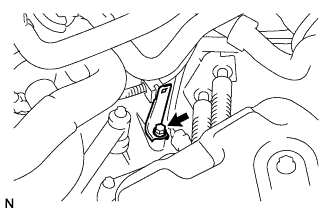
- Torque:
- 8 N*m{ 82 kgf*cm , 71 in.*lbf }
Install the harness clamp.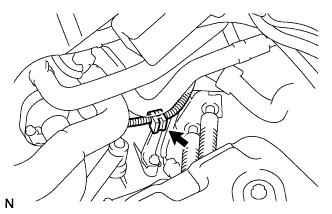
| 24. CONNECT CONNECTOR |
Connect the back-up light switch connector.
| 25. CONNECT WIRE HARNESS |
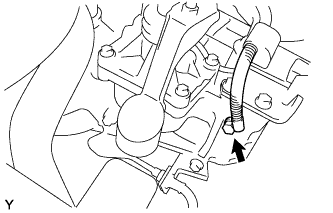 |
Connect the wire harness with the bolt.
- Torque:
- 26 N*m{ 260 kgf*cm , 19 ft.*lbf }
| 26. INSTALL TRANSMISSION CONTROL CABLE ASSEMBLY |
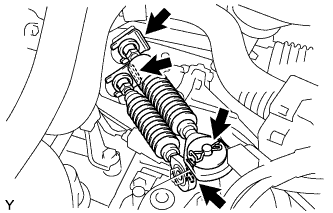 |
Connect the 2 cable ends, and install the 2 washers and the 2 clips.
Install the 2 new clips onto the control cable bracket.
| 27. INSTALL CLUTCH RELEASE CYLINDER ASSEMBLY |
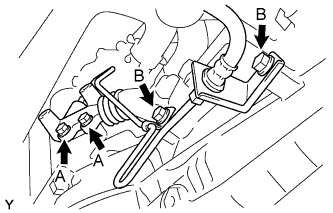 |
Install the clutch release cylinder and clutch pipe with the 4 bolts.
- Torque:
- 14 N*m{ 141 kgf*cm , 10 ft.*lbf } for bolt A
- 19 N*m{ 194 kgf*cm , 14 ft.*lbf } for bolt B
| 28. INSTALL RELEASE CYLINDER HEAT INSULATOR |
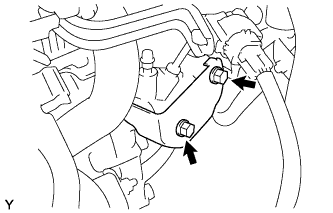 |
Install the release cylinder heat insulator with the 2 bolts.
- Torque:
- 12 N*m{ 120 kgf*cm , 8.7 ft.*lbf }
| 29. INSTALL BATTERY CARRIER |
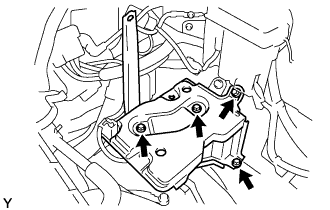 |
Install the battery carrier with the 4 bolts.
- Torque:
- 17 N*m{ 175 kgf*cm , 13 ft.*lbf }
| 30. INSTALL BATTERY TRAY |
| 31. INSTALL BATTERY |
| 32. INSTALL BATTERY HOLD DOWN CLAMP |
| 33. INSTALL COWL TOP PANEL OUTER |
Install the cowl top panel outer with the 9 bolts.
- Torque:
- 6.5 N*m{ 66 kgf*cm , 58 in.*lbf }
Engage the clamp and install the wiper motor connector wire harness.
| 34. INSTALL COWL TO REGISTER DUCT SUB-ASSEMBLY NO.2 |
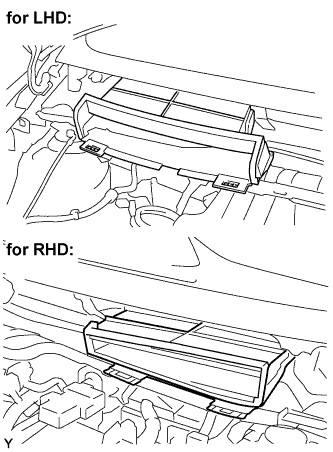 |
Engage the claws, and install the cowl to register duct No. 2.
| 35. INSTALL WINDSHIELD WIPER MOTOR AND LINK |
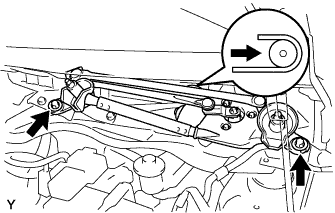 |
Connect the connector.
Slide the wiper link as shown in the illustration and engage the rubber pin with the body.
Install the front wiper motor and link with the 2 bolts.
- Torque:
- 5.5 N*m{ 56 kgf*cm , 49 in.*lbf }
| 36. INSTALL COWL TOP VENTILATOR LOUVER LH (for LHD) |
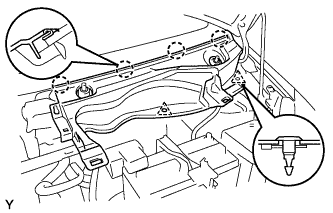 |
Engage the 4 claws and install the cowl top ventilator louver LH.
Install the 2 clips.
| 37. INSTALL COWL TOP VENTILATOR LOUVER SUB-ASSEMBLY (for LHD) |
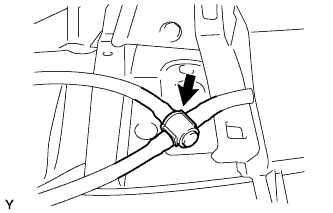 |
Connect the washer hose.
Engage the 11 claws and install the cowl top ventilator louver sub-assembly.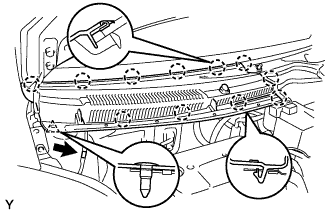
Install the clip.
Connect the washer hose.
Engage the 2 hooks and install cowl top ventilator louver center No. 1.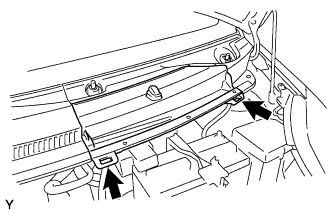
| 38. INSTALL COWL TOP VENTILATOR LOUVER LH (for RHD) |
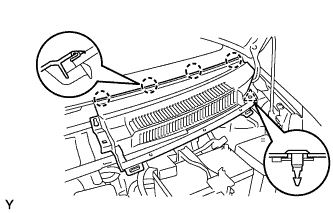 |
Engage the 4 claws and install the cowl top ventilator louver LH.
Install the clip.
| 39. INSTALL COWL TOP VENTILATOR LOUVER SUB-ASSEMBLY (for RHD) |
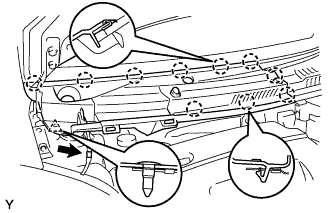 |
Engage the 10 claws and install the cowl top ventilator louver sub-assembly.
Install the clip.
Connect the washer hose.
| 40. INSTALL HOOD TO COWL TOP SEAL |
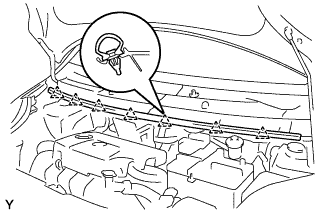 |
Engage the 7 clips and install the hood to cowl top seal.
| 41. INSTALL FRONT WIPER ARM AND BLADE ASSEMBLY LH |
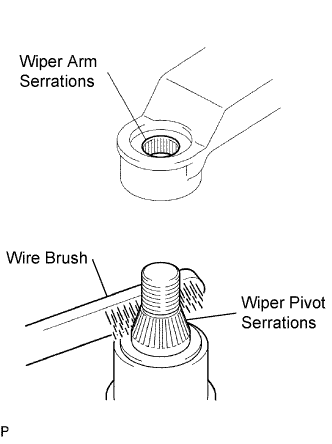 |
Scrape any metal powder off the serrated part of the wiper arm with a round file or the equivalent (when reinstalling).
Clean the wiper pivot serrations with a wire brush.
Operate the wiper, then stop the windshield wiper motor in the automatic stop position.
Align the blade tip with the mark on the windshield glass, as shown in the illustration.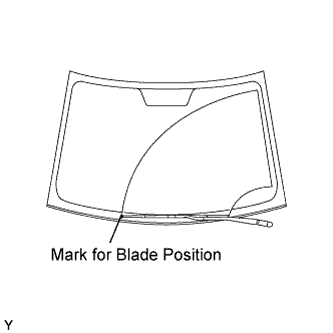
Tighten the nut of the front wiper arm.
- Torque:
- 26 N*m{ 265 kgf*cm , 19 ft.*lbf }
| 42. INSTALL FRONT WIPER ARM AND BLADE ASSEMBLY RH |
|
|
Scrape any metal powder off the serrated part of the wiper arm with a round file or the equivalent (when reinstalling).
Clean the wiper pivot serrations with a wire brush.
Operate the wiper, then stop the windshield wiper motor in the automatic stop position.
Align the blade tip with the mark on the windshield glass, as shown in the illustration.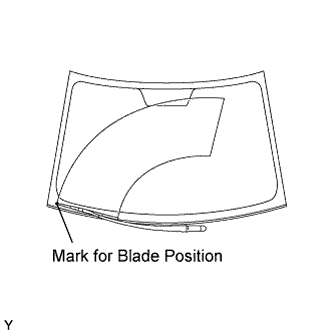
Tighten the nut of the front wiper arm.
- Torque:
- 26 N*m{ 265 kgf*cm , 19 ft.*lbf }
| 43. INSTALL HOOD SUB-ASSEMBLY |
| 44. INSPECT HOOD SUB-ASSEMBLY |
Check that the clearance measurements are within the standard ranges.
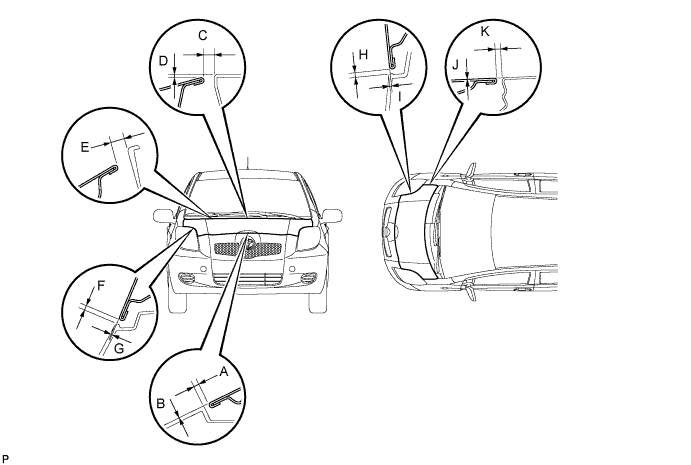
- Standard:
Area
Measurement
Area
Measurement
A
1.7 to 5.7 mm
(0.067 to 0.224 in.)
G
-1.55 to 2.45 mm
(-0.061 to 0.096 in.)
B
-2 to 2 mm
(-0.079 to 0.079 in.)
H
1.75 to 5.75 mm
(0.067 to 0.226 in.)
C
4.45 to 10.45 mm
(0.175 to 0.411 in.)
I
-1.25 to 2.75 mm
(-0.049 to 0.108 in.)
D
-0.95 to 5.05 mm
(-0.037 to 0.199 in.)
J
-1.5 to 1.5 mm
(-0.059 to 0.059 in.)
E
7.55 to 13.55 mm
(0.297 to 0.533 in.)
K
2.0 to 5.0 mm
(0.079 to 0.197 in.)
F
1.65 to 5.65 mm
(0.065 to 0.222 in.)
-
-
| 45. ADJUST HOOD SUB-ASSEMBLY |
Loosen the hood side hinge bolts.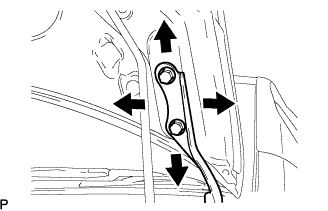
Move the hood to adjust the clearance to within the standard range.
Tighten the hood side hinge bolts after the adjustment.
- Torque:
- 13 N*m{ 133 kgf*cm , 10 ft.*lbf }
Adjust the height of the hood front end by turning the cushion rubber.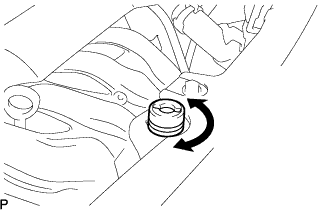
- HINT:
- The cushion rubber can be raised and lowered by turning it.
Adjust the hood lock.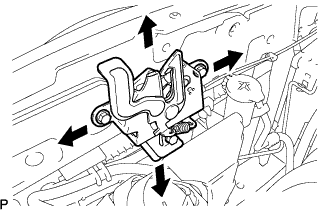
Loosen the 3 bolts.
Adjust the hood lock position so that the striker can enter it smoothly.
Tighten the 3 bolts after the adjustment.
- Torque:
- 7.5 N*m{ 76 kgf*cm , 66 in.*lbf }
| 46. ADD TRANSAXLE OIL |
| 47. INSPECT AND ADJUST TRANSAXLE OIL |
Stop the vehicle in a level place.
Remove the transmission filler plug and the gasket.
Check that the oil surface is within 5 mm (0.20 in.) of the bottom of the transmission filler plug opening.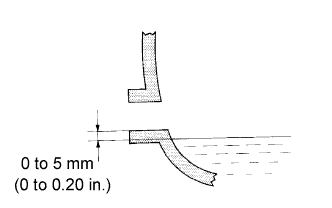
- NOTICE:
- Excessively large or small amounts of oil may cause problems.
- Excessively large or small amounts of oil may cause problems.
- After replacing the oil, drive the vehicle and check the oil level again.
- After replacing the oil, drive the vehicle and check the oil level again.
Check for oil leakage if the oil level is low.
Install the transmission filler plug and a new gasket.
- Torque:
- 39 N*m{ 400 kgf*cm , 29 ft.*lbf }
| 48. INSTALL ENGINE UNDER COVER RH |
| 49. INSTALL ENGINE UNDER COVER LH |
| 50. INSTALL FRONT WHEELS |
| 51. INSTALL STEERING SLIDING YOKE SUB-ASSEMBLY |
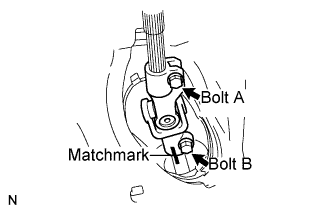 |
Align the matchmarks and install the sliding yoke onto the intermediate shaft.
- Torque:
- 28 N*m{ 290 kgf*cm , 21 ft.*lbf }
Tighten bolt A.
- Torque:
- 28 N*m{ 290 kgf*cm , 21 ft.*lbf }
| 52. INSTALL COLUMN HOLE COVER SILENCER SHEET |
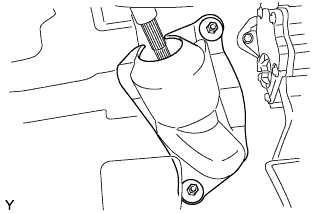 |
Install the column hole cover silencer sheet with the 2 clips.
Install the floor carpet.
| 53. CONNECT CABLE TO NEGATIVE BATTERY TERMINAL |
- Torque:
- 5.4 N*m{ 55 kgf*cm , 48 in.*lbf }
| 54. INSPECT ABS SPEED SENSOR SIGNAL |
| 55. INSPECT AND ADJUST FRONT WHEEL ALIGNMENT |
| 56. CHECK FOR EXHAUST GAS LEAKAGE |
| 57. CHECK FOR TRANSAXLE OIL LEAKAGE |