ECM Power Source Circuit
Circuit diagnosis · Vehicles built from Nov 2006
DESCRIPTION
When the ignition switch is turned on (IG), the battery voltage is applied to the IGSW terminal of the ECM. The output signal from the MREL terminal of the ECM causes a current to flow to the EFI relay coil, closing the EFI relay contacts and supplying power to terminal +B of the ECM.WIRING DIAGRAM
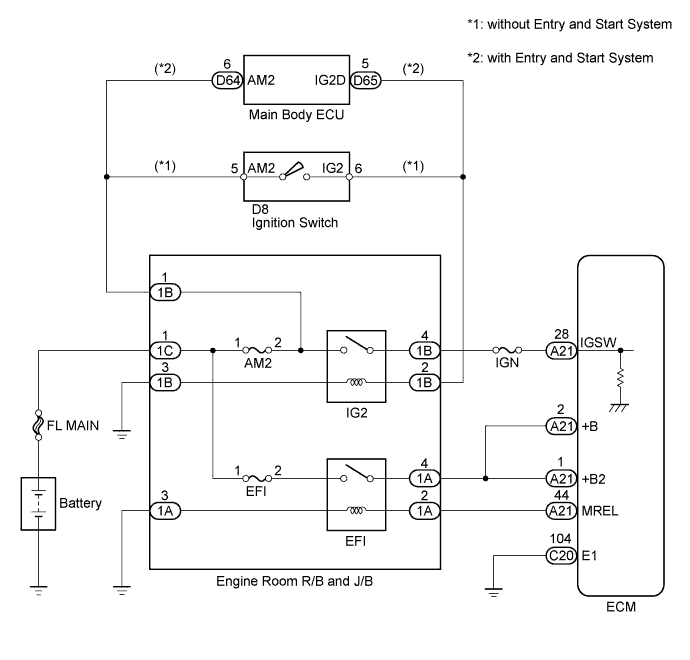

INSPECTION PROCEDURE
| 1. INSPECT INTEGRATION RELAY (POWER SOURCE) |

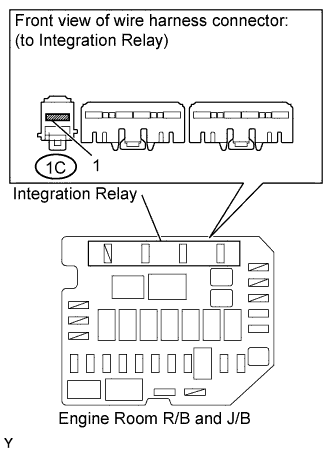 |
Remove the integration relay from the engine room R/B and J/B.
Measure the voltage according to the value(s) in the table below.
- Standard voltage:
Tester Connection
Condition
Specified Condition
1C-1 - Body ground
Always
11 to 14 V
Reinstall the integration relay.
|
|
||||

| OK | |
 |
| 2. INSPECT INTEGRATION RELAY (EFI RELAY AND IG2 RELAY) |
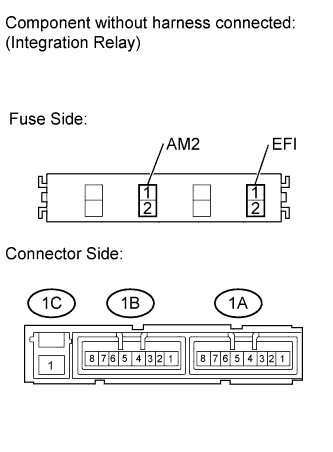 |
Inspect the AM2 fuse and EFI fuse.
Remove the AM2 fuse and EFI fuse.
Measure the resistance according to the value(s) in the table below.
- Standard resistance:
Tester Connection
Condition
Specified Condition
AM2 fuse
Always
Below 1 Ω
EFI fuse
Always
Below 1 Ω
Reinstall the fuses.
Inspect the relay.
Measure the resistance according to the value(s) in the table below.
- Standard resistance:
Tester Connection
Condition
Specified Condition
1C-1 - 1B-4
Always
10 kΩ or higher
Battery voltage applied to terminals 1B-2 and 1B-3
Below 1 Ω
1C-1 - 1A-4
Always
10 kΩ or higher
Battery voltage applied to terminals 1A-2 and 1A-3
Below 1 Ω
1C-1 - 1B-1
Always
Below 1 Ω
|
|
||||
| OK | |
|
| 3. CHECK HARNESS AND CONNECTOR (INTEGRATION RELAY - ECM) |
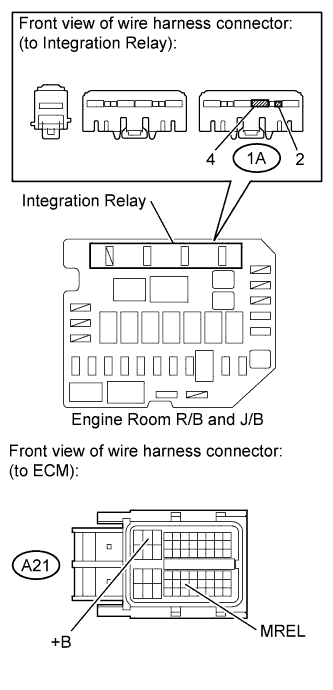 |
Remove the integration relay from the engine room R/B and J/B.
Disconnect the ECM connector.
Measure the resistance according to the value(s) in the table below.
- Standard resistance (Check for open):
Tester Connection
Condition
Specified Condition
A21-44 (MREL) - 1A-2
Always
Below 1 Ω
A21-2 (+B) - 1A-4
Always
Below 1 Ω
- Standard resistance (Check for short):
Tester Connection
Condition
Specified Condition
A21-44 (MREL) - Body ground
Always
10 kΩ or higher
A21-2 (+B) - Body ground
Always
10 kΩ or higher
Reinstall the integration relay.
Reconnect the ECM connector.
|
|
||||
| OK | |
|
| 4. CHECK HARNESS AND CONNECTOR (ECM - BODY GROUND) |
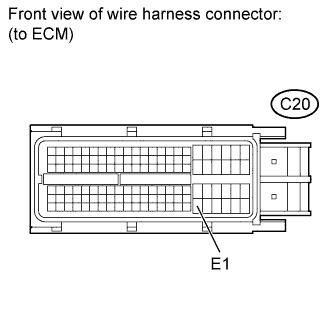 |
Disconnect the ECM connector.
Measure the resistance according to the value(s) in the table below.
- Standard resistance (Check for open):
Tester Connection
Condition
Specified Condition
C20-104 (E1) - Body ground
Always
Below 1 Ω
Reconnect the ECM connector.
|
|
||||
| OK | |
|
| 5. INSPECT ECM (IGSW TERMINAL VOLTAGE) |
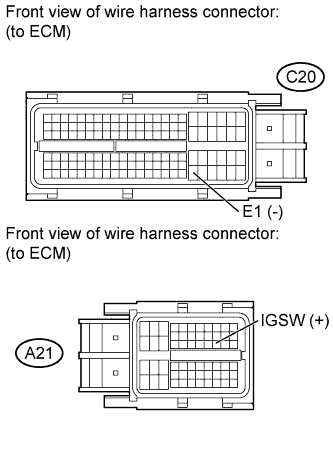 |
Disconnect the ECM connectors.
Turn the ignition switch on (IG).
Measure the voltage according to the value(s) in the table below.
- Standard voltage:
Tester Connection
Condition
Specified Condition
A21-28 (IGSW) - C20-104 (E1)
Ignition switch on (IG)
11 to 14 V
Reconnect the ECM connectors.
- Result:
Result
Proceed to
Outside standard range
A
Within standard range
B
|
|
||||
| A | |
|
| 6. INSPECT FUSE (IGN FUSE) |
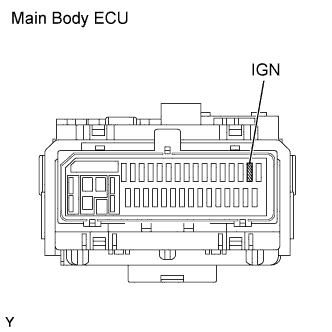 |
Remove the IGN fuse from the main body ECU.
Measure the resistance according to the value(s) in the table below.
- Standard resistance:
Tester Connection
Condition
Specified Condition
IGN fuse
Always
Below 1 Ω
Reinstall the IGN fuse.
|
|
||||
| OK | |
|
| 7. CHECK HARNESS AND CONNECTOR (ECM - INTEGRATION RELAY) |
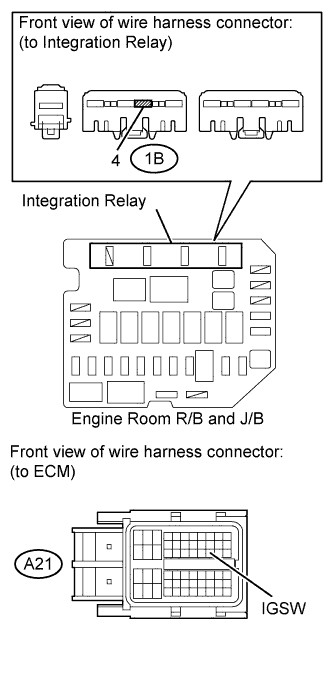 |
Remove the integration relay from the engine room R/B and J/B.
Disconnect the ECM connector.
Measure the resistance according to the value(s) in the table below.
- Standard resistance (Check for open):
Tester Connection
Condition
Specified Condition
A21-28 (IGSW) - 1B-4
Always
Below 1 Ω
- Standard resistance (Check for short):
Tester Connection
Condition
Specified Condition
A21-28 (IGSW) - Body ground
Always
10 kΩ or higher
Reinstall the integration relay.
Reconnect the ECM connector.
- Result:
Result
Proceed to
Outside normal range
A
Within normal range (with Entry and Start System)
B
Within normal range (without Entry and Start System)
C
|
|
||||
|
|
||||

| A | ||
 |
||
| ||
| 8. CHECK HARNESS AND CONNECTOR (INTEGRATION RELAY - MAIN BODY ECU) |
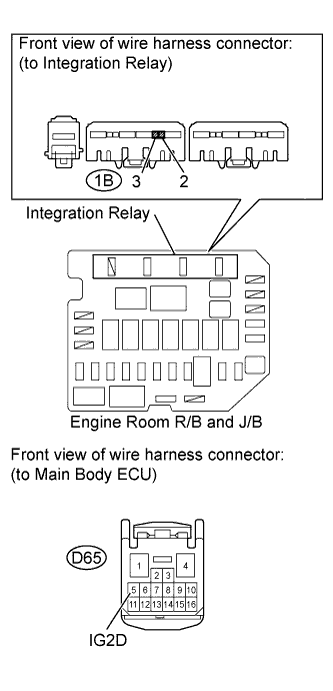 |
Remove the integration relay from the engine room R/B and J/B.
Disconnect the main body ECU connector.
Measure the resistance according to the value(s) in the table below.
- Standard resistance (Check for open):
Tester Connection
Condition
Specified Condition
1B-2 - D65-5 (IG2D)
Always
Below 1 Ω
1B-3 - Body ground
Always
Below 1 Ω
- Standard resistance (Check for short):
Tester Connection
Condition
Specified Condition
D65-5 (IG2D) - Body ground
Always
10 kΩ or higher
Reinstall the integration relay.
Reconnect the main body ECU connector.
|
|
||||
| OK | ||
|
||
| ||
| 9. CHECK HARNESS AND CONNECTOR (INTEGRATION RELAY - IGNITION SWITCH) |
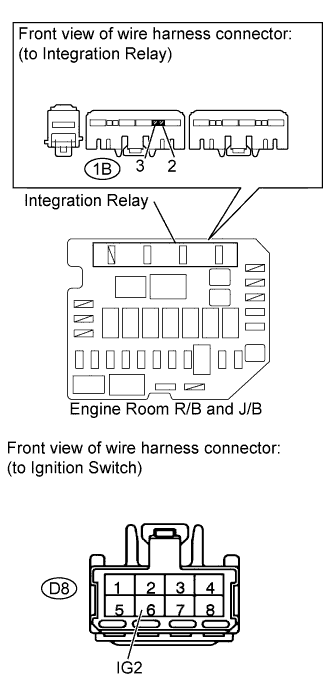 |
Remove the integration relay from the engine room R/B and J/B.
Disconnect the ignition switch connector.
Measure the resistance according to the value(s) in the table below.
- Standard resistance (Check for open):
Tester Connection
Condition
Specified Condition
1B-2 - D8-6 (IG2)
Always
Below 1 Ω
1B-3 - Body ground
Always
Below 1 Ω
- Standard resistance (Check for short):
Tester Connection
Condition
Specified Condition
D8-6 (IG2) - Body ground
Always
10 kΩ or higher
Reinstall the integration relay.
Reconnect the ignition switch connector.
|
|
||||
| OK | |
|
| 10. INSPECT IGNITION SWITCH |
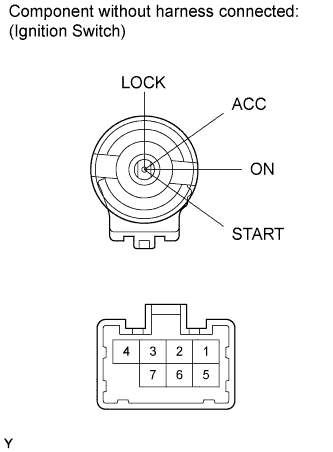 |
Remove the ignition switch.
Measure the resistance according to the value(s) in the table below.
- Standard resistance:
Tester Connection
Switch Position
Specified Condition
-
LOCK
10 kΩ or higher
2 - 4
ACC
Below 1 Ω
1 - 2 - 4
ON
5 - 6
1 - 3 - 4
START
5 - 6 - 7
Reinstall the ignition switch.
|
|
||||
| OK | ||
|
||
| ||