Fuel Gauge Malfunction
Circuit diagnosis · Vehicles built from Jan 2006
DESCRIPTION
The combination meter assembly controls the fuel receiver gauge in accordance with the resistance of the fuel sender gauge that varies depending on the fuel remaining amount in the fuel tank.WIRING DIAGRAM
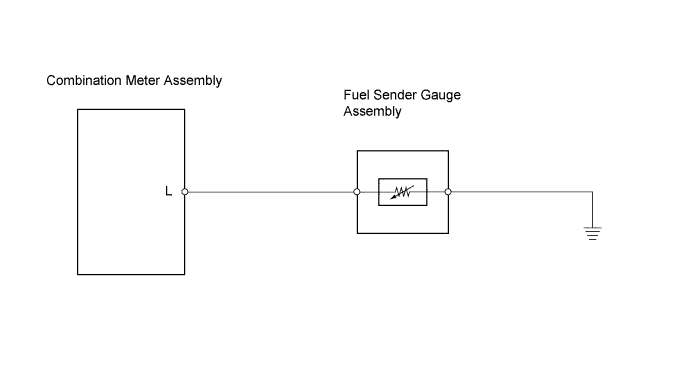

INSPECTION PROCEDURE
| 1. PERFORM ACTIVE TEST USING INTELLIGENT TESTER (FUEL METER) |

Connect the intelligent tester to the DLC3.
Turn the ignition switch ON and turn the tester on.
Perform the Active Test according to the prompts displayed on the tester.
- Combination Meter:
Item
Test Details
Diagnostic Note
Fuel Meter Operation
EMPTY: Segment No. 1 flashes
1/2: Segment No. 1 to No. 4 illuminate
FULL: Segment No. 1 to No. 8 illuminate
-
- OK:
- Fuel receiver gauge segments are illuminated in accordance with the tester operations.
|
|
||||

| OK | |
 |
| 2. READ VALUE USING INTELLIGENT TESTER (FUEL INPUT) |
Connect the intelligent tester to the DLC3.
Turn the ignition switch ON and turn the tester on.
Read the Data List according to the prompts displayed on the tester.
- Combination Meter:
Item
Measurement Item/Range
(Display)
Normal Condition
Diagnostic Note
Fuel Input (A/D)
Fuel input signal /
Min.: 0, Max.: 255
Fuel receiver gauge segments
No.1 to No.8 illuminate:
14 to 34
No.1 to (No.6, No.7) illuminate:
77 to 109
No.1 to (No.4, No,5) illuminate:
135 to 172
No.1 to No.2 illuminate:
175 to 188
No.1 flashes:
194 to 200
-
- OK:
- Fuel input signal displayed on the tester is approximately the same as the fuel receiver gauge indication.
|
|
||||
| OK | |
|
| 3. CHECK COMBINATION METER ASSEMBLY |
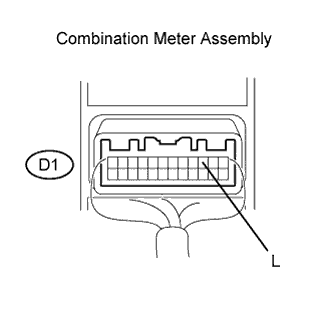 |
Disconnect the J5 fuel sender gauge assembly connector.
Remove the combination meter assembly with its connectors connected.
Measure the voltage.
- Standard voltage:
Tester Connection
Condition
Specified Condition
D1-3 (L) - Body ground
Ignition switch ON
10 to 14 V
Reconnect the fuel sender gauge assembly connector.
Reinstall the combination meter assembly.
|
|
||||
| OK | |
|
| 4. INSPECT FUEL SENDER GAUGE ASSEMBLY |
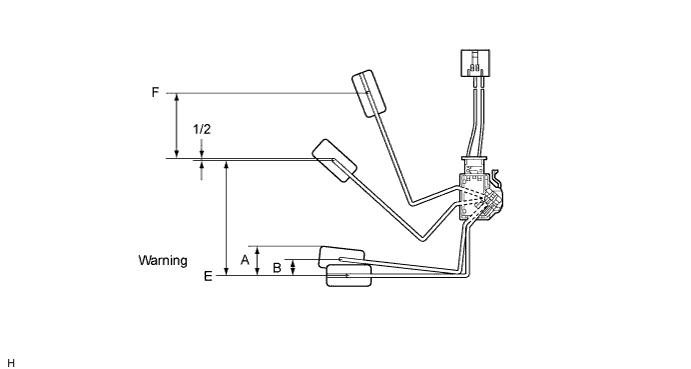
Remove the fuel sender gauge assembly.
Check that the float position is between E and F.
Measure the resistance between terminals 2 and 1 of the J5 fuel sender gauge assembly connector.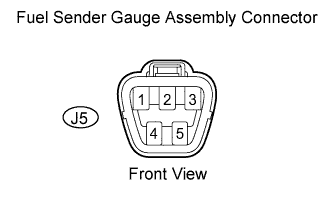
- Standard resistance:
Float Level
Float Position (mm (in.))
Specified Condition
F
77.3 (3.04) to 79.3 (3.12)
15 Ω to 18 Ω
1/2
1.6 (0.05)
208.3 Ω
Warning A
34.8 (1.37)
365.2 Ω
Warning B
25.3 (1.00)
388.2 Ω
E
75.0 (2.96)
410.0 Ω
Reinstall the fuel sender gauge assembly.
|
|
||||
| OK | |
|
| 5. CHECK HARNESS AND CONNECTOR (COMBINATION METER ASSEMBLY - FUEL SENDER GAUGE ASSEMBLY) |
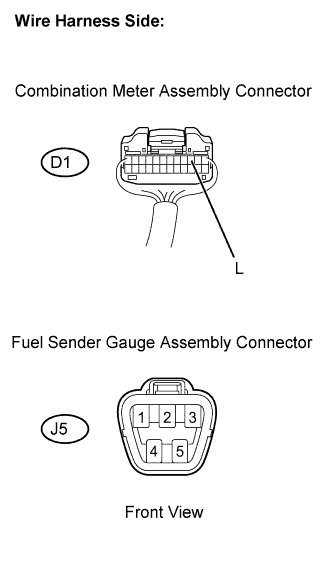 |
Disconnect the D1 combination meter assembly connector.
Disconnect the J5 fuel sender gauge assembly connector.
Measure the resistance.
- Standard resistance:
Tester Connection
Specified Condition
D1-3 (L) - J5-2
Below 1Ω
J5-3 - Body ground
Below 1Ω
Reconnect the combination meter assembly and fuel sender gauge assembly connectors.
|
|
||||
| OK | ||
 |
||
| ||