Cranking Holding Function Circuit
Circuit diagnosis · Vehicles built from Nov 2005
DESCRIPTION
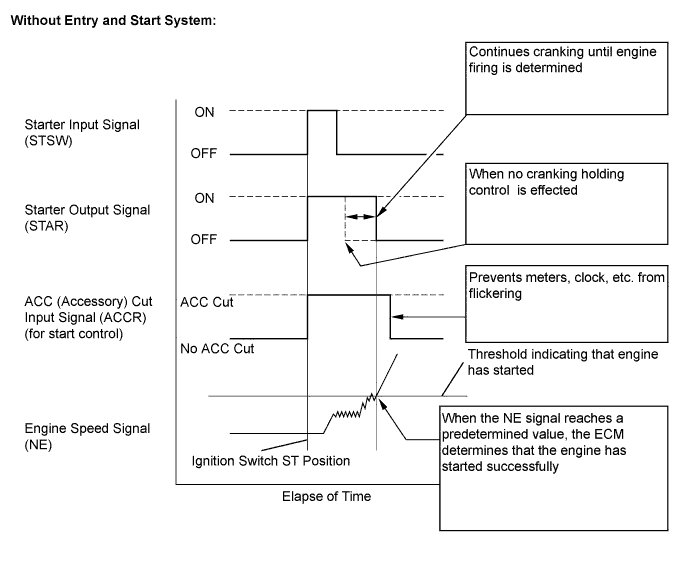
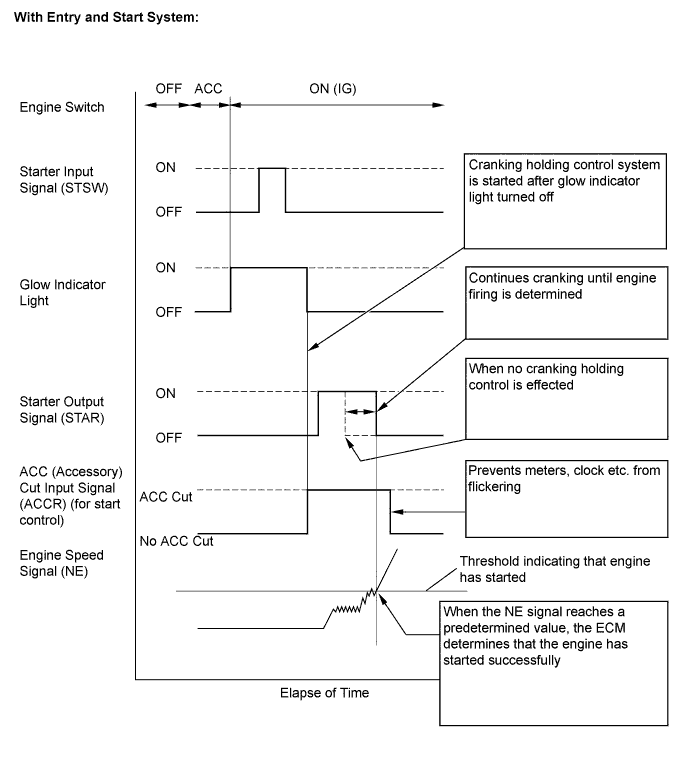
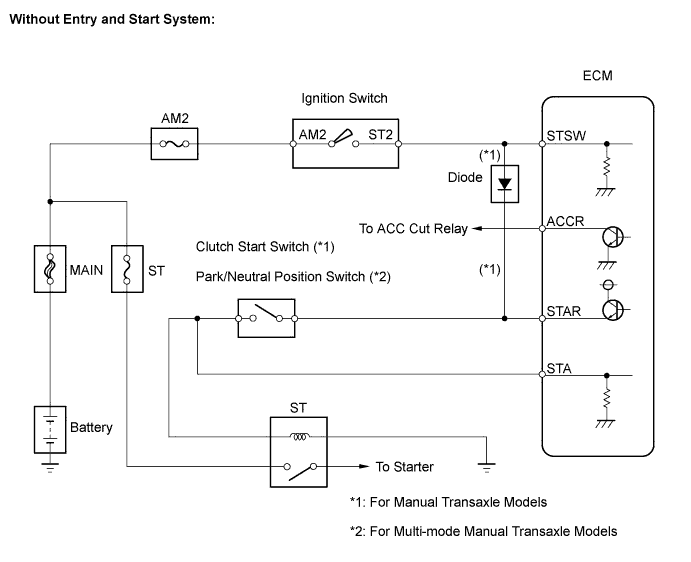
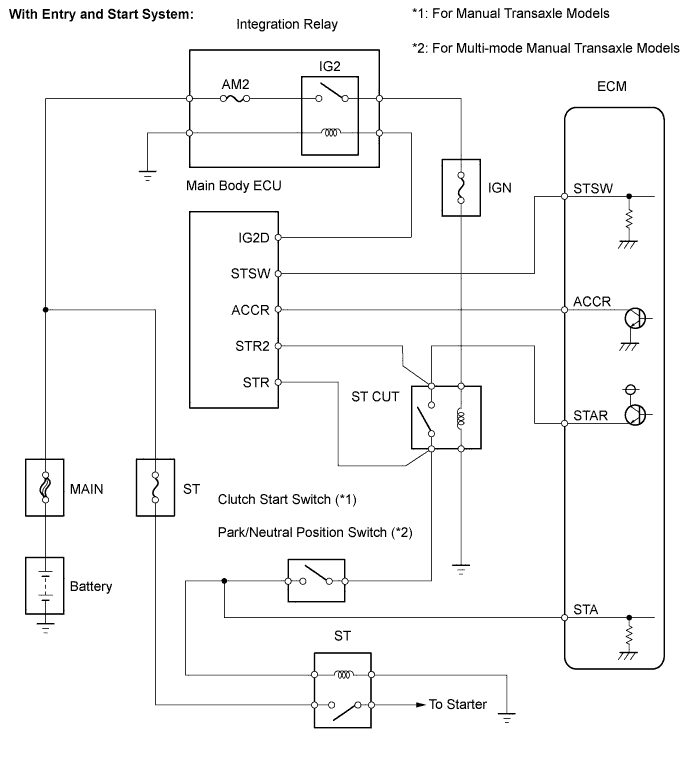
The cranking holding control system keeps energizing the starter relay after the ECM detects the starter signal (STSW signal) from the ignition switch or the main body ECU until the ECM performs a judgement of "Engine started". Furthermore, the ECM outputs an accessory cut signal (ACCR signal) to the ACC cut relay during cranking to prevent flickering of the combination meter, clock, audio system, and so on.When the ECM detects the STSW signal, the ECM outputs the starter relay drive signal (STAR signal) to the starter relay through the clutch start switch, and then, the engine is cranked. When the ECM receives a stable engine speed signal (NE signal), more specifically, when the NE signal reaches a predetermined value, the ECM stops outputting the STAR signal. Also, the ECM monitors the starter relay operating conditions based on the STA terminal voltage status.

WIRING DIAGRAM
INSPECTION PROCEDURE
| 1. READ VALUE USING INTELLIGENT TESTER (STARTER SIGNAL) |

Connect an intelligent tester to the DLC3.
Turn the ignition switch on (IG) and turn the tester on.
Select the following menu items: Powertrain / Engine and ECT / Data List / Starter Signal.
Check the result when the ignition switch is turned on (IG).
Check the result when the engine starts.
- Standard:
Ignition Switch Conditions
Tester Display (Starter Signal)
On (IG)
OFF
Engine starts
ON
- Result:
Result
Proceed To
OK (for manual transaxle models)
A
OK (for multi-mode manual transaxle models)
B
NG (for manual transaxle models)
C
NG (for multi-mode manual transaxle models)
D
|
|
||||
|
|
||||
|
|
||||

| C | |
 |
| 2. INSPECT ECM (STSW TERMINAL VOLTAGE) |
Disconnect the A49 ECM connector.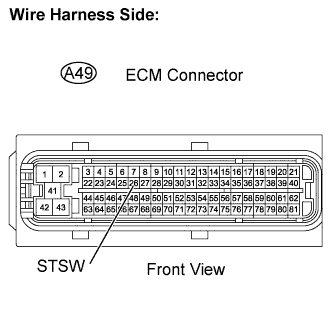
Depress the clutch pedal fully.
Measure the voltage between the ECM terminal and the body ground when operating the ignition switch to start cranking.
- Standard voltage:
Tester Connections
Specified Conditions
STSW (A49-26) - Body ground
9 to 14 V
Reconnect the ECM connector.
- Result:
Result
Proceed To
Within standard range
A
Outside standard range (vehicle without entry and start system)
B
Outside standard range (vehicle with entry and start system)
C
|
|
||||
|
|
||||
| A | |
|
| 3. INSPECT ECM (STAR OUTPUT VOLTAGE) |
Disconnect the A16 clutch start switch connector.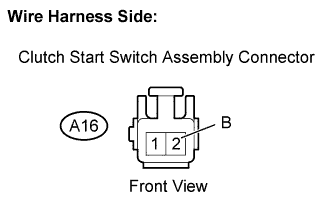
Measure the voltage between the terminal of clutch start switch connector and the body ground while cranking the engine.
- Standard voltage:
Tester Connections
Specified Conditions
B (A16-2) - Body ground
9 to 14 V
Reconnect the clutch start switch connector.
- Result:
Result
Proceed To
Within standard range
A
Outside standard range (vehicle without entry and start system)
B
Outside standard range (vehicle with entry and start system)
C
|
|
||||
|
|
||||
| A | |
|
| 4. INSPECT CLUTCH START SWITCH ASSEMBLY |
Remove the clutch start switch.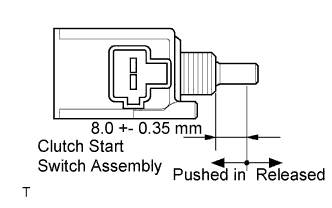
Check the resistance between the terminals of the clutch start switch connector.
- Standard resistance:
Switch Conditions
Specified Conditions
Pushed in
Below 1 Ω
Released
10 kΩ or higher
Reinstall the clutch start switch.
|
|
||||
| NG | ||
 |
||
| ||
| 5. INSPECT IGNITION OR STARTER SWITCH ASSEMBLY |
Remove the ignition switch.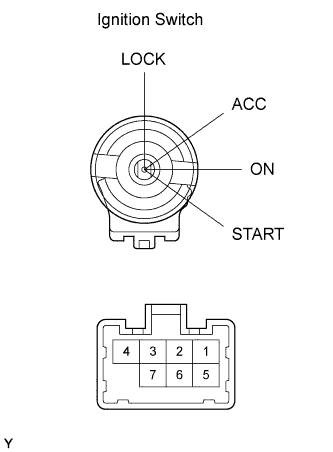
Check the resistance between the terminals of the ignition switch.
- Standard resistance:
Switch Positions
Tester Connections
Specified Conditions
LOCK
-
10 kΩ or higher
ACC
2 - 4
Below 1 Ω
ON
1 - 2 - 4
5 - 6
START
1 - 3 - 4
5 - 6 - 7
Reinstall the ignition switch.
|
|
||||

| OK | ||
|
||
| ||
| 6. CHECK HARNESS AND CONNECTOR (ECM - MAIN BODY ECU) |
Disconnect the D66 main body ECU connector.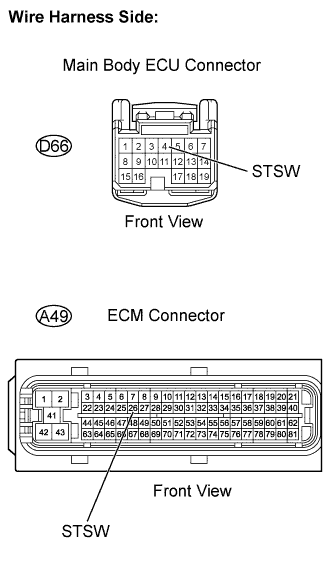
Disconnect the A49 ECM connector.
Check the resistance.
- Standard resistance (Check for open):
Tester Connections
Specified Conditions
STSW (D66-4) - STSW (A49-26)
Below 1 Ω
- Standard resistance (Check for short):
Tester Connections
Specified Conditions
STSW (D66-4) or STSW (A49-26) - Body ground
10 kΩ or higher
Reconnect the main body ECU connector.
Reconnect the ECM connector.
|
|
||||
| OK | ||
|
||
| ||
| 7. CHECK HARNESS AND CONNECTOR (IGNITION SWITCH - CLUTCH START SWITCH - ECM) |
Disconnect the D8 ignition switch connector.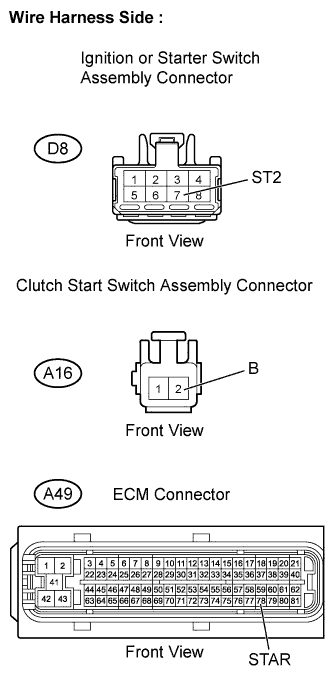
Disconnect the A16 clutch start switch connector.
Disconnect the A49 ECM connector.
Check the resistance.
- Standard resistance (Check for open):
Tester Connections
Specified Conditions
ST2 (D8-7) - B (A16-2)
Below 1 Ω
STAR (A49-78) - B (A16-2)
- Standard resistance (Check for short):
Tester Connections
Specified Conditions
ST2 (D8-7) or B (A16-2) - Body ground
10 kΩ or higher
STAR (A49-78) or B (A16-2) - Body ground
- HINT:
- The wire between the clutch start switch and the ignition switch has a diode (Refer to the wiring diagram). The current flowing to the clutch start switch is rectified by the diode.
Reconnect the ignition switch connector.
Reconnect the clutch start switch connector.
Reconnect the ECM connector.
|
|
||||
| OK | ||
|
||
| ||
| 8. INSPECT ST CUT RELAY |
Remove the ST CUT relay.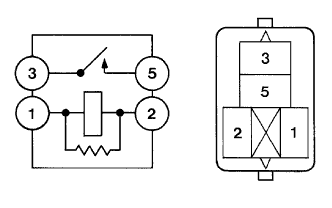
Check the resistance.
- Standard resistance:
Tester Connections
Specified Conditions
3 - 5
10 kΩ or higher
Below 1 Ω
(When battery voltage applied to terminals 1 and 2)
Reinstall the relay.
|
|
||||
| OK | |
|
| 9. INSPECT ST CUT RELAY (RELAY HOLDER TERMINAL VOLTAGE) |
Remove the ST CUT relay.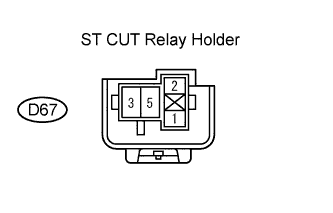
Turn the ignition switch on (IG).
Measure the voltage between the terminals of the ST CUT relay holder.
- Standard voltage:
Tester Connections
Specified Conditions
1 - 2
9 to 14 V
Reinstall the relay.
|
|
||||
| OK | |
|
| 10. CHECK HARNESS AND CONNECTOR (ECM - ST CUT RELAY - CLUTCH START SWITCH - MAIN BODY ECU) |
Remove the ST CUT relay.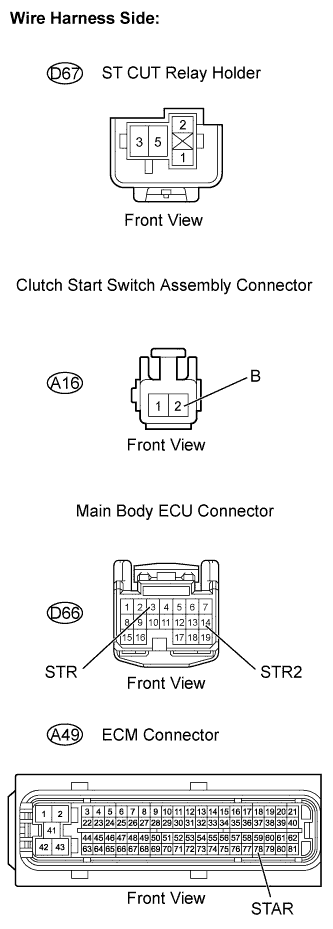
Disconnect the A16 clutch start switch connector.
Disconnect the D66 main body ECU connector.
Disconnect the A49 ECM connector.
Check the resistance.
- Standard resistance (Check for open):
Tester Connections
Specified Conditions
ST CUT relay (D67-3) - STAR (A49-78)
Below 1 Ω
ST CUT relay (D67-3) - STR2 (D66-14)
STR (D66-3) - ST CUT relay (D67-5)
B (A16-2) - ST CUT relay (D67-5)
- Standard resistance (Check for short):
Tester Connections
Specified Conditions
ST CUT relay (D67-3) or STAR (A49-78) - Body ground
10 kΩ or higher
ST CUT relay (D67-3) or STR2 (D66-14) - Body ground
STR (D66-3) or ST CUT relay (D67-5) - Body ground
B (A16-2) or ST CUT relay (D67-5) - Body ground
Reconnect the ECM connector.
Reconnect the main body ECU connector.
Reconnect the clutch start switch connector.
Reinstall the ST CUT relay.
|
|
||||
| OK | |
|
| 11. INSPECT MAIN BODY ECU (CHECK FOR SHORT) |
Disconnect the ECM connector.
Remove the ST CUT relay.
Check the resistance.
- Standard resistance (Check for short):
Tester Connections
Specified Conditions
ST CUT relay (D67-3) - Body ground
10 kΩ or higher
ST CUT relay (D67-5) - Body ground
Reinstall the ST CUT relay.
Reconnect the ECM connector.
|
|
||||
| OK | ||
|
||
| ||
| 12. INSPECT BATTERY |
Check that the battery is not depleted.
- OK:
- Battery is not depleted.
|
|
||||
| OK | |
|
| 13. CHECK BATTERY TERMINAL |
Check that the battery terminals are not loose or corroded.
- OK:
- Battery terminals are not loose or corroded.
|
|
||||
| OK | |
|
| 14. CHECK HARNESS AND CONNECTOR (CLUTCH START SWITCH - ECM - ST RELAY) |
Remove the ST relay from the engine room relay block.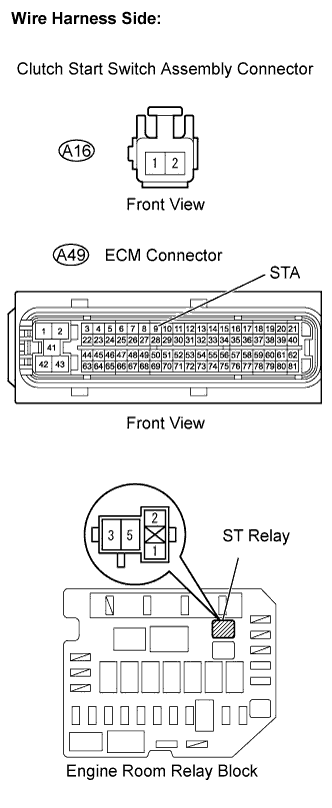
Disconnect the A16 clutch start switch connector.
Disconnect the A49 ECM connector.
Check the resistance.
- Standard resistance (Check for open):
Tester Connections
Specified Conditions
L (A16-1) - STA (A49-9)
Below 1 Ω
L (A16-1) - ST relay (2)
ST relay (1) - Body ground
- Standard resistance (Check for short):
Tester Connections
Specified Conditions
L (A16-1) or STA (A49-9) - Body ground
10 kΩ or higher
L (A16-1) - ST relay (2) - Body ground
Reinstall the ST relay.
Reconnect the clutch start switch connector.
Reconnect the ECM connector.
|
|
||||
| OK | ||
|
||
| ||
| 15. INSPECT ECM (STSW TERMINAL VOLTAGE) |
Disconnect the A49 ECM connector.
Shift lever is in the N position.
Measure the voltage between the ECM terminal and the body ground when operating the ignition switch to start cranking.
- Standard voltage:
Tester Connections
Specified Conditions
STSW (A49-26) - Body ground
9 to 14 V
Reconnect the ECM connector.
- Result:
Result
Proceed To
Within standard range
A
Outside standard range (vehicle without entry and start system)
B
Outside standard range (vehicle with entry and start system)
C
|
|
||||
|
|
||||
| A | |
|
| 16. INSPECT ECM (STAR OUTPUT VOLTAGE) |
Disconnect the A43 Park/Neutral Position (PNP) switch connector.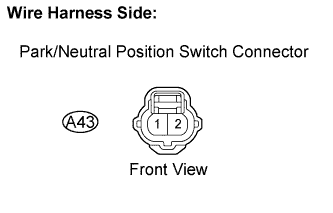
Measure the voltage between the terminal of PNP switch connector and the body ground while cranking the engine.
- Standard voltage:
Tester Connections
Specified Conditions
B (A43-2) - Body ground
9 to 14 V
Reconnect the PNP switch connector.
- Result:
Result
Proceed To
Within standard range
A
Outside standard range (vehicle without entry and start system)
B
Outside standard range (vehicle with entry and start system)
C
|
|
||||
|
|
||||
| A | |
|
| 17. INSPECT PARK/NEUTRAL POSITION SWITCH ASSEMBLY |
Remove the PNP switch (Click here).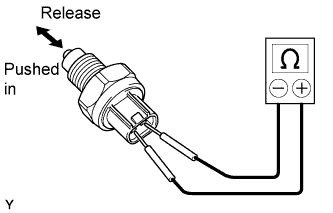
Check the resistance between the terminals of the PNP switch connector.
- Standard resistance:
Switch Conditions
Specified Conditions
Pushed in
Below 1 Ω
Released
10 kΩ or higher
Reinstall the PNP switch (Click here).
|
|
||||
| NG | ||
|
||
| ||
| 18. INSPECT IGNITION OR STARTER SWITCH ASSEMBLY |
Remove the ignition switch.
Check the resistance between the terminals of the ignition switch.
- Standard resistance:
Switch Positions
Tester Connections
Specified Conditions
LOCK
-
10 kΩ or higher
ACC
2 - 4
Below 1 Ω
ON
1 - 2 - 4
5 - 6
START
1 - 3 - 4
5 - 6 - 7
Reinstall the ignition switch.
|
|
||||
| OK | ||
|
||
| ||
| 19. CHECK HARNESS AND CONNECTOR (ECM - MAIN BODY ECU) |
Disconnect the D66 main body ECU connector.
Disconnect the A49 ECM connector.
Check the resistance.
- Standard resistance (Check for open):
Tester Connections
Specified Conditions
STSW (D66-4) - STSW (A49-26)
Below 1 Ω
- Standard resistance (Check for short):
Tester Connections
Specified Conditions
STSW (D66-4) or STSW (A49-26) - Body ground
10 kΩ or higher
Reconnect the main body ECU connector.
Reconnect the ECM connector.
|
|
||||
| OK | ||
|
||
| ||
| 20. CHECK HARNESS AND CONNECTOR (IGNITION SWITCH - PARK/NEUTRAL POSITION SWITCH - ECM) |
Disconnect the D8 ignition switch connector.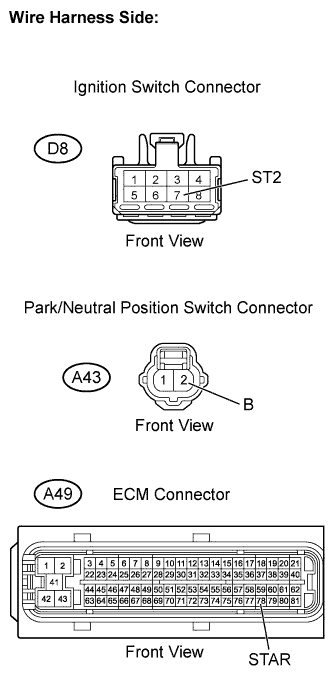
Disconnect the A43 PNP switch connector.
Disconnect the A49 ECM connector.
Check the resistance.
- Standard resistance (Check for open):
Tester Connections
Specified Conditions
ST2 (D8-7) - B (A43-2)
Below 1 Ω
STAR (A49-78) - B (A43-2)
- Standard resistance (Check for short):
Tester Connections
Specified Conditions
ST2 (D8-7) or B (A43-2) - Body ground
10 kΩ or higher
STAR (A49-78) or B (A43-2) - Body ground
- HINT:
- The wire between the clutch start switch and the ignition switch has a diode (Refer to the wiring diagram). The current flowing to the clutch start switch is rectified by the diode.
Reconnect the ignition switch connector.
Reconnect the PNP switch connector.
Reconnect the ECM connector.
|
|
||||
| OK | ||
|
||
| ||
| 21. INSPECT ST CUT RELAY |
Remove the ST CUT relay.
Check the resistance.
- Standard resistance:
Tester Connections
Specified Conditions
3 - 5
10 kΩ or higher
Below 1 Ω
(When battery voltage applied to terminals 1 and 2)
Reinstall the relay.
|
|
||||
| OK | |
|
| 22. INSPECT ST CUT RELAY (RELAY HOLDER TERMINAL VOLTAGE) |
Remove the ST CUT relay.
Turn the ignition switch on (IG).
Measure the voltage between the terminals of the ST CUT relay holder.
- Standard voltage:
Tester Connections
Specified Conditions
1 - 2
9 to 14 V
Reinstall the relay.
|
|
||||
| OK | |
|
| 23. CHECK HARNESS AND CONNECTOR (ECM - ST CUT RELAY - PNP SWITCH - MAIN BODY ECU) |
Remove the ST CUT relay.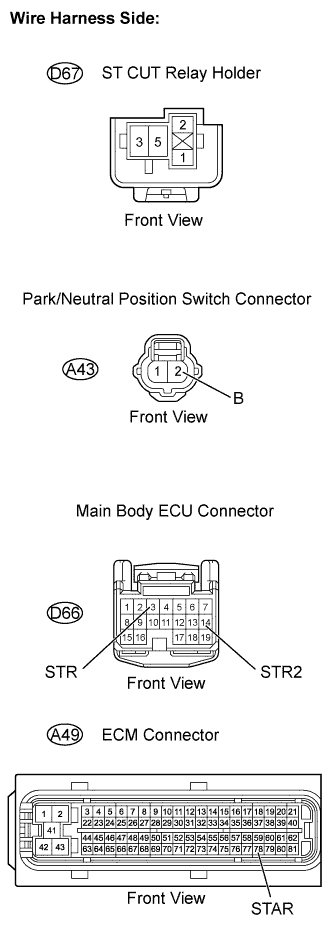
Disconnect the A43 PNP switch assembly connector.
Disconnect the D66 main body ECU connector.
Disconnect the A49 ECM connector.
Check the resistance.
- Standard resistance (Check for open):
Tester Connections
Specified Conditions
ST CUT relay (D67-3) - STAR (A49-78)
Below 1 Ω
ST CUT relay (D67-3) - STR2 (D66-14)
STR (D66-3) - ST CUT relay (D67-5)
B (A43-2) - ST CUT relay (D67-5)
- Standard resistance (Check for short):
Tester Connections
Specified Conditions
ST CUT relay (D67-3) or STAR (A49-78) - Body ground
10 kΩ or higher
ST CUT relay (D67-3) or STR2 (D66-14) - Body ground
STR (D66-3) or ST CUT relay (D67-5) - Body ground
B (A43-2) or ST CUT relay (D67-5) - Body ground
Reconnect the ECM connector.
Reconnect the main body ECU connector.
Reconnect the PNP switch assembly connector.
Reinstall the ST CUT relay.
|
|
||||
| OK | |
|
| 24. INSPECT MAIN BODY ECU (CHECK FOR SHORT) |
Disconnect the ECM connector.
Remove the ST CUT relay.
Check the resistance.
- Standard resistance (Check for short):
Tester Connections
Specified Conditions
ST CUT relay (D67-3) - Body ground
10 kΩ or higher
ST CUT relay (D67-5) - Body ground
Reinstall the ST CUT relay.
Reconnect the ECM connector.
|
|
||||
| OK | ||
|
||
| ||
| 25. INSPECT BATTERY |
Check that the battery is not depleted.
- OK:
- Battery is not depleted.
|
|
||||
| OK | |
|
| 26. CHECK BATTERY TERMINAL |
Check that the battery terminals are not loose or corroded.
- OK:
- Battery terminals are not loose or corroded.
|
|
||||
| OK | |
|
| 27. CHECK HARNESS AND CONNECTOR (PARK/NEUTRAL POSITION SWITCH - ECM - ST RELAY) |
Remove the ST relay from the engine room relay block.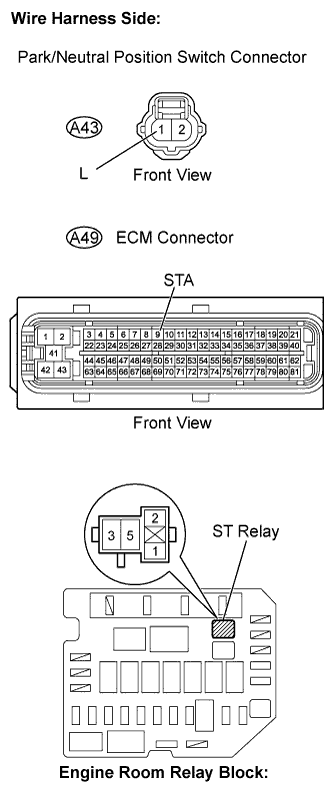
Disconnect the A43 PNP switch connector.
Disconnect the A49 ECM connector.
Check the resistance.
- Standard resistance (Check for open):
Tester Connections
Specified Conditions
L (A43-1) - STA (A49-9)
Below 1 Ω
L (A43-1) - ST relay (2)
ST relay (1) - Body ground
- Standard resistance (Check for short):
Tester Connections
Specified Conditions
L (A43-1) or STA (A49-9) - Body ground
10 kΩ or higher
L (A43-1) or ST relay (2) - Body ground
Reinstall the ST relay.
Reconnect the PNP switch connector.
Reconnect the ECM connector.
|
|
||||
| OK | ||
|
||
| ||