INSTALLATION
Removal / installation · Vehicles built from Nov 2005
| 1. INSTALL REAR BRAKE DRUM SUB-ASSEMBLY |
| 2. FILL RESERVOIR WITH BRAKE FLUID |

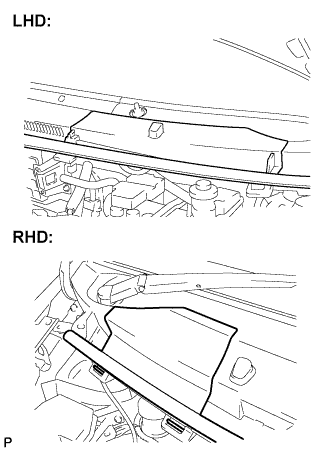  |
Remove the cowl top ventilator louver.
Set the brake fluid can upside down on the reservoir.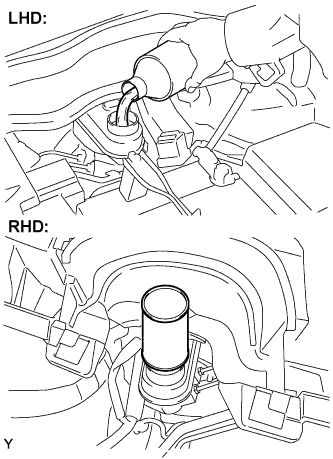
- Fluid:
- SAE J1704 or FMVSS No. 116 DOT4
| 3. BLEED MASTER CYLINDER |
- HINT:
- If the master cylinder has been disassembled or if the reservoir becomes empty, bleed the air from the master cylinder.
w/o VSC: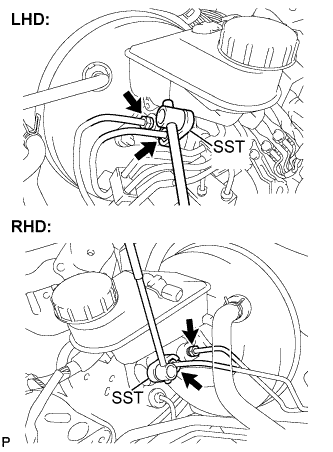
Using SST, disconnect the brake tubes from the master cylinder.
- SST
- 09023-00100
w/ VSC:
Using SST, disconnect the brake tubes from the master cylinder.
- SST
- 09023-38200
Slowly depress the brake pedal and hold it there (Step A).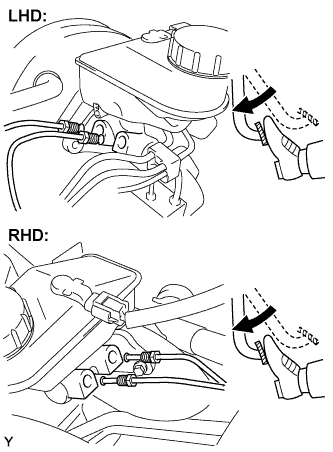
Block the outer holes with your fingers, and release the brake pedal (Step B).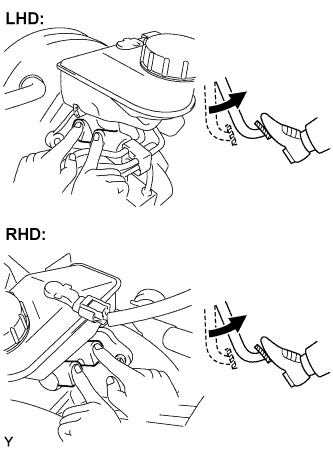
Repeat steps A and B 3 or 4 times.
w/o VSC:
Using SST, connect the brake tubes to the master cylinder.
- SST
- 09023-00100
- Torque:
- for use without SST:
- 15 N*m{ 155 kgf*cm , 11 ft.*lbf }
- for use with SST:
- 14 N*m{ 143 kgf*cm , 10 ft.*lbf }
- HINT:
- Use a torque wrench with a fulcrum length of 300 mm (11.81 in.).
- This torque value is effective when SST is parallel to a torque wrench.
- Use a torque wrench with a fulcrum length of 300 mm (11.81 in.).
w/ VSC:
Using SST, connect the brake tubes to the master cylinder.
- SST
- 09023-38200
- Torque:
- for use without SST:
- 20 N*m{ 199 kgf*cm , 14 ft.*lbf }
- for use with SST:
- 18 N*m{ 180 kgf*cm , 13 ft.*lbf }
- HINT:
- Use a torque wrench with a fulcrum length of 300 mm (11.81 in.).
- This torque value is effective when SST is parallel to a torque wrench.
- Use a torque wrench with a fulcrum length of 300 mm (11.81 in.).
| 4. BLEED BRAKE LINE |
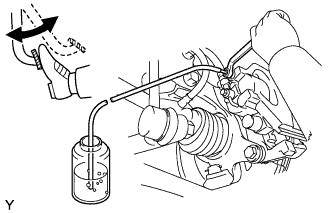 |
Connect the vinyl tube to the bleeder plug.
Depress the brake pedal several times, then loosen the bleeder plug with the pedal depressed (Step C).
At the point where the fluid stops coming out, tighten the bleeder plug, then release the brake pedal (Step D).
Repeat steps C and D until all the air in the fluid is completely bled out.
Tighten the bleeder plug.
- Torque:
- Front Disc Brake:
- 17 N*m{ 173 kgf*cm , 13 ft.*lbf }
- Rear Drum Brake:
- 9.5 N*m{ 97 kgf*cm , 84 in.*lbf }
- Rear Disc Brake:
- 14 N*m{ 143 kgf*cm , 10 ft.*lbf }
Repeat the above procedure to bleed the air out of the brake line for each wheel.
| 5. CHECK FLUID LEVEL IN RESERVOIR |
Check the fluid level and add fluid if necessary.
- Fluid:
- SAE J1704 or FMVSS No. 116 DOT4
| 6. CHECK FOR BRAKE FLUID LEAKAGE |
| 7. ADJUST CLEARANCE BETWEEN BRAKE SHOES AND DRUM |
- NOTICE:
- Do not use screwdrivers or any other tools to rotate the adjuster.
Press the brake pedal 30 times (not the parking brake). The clearance between the brake shoes and drum will be adjusted automatically.
| 8. CHECK CLEARANCE BETWEEN BRAKE SHOES AND DRUM |
Remove the rear brake drum.
Measure the brake drum inner diameter and the diameter of the brake shoes. Check that the difference between the diameters is equal to the specified shoe clearance.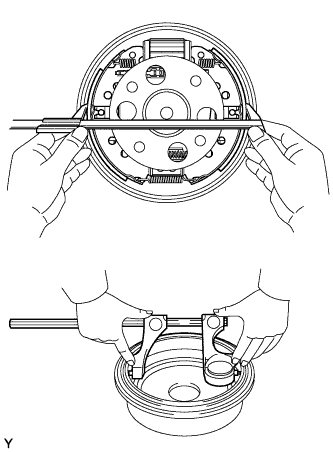
- Shoe clearance:
- 0.6 mm (0.024 in.)
Install the rear brake drum.
| 9. INSTALL REAR WHEEL |
- Torque:
- 103 N*m{ 1,050 kgf*cm , 76 ft.*lbf }
| 10. INSPECT PARKING BRAKE LEVER TRAVEL |
Slowly pull the parking brake lever to the fully applied position, counting the number of clicks.
- Parking brake lever travel at 200 N (20 kgf, 45 lbf):
Rear Brake type
Number of clicks
Drum
5 to 8
Disc
4 to 7
| 11. ADJUST PARKING BRAKE LEVER TRAVEL |
Completely release the parking brake lever.
Turn the adjusting nut until the parking brake lever travel is corrected to within the specified range.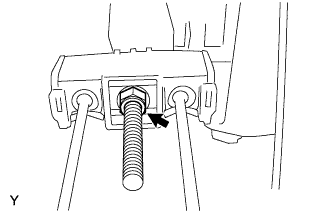
- Parking brake lever travel:
- 5 to 8 clicks at 200 N (20 kgf 45 lbf)
Operate the parking brake lever 3 to 4 times, and check the parking brake lever travel.
Check whether the parking brake drags or not.
When operating the parking brake lever, check that the brake warning light illuminates.
- Standard:
- Brake warning light always illuminates at the first click.