INSTALLATION
Removal / installation · Vehicles built from Aug 2005
| 1. INSTALL FRONT DOOR HANDLE ASSEMBLY OUTSIDE |

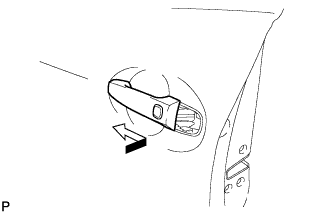  |
Pushing the front door handle assembly outside in the direction of the arrow mark shown in the illustration, install the front door handle assembly outside.
Connect the connector.
| 2. INSTALL FRONT DOOR LOCK ASSEMBLY |
- NOTICE:
- If reusing a door lock that has been removed, replace the packing in the connecting part with new.
- Make sure that no grease and dirt adheres to the packing surface in the connecting part.
- If reusing a door lock that has been removed, replace the packing in the connecting part with new.
Apply MP grease to the sliding and rotating areas of the front door lock.
Connect the front door lock remote control cable and front door inside locking cable.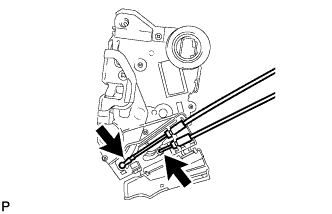
Close the cover.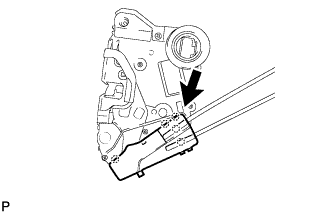
Insert the door lock open rod into the front door lock, then set it to the door panel.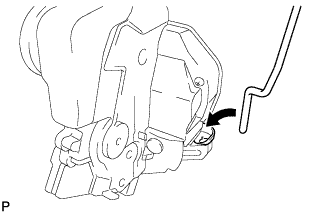
- NOTICE:
- Make sure that the outside handle link is securely engaged with the door lock.
Apply adhesive to the threads of the screws.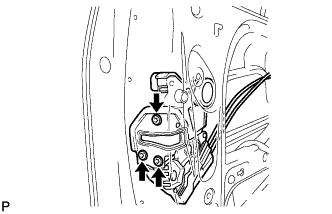
- Adhesive:
- Part No. 08833-00070, THREE BOND 1324 or the equivalent
Using "Torx" socket wrench T30, install the front door lock with the 3 screws.
- Torque:
- 5.0 N*m{ 51 kgf*cm , 44 in.*lbf }
| 3. INSTALL FRONT DOOR OUTSIDE HANDLE COVER |
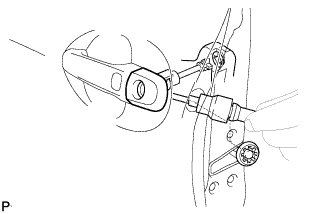 |
Using "Torx" socket wrench T30, install the cover with the door lock key cylinder.
- Torque:
- 4.0 N*m{ 41 kgf*cm , 35 in.*lbf }
- HINT:
- Make sure that the door lock key cylinder rod is inserted.
Install the hole plug.
| 4. INSTALL FRONT DOOR FRAME SUB-ASSEMBLY REAR LOWER |
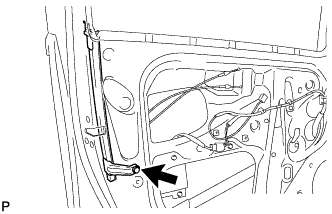 |
Install the front door frame sub-assembly rear lower with the bolt.
- Torque:
- 6.2 N*m{ 63 kgf*cm , 54 in.*lbf }
| 5. INSTALL FRONT DOOR WINDOW REGULATOR SUB-ASSEMBLY |
Apply MP grease to the sliding and rotating areas of the front door window regulator.
- NOTICE:
- Do not apply grease to the window regulator spring.
Loosely screw bolt A onto the front door window regulator.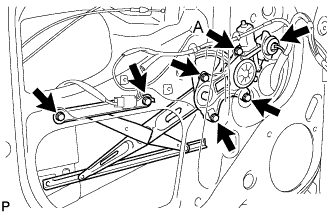
Insert the front door window regulator into the door panel. Use bolt A to hang the front door window regulator on the door panel.
- NOTICE:
- Do not drop the window regulator as it may be damaged.
Install the front door window regulator with the 5 bolts, and tighten bolt A.
- Torque:
- 8.0 N*m{ 82 kgf*cm , 71 in.*lbf }
Connect the connector.
| 6. INSTALL FRONT DOOR GLASS RUN |
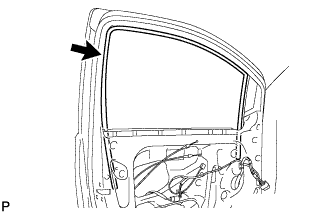 |
Install the front door glass run.
| 7. INSTALL FRONT DOOR GLASS SUB-ASSEMBLY |
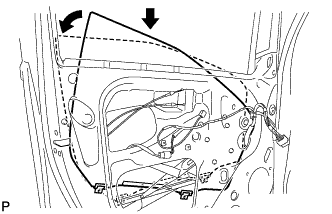 |
Insert the door glass into the door panel along the glass run as indicated by the arrows in the illustration.
- NOTICE:
- Do not damage the glass.
Install the front door glass onto the front door window regulator with the 2 bolts.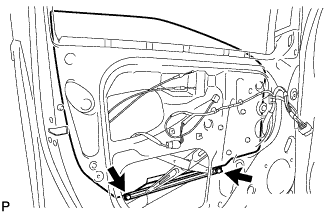
- Torque:
- 8.0 N*m{ 82 kgf*cm , 71 in.*lbf }
| 8. INSTALL FRONT DOOR SERVICE HOLE COVER |
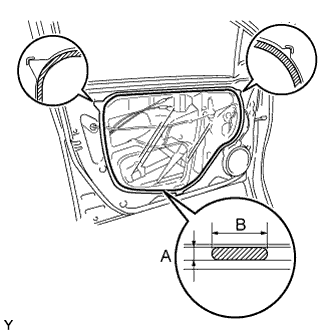 |
for 5 Door:
Apply butyl tape to the door panel, then install the front door service hole cover as shown in the illustration.- Adhesive:
- Part No. 08850-00065, Butyl Tape Set or the equivalent
- Specification:
Area
Dimension
A
2.0mm (0.079 in.) or more
B
6.0mm (0.236 in.) or more
- HINT:
- When installing the service hole cover, pull the links and connectors out through the service hole.
- There should be no wrinkles or folds after attaching the service hole cover.
- After attaching the service hole cover, check the quality of the seal.
- When installing the service hole cover, pull the links and connectors out through the service hole.
for 3 Door: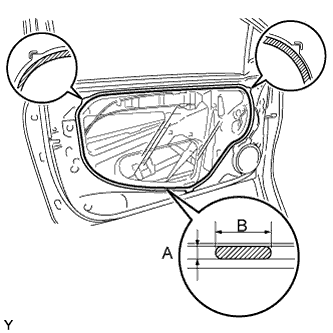
Apply butyl tape to the door panel, then install the front door service hole cover as shown in the illustration.- Adhesive:
- Part No. 08850-00065, Butyl Tape Set or the equivalent
- Specification:
Area
Dimension
A
2.0mm (0.079 in.) or more
B
6.0mm (0.236 in.) or more
- HINT:
- When installing the service hole cover, pull the links and connectors out through the service hole.
- There should be no wrinkles or folds after attaching the service hole cover.
- After attaching the service hole cover, check the quality of the seal.
- When installing the service hole cover, pull the links and connectors out through the service hole.
| 9. INSTALL FRONT DOOR BELT MOULDING |
for 5 Door: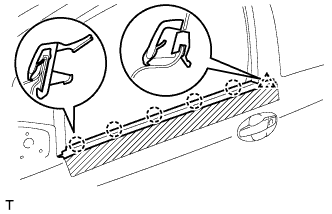
Engage the 5 claws and the clip and install a new front door belt moulding.
Remove the protective tape.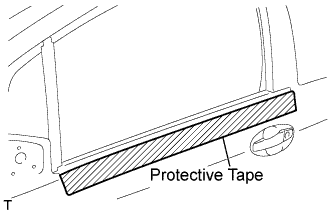
for 3 Door: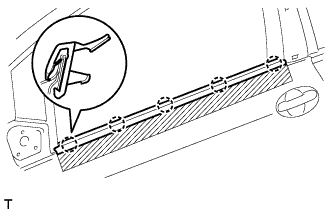
Engage the 5 claws and the clip and install a new front door belt moulding.
Remove the protective tape.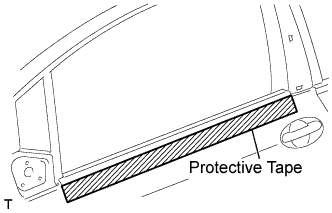
| 10. INSTALL OUTER REAR VIEW MIRROR ASSEMBLY |
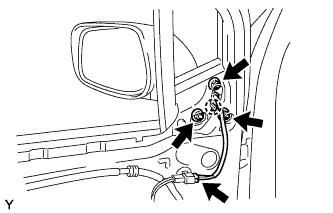 |
Engage the claw, then install the outer rear view mirror with the 3 nuts.
- Torque:
- 8.0 N*m{ 82 kgf*cm , 71 in.*lbf }
w/ Power mirror:
Connect the connector.
| 11. INSTALL FRONT DOOR WINDOW FRAME REAR MOULDING (for 3 Door) |
Using an infrared light, heat the front door window frame rear moulding.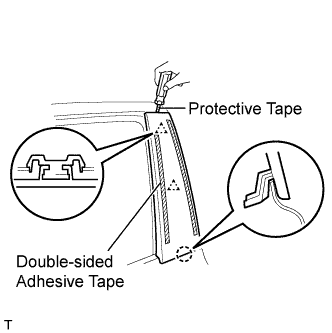
- NOTICE:
- Do not burn yourself with the heated front door panel or infrared light.
- HINT:
- Heat at 40 to 60°C (104 to 140°F) for 3 to 5 minutes.
Using a screwdriver with its tip wrapped in protective tape, disengage the 2 clips and the claw and remove the double-sided adhesive tape and front door window frame rear moulding.
| 12. INSTALL FRONT DOOR WINDOW FRAME FRONT MOULDING |
Clean the attachment surface.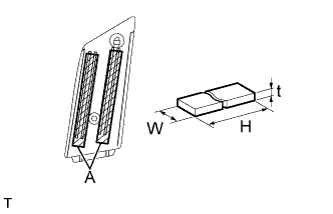
Using an infrared light, heat the adhesive remaining on the body.
- NOTICE:
- Do not burn yourself with the heated body or infrared light.
Using a shop rag or piece of cloth, rub the remaining adhesive off the body.
Using a non-residue solvent, clean the attachment surface.
Apply new double-sided adhesive tape to the front door window frame front moulding.
Tape size: Area
t
W
H
A
1.2 mm (0.047 in.)
7 mm (0.276 in.)
88 mm (3.465 in.)
Engage the 2 clips and the claw and install the front door window frame front moulding.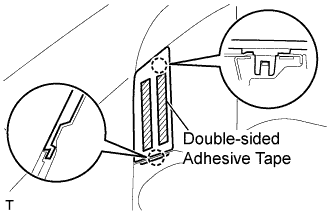
| 13. INSTALL FRONT DOOR INSIDE HANDLE SUB-ASSEMBLY |
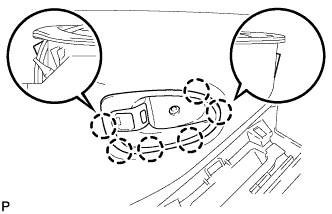 |
Engage the 6 claws and install the front door inside handle.
| 14. INSTALL FRONT DOOR TRIM BOARD SUB-ASSEMBLY |
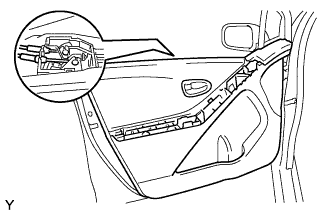 |
Connect the front door lock remote control cable and front door inside locking cable.
5 Door: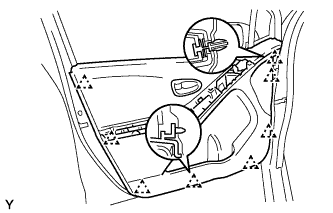
Engage the 8 clips and install the front door trim board.
3 Door: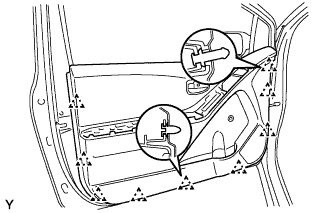
Engage the 9 clips and install the front door trim board.
Tighten the 4 screws.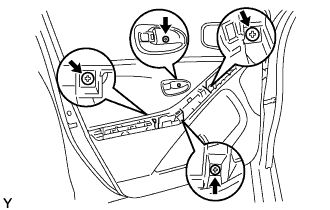
| 15. INSTALL FRONT ARMREST BASE PANEL UPPER |
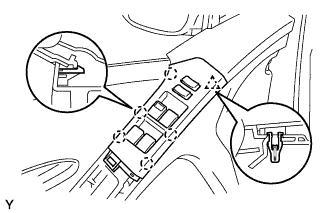 |
Connect the connector.
Engage the 5 claws and clip and install the front armrest base panel upper.
| 16. INSTALL DOOR ARMREST COVER |
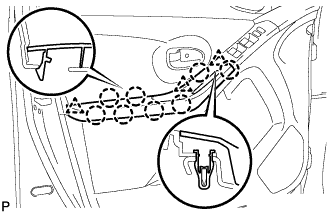 |
for 5 Door:
Engage the 8 claws and 3 clips and install the door armrest cover.
for 3 Door: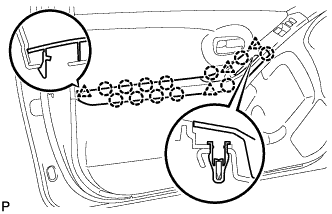
Engage the 12 claws and 4 clips and install the door armrest cover.
| 17. INSTALL BACK DOOR OUTSIDE HANDLE |
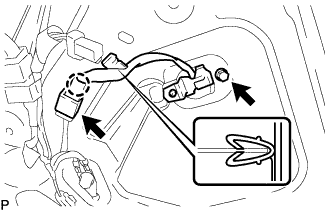 |
Install the back door outside handle onto the back door panel with the bolt.
- Torque:
- 7.0 N*m{ 71 kgf*cm , 62 in.*lbf }
Engage the claw and the clamp.
Connect the connector.
| 18. INSTALL BACK DOOR LOCK ASSEMBLY |
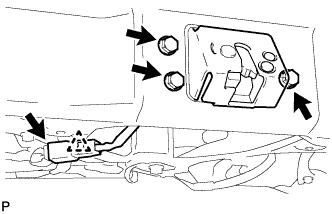 |
Install the back door lock with the 3 bolts.
- Torque:
- 7.5 N*m{ 76 kgf*cm , 66 in.*lbf }
Connect the connector and the clamp.
| 19. INSTALL BACK DOOR TRIM BOARD ASSEMBLY |
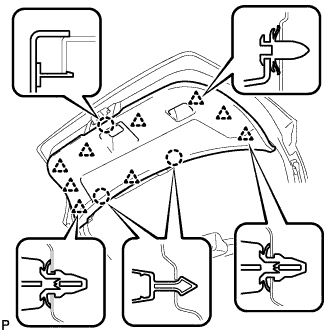 |
Engage the 3 claws and 9 clips and install the back door trim board.
Slide the handle plate of the back door trim board to engage it.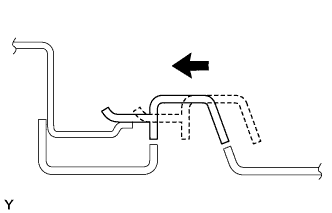
| 20. CONNECT CABLE TO NEGATIVE BATTERY TERMINAL |
- Torque:
- 5.4 N*m{ 55 kgf*cm , 48 in.*lbf }