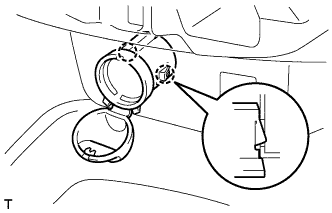
REMOVAL
Removal / installation · Vehicles built from Aug 2005
| 1. DISCONNECT CABLE FROM NEGATIVE BATTERY TERMINAL |
| 2. REMOVE INSTRUMENT PANEL FINISH PANEL END LH |

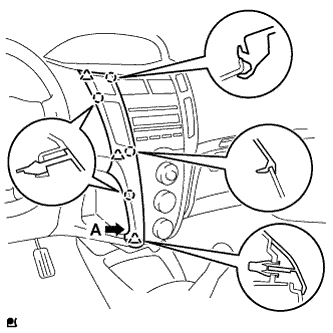  |
with CD player
Pull the instrument panel finish panel end LH rearward and disengage the 4 claws and 3 clips.
- NOTICE:
- To avoid damaging the radio receiver and the air conditioning panel, remove the instrument panel finish panel end without using any tool.
- HINT:
- Grip portion A of the instrument panel finish panel end and remove the instrument panel finish panel end from the lower side.
Disconnect the connector and remove the instrument panel finish panel end LH.
Except CD player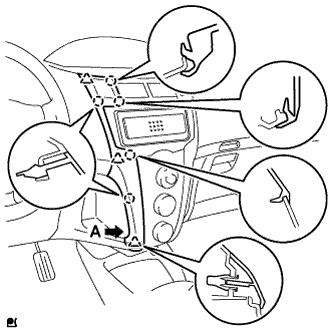
Pull the instrument panel finish panel end LH rearward and disengage the 5 claws and 3 clips.
- NOTICE:
- To avoid damaging the instrument cluster finish panel center and the air conditioning panel, remove the instrument panel finish panel end without using any tool.
- HINT:
- Grip portion A of the instrument panel finish panel end and remove the instrument panel finish panel end from the lower side.
Disconnect the connector and remove the instrument panel finish panel end LH.
| 3. REMOVE INSTRUMENT PANEL FINISH PANEL END RH |
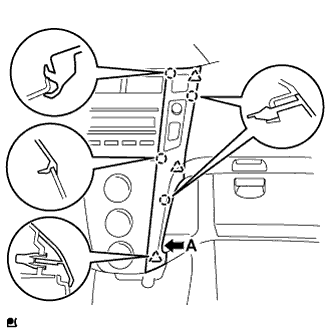 |
with CD player
Pull the instrument panel finish panel end RH and disengage the 4 claws and 3 clips.
- NOTICE:
- To avoid damaging the radio receiver and the air conditioning panel, remove the instrument panel finish panel end without using any tool.
- HINT:
- Grip portion A of the instrument panel finish panel end and remove the instrument panel finish panel end from the lower side.
Disconnect the connector and remove the instrument panel finish panel end RH.
Except CD player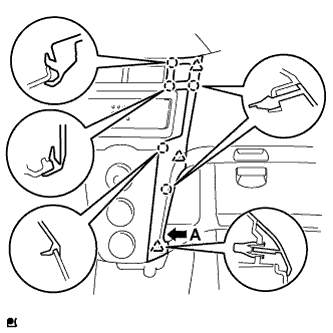
Pull the instrument panel finish panel end RH rearward and disengage the 5 claws and 3 clips.
- NOTICE:
- To avoid damaging the instrument cluster finish panel center and the air conditioning panel, remove the instrument panel finish panel end without using any tool.
- HINT:
- Grip portion A of the instrument panel finish panel end and remove the instrument panel finish panel end from the lower side.
Disconnect the connector and remove the instrument panel finish panel end RH.
| 4. REMOVE INSTRUMENT CLUSTER FINISH PANEL |
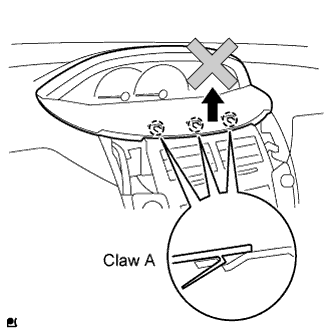 |
- NOTICE:
- Follow the procedure below to remove the instrument cluster finish panel. Claw A will break if the instrument cluster finish panel is raised carelessly.
Disengage the 2 claws and 5 clips.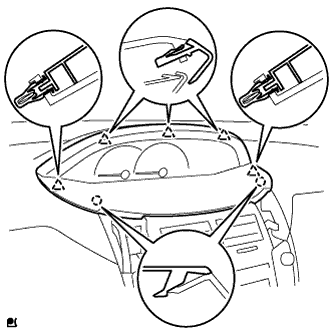
After removing the instrument panel finish panel end, insert your finger into the opening as shown, push the upper portion of the instrument cluster finish panel center and the 2 B claws of the instrument cluster finish panel, and then disengage the claws B.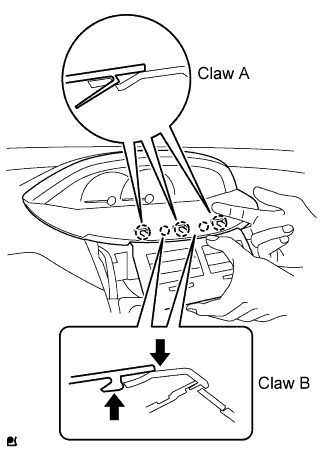
Disengage the 3 A claws and remove the instrument cluster finish panel.
| 5. REMOVE INSTRUMENT CLUSTER FINISH PANEL SUB-ASSEMBLY CENTER (w/ Cassette Tape Player) |
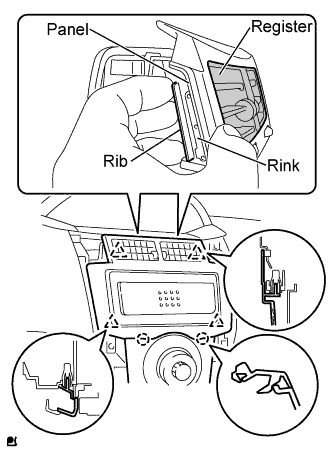 |
Disengage the 2 claws and 4 clips and remove the instrument cluster finish panel center.
- NOTICE:
- Grip the rib portion of the instrument cluster finish panel center by hand to remove it.
- To avoid breakage of the instrument cluster finish panel center when removing it, do not apply excessive force to the register or pull out the rink or panel portions.
- Grip the rib portion of the instrument cluster finish panel center by hand to remove it.
| 6. REMOVE INSTRUMENT CLUSTER FINISH PANEL SUB-ASSEMBLY LOWER CENTER (for Manual Air Conditioning System) |
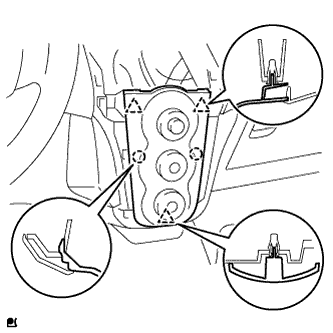 |
Disengage the 3 clips and 2 claws and remove the air conditioning panel.
Disconnect the 3 connectors and clamp.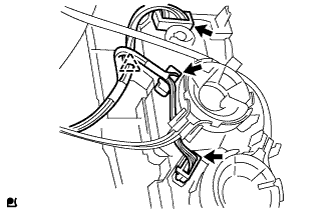
| 7. REMOVE AIR MIX DAMPER CONTROL CABLE SUB-ASSEMBLY (for Manual Air Conditioning System) |
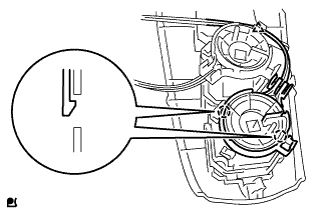 |
Disconnect the air mix control cable from the clamp.
Disengage the 2 claws and disconnect the air mix damper control cable.
| 8. REMOVE DEFROSTER DAMPER CONTROL CABLE SUB-ASSEMBLY (for Manual Air Conditioning System) |
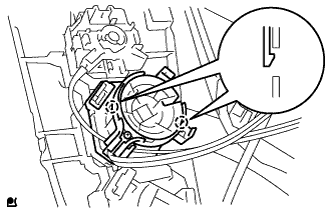 |
Disengage the 2 claws and disconnect the defroster damper control cable.
| 9. REMOVE AIR INLET DAMPER CONTROL CABLE SUB-ASSEMBLY (for Manual Air Conditioning System) |
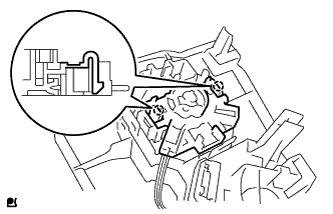 |
Disengage the 2 claws and disconnect the air inlet damper control cable.
| 10. REMOVE AIR CONDITIONING CONTROL ASSEMBLY (for Automatic Air Conditioning System) |
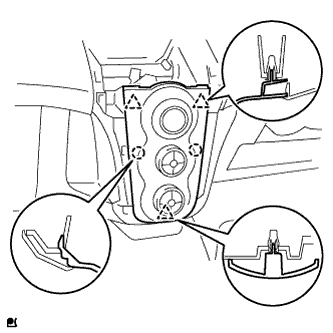 |
Disengage the 3 clips and 2 claws and remove the air conditioning control assembly.
Disconnect the 2 connectors, clamp and the aspirator pipe.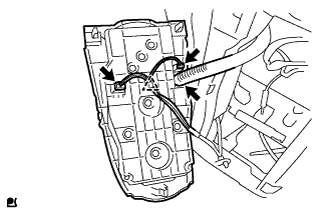
| 11. REMOVE POWER OUTLET SOCKET |
Disconnect the power outlet connector.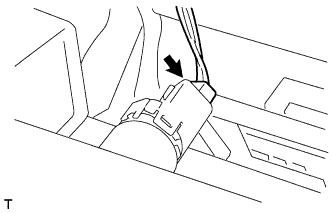
Using a screwdriver, disengage the claw, then turn the power outlet socket counterclockwise and push the power outlet socket half way out.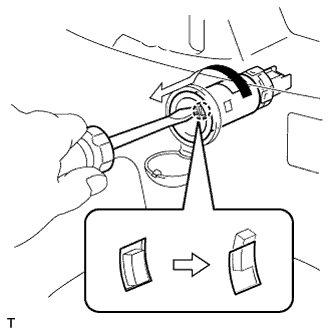
Align the protrusion of the power outlet socket with the cutout of the power outlet socket cover and then push the power outlet socket out.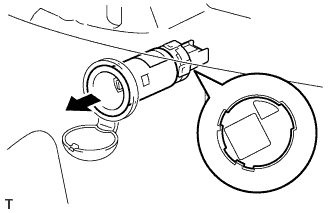
| 12. REMOVE POWER OUTLET SOCKET COVER |
Disengage the 2 claws and remove the power outlet socket cover.