Rear Window Defogger System does not Operate (w/ Auto Air Conditioning)
Circuit diagnosis · Vehicles built from Aug 2005
DESCRIPTION
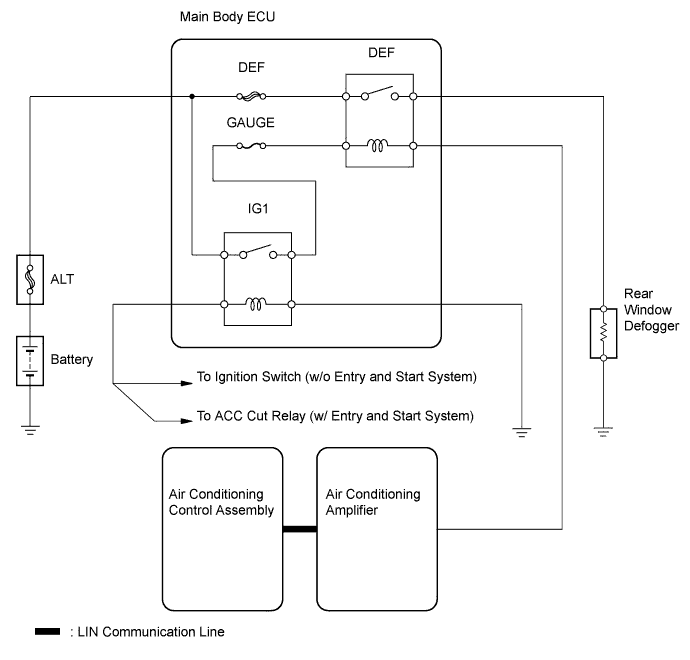
When the rear defogger switch is turned on, a rear defogger activation request signal is transmitted from the air conditioning control assembly to the air conditioning amplifier. Upon receipt of the signal, the air conditioning amplifier turns on the defogger relay (marked DEF) to activate the rear window defogger system.WIRING DIAGRAM

INSPECTION PROCEDURE
| 1. CHECK AIR CONDITIONING SYSTEM (OPERATION) |

Check that the air conditioning control assembly operates normally.
- OK:
- Auto air conditioning operates normally.
|
|
||||

| OK | |
 |
| 2. PERFORM ACTIVE TEST USING INTELLIGENT TESTER (REAR WINDOW DEFOGGER) |
Using the intelligent tester, operate the rear window defogger to check whether it operates normally.
- Air Conditioning Amplifier:
Item
Test Details
Diagnostic Note
Defogger Relay (Rear)
Turn rear window defogger OFF/ON
-
- Result:
Result
Proceed to
Rear window defogger operates abnormally
A
Rear window defogger operates normally
B
|
|
||||
| A | |
|
| 3. INSPECT FUSES (GAUGE, DEF) |
Remove the GAUGE fuse and DEF fuse from the main body ECU.
Measure the resistance of the fuse.
- Standard resistance:
- Below 1 Ω
Reinstall the GAUGE fuse and DEF fuse.
|
|
||||
| OK | |
|
| 4. INSPECT BACK DOOR GLASS (DEFOGGER WIRE) |
- NOTICE:
- When measuring voltage, wrap a piece of tin foil around the tip of the negative tester probe and press the foil against the wire with your finger, as shown in the illustration.
Turn the ignition switch on (IG).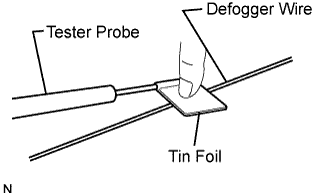
Turn the defogger switch ON.
Check the voltage at the center of each defogger wire, as shown in the illustration.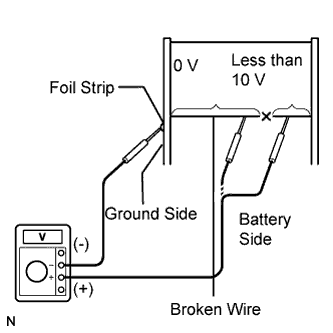
- Standard:
Voltage
Criteria
Approximately 5 V
Wire is not broken
Approximately 10 V or 0 V
Wire is broken
- HINT:
- If there is approximately 10 V, the wire may be faulty between the center of the wire and the wire end on the battery side. If there is no voltage, the wire may be faulty between the center of the wire and the wire end on the ground side.
Place the voltmeter's positive (+) lead against the defogger wire on the battery side.
Place the voltmeter's negative (-) lead with the foil strip against the wire on the ground side.
Slide the positive (+) lead from the battery side to the ground side.
The point where the voltage drops from approximately 10 V to 0 V is where the defogger wire is broken.
- HINT:
- If the defogger wire is not broken, the voltmeter should indicate 0 V at the positive (+) end of the defogger wire but gradually increase to approximately 12 V as the meter probe is moved to the other end.
|
|
||||
| OK | |
|
| 5. INSPECT MAIN BODY ECU (REAR DEFOGGER RELAY) |
Disconnect the 4Q main body ECU connector.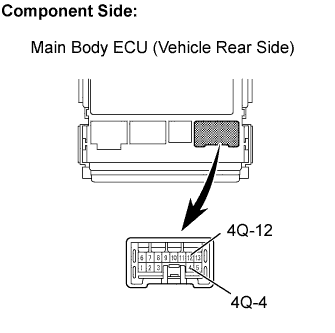
Measure the resistance.
- Standard resistance:
Tester Connection
Specified Condition
4Q-4 - 4Q-12
Below 1 Ω
Reconnect the 4Q connector.
Turn the ignition switch on (IG) and defogger switch ON.
Measure the voltage.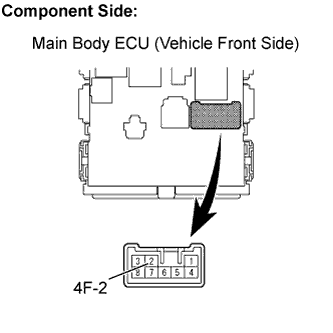
- Standard voltage:
Tester Connection
Specified Condition
4F-2 - Body ground
10 to 14 V
|
|
||||
| OK | |
|
| 6. CHECK HARNESS AND CONNECTOR (A/C AMPLIFIER - MAIN BODY ECU) |
Disconnect the E11 amplifier connector.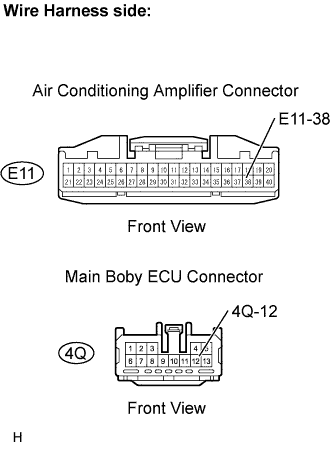
Disconnect the 4Q main body ECU connector.
Measure the resistance.
- Standard resistance:
Tester Connection
Specified Condition
E11-38 - 4Q-12
Below 1 Ω
E11-38 or 4Q-12 - Body ground
10 kΩ or higher
Reconnect the amplifier and the main body ECU connectors.
|
|
||||
| OK | |
|
| 7. CHECK HARNESS AND CONNECTOR (MAIN BODY ECU - REAR WINDOW DEFOGGER) |
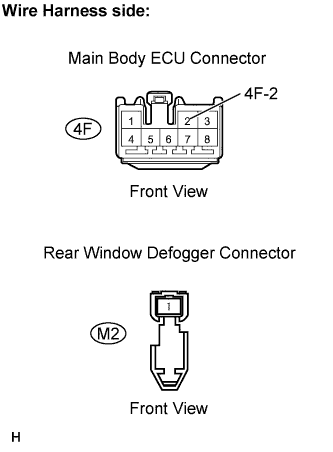 |
Disconnect the 4F main body ECU connector.
Disconnect the M2 rear window defogger connector.
Measure the resistance of the wire harness side connectors.
- Standard resistance:
Tester Connection
Specified Condition
4F-2 - M2-1
Below 1 Ω
4F-2 or M2-1 - Body ground
10 kΩ or higher
Reconnect the main body ECU and the defogger connectors.
|
|
||||
| OK | |
|
| 8. CHECK HARNESS AND CONNECTOR (REAR WINDOW DEFOGGER - BODY GROUND) |
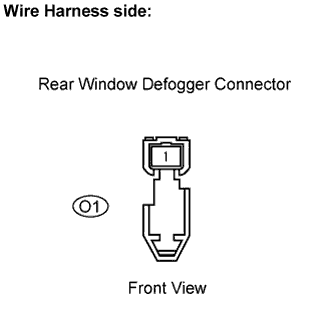 |
Disconnect the O1 defogger connector.
Measure the resistance of the wire harness side connector.
- Standard resistance:
Tester Connection
Specified Condition
O1-1 - Body ground
Below 1 Ω
Reconnect the defogger connector.
|
|
||||
| OK | ||
 |
||
| ||