Headlight Beam Level Control Actuator Circuit
Circuit diagnosis · Vehicles built from Aug 2005
DESCRIPTION
The headlight beam level control actuators are activated by operating the headlight leveling switch, allowing the headlight beam angle to be adjusted.WIRING DIAGRAM
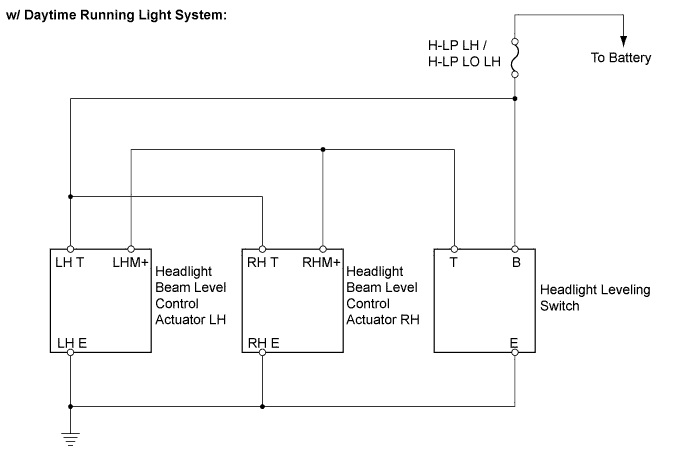

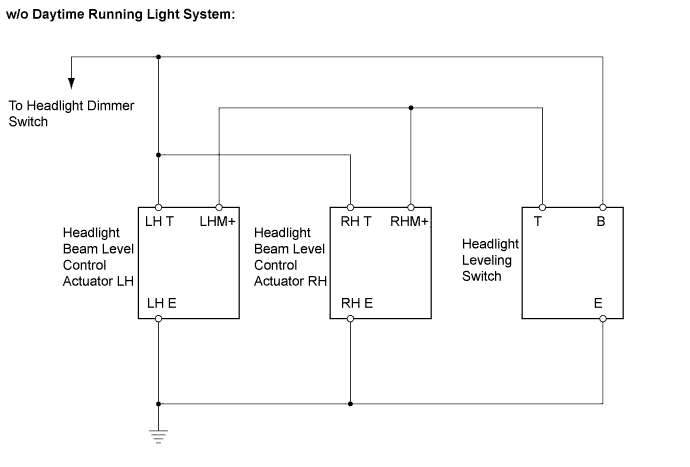
INSPECTION PROCEDURE
| 1. CHECK VEHICLE SPECIFICATIONS |

Check whether the vehicle is equipped with the daytime running light system.
- Result:
Daytime running light system
Proceed to
Yes
A
No
B
|
|
||||

| A | |
 |
| 2. INSPECT FUSE (H-LP LH/H-LP LO LH) |
Remove the H-LP LH/H-LP LO LH fuses from the engine room relay block.
Measure the resistance.
- Standard resistance:
- Below 1 Ω
Remove the H-LP LH/H-LP LO LH fuses.
|
|
||||

| OK | |
|
| 3. INSPECT HEADLIGHT LEVELING SWITCH |
Remove the headlight leveling switch.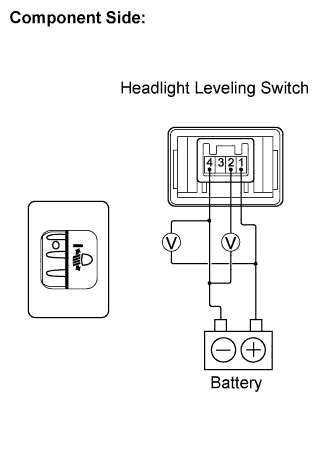
Connect the positive (+) battery lead to terminal 1 and the negative (-) battery lead to terminal 4.
Check the ratio which is obtained by dividing the voltage between terminals 2 and 4 by the voltage between 1 and 4. The voltages must be measured using a voltmeter.
- Standard ratio:
Tester Connection
Switch Position
Specified Condition
1 (B) - 4 (E)
2 (T) - 4 (E)
0
0.87 to 0.93
1 (B) - 4 (E)
2 (T) - 4 (E)
1
0.76 to 0.82
1 (B) - 4 (E)
2 (T) - 4 (E)
2
0.66 to 0.72
1 (B) - 4 (E)
2 (T) - 4 (E)
3
0.55 to 0.61
1 (B) - 4 (E)
2 (T) - 4 (E)
4
0.44 to 0.50
1 (B) - 4 (E)
2 (T) - 4 (E)
5
0.34 to 0.40
Reinstall the headlight leveling switch.
|
|
||||
| OK | |
|
| 4. CHECK HARNESS AND CONNECTOR (H-LP FUSE - HEADLIGHT LEVELING SWITCH) |
Disconnect the D52 headlight leveling switch connectors.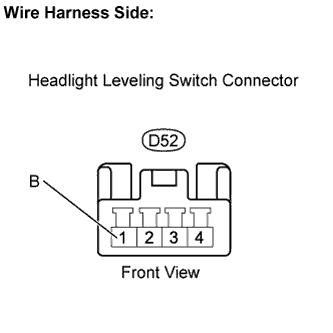
Measure the voltage.
- Standard voltage:
Tester Connection
Condition
Specified Condition
D52-1 (B) - Body ground
Ignition switch on (IG)
Light control switch in TAIL or HEAD position
10 to 14 V
Reconnect the headlight leveling switch connectors.
|
|
||||
| OK | |
|
| 5. INSPECT HEADLIGHT BEAM LEVEL CONTROL ACTUATOR |
Disconnect the B14 and B15 headlight beam level control actuator connectors.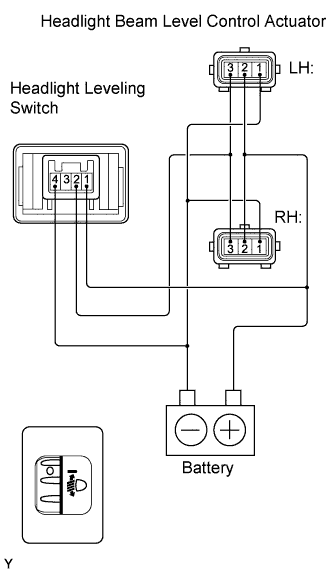
Connect the positive (+) battery lead to headlight leveling switch terminal 1 and the negative (-) battery lead to headlight leveling switch terminal 4.
Connect the positive (+) battery lead to headlight beam level control actuator terminal 2 and the negative (-) battery lead to headlight beam level control actuator terminal 1.
Connect headlight leveling switch terminal 2 and headlight beam level control actuator terminal 3 using a lead wire.
Check the headlight beam level control actuator operation when the headlight leveling switch is operated.
- Standard:
- Headlight beam level control actuator operates.
Reconnect the headlight beam level control actuator connectors.
|
|
||||
| OK | |
|
| 6. CHECK HARNESS AND CONNECTOR (H-LP FUSE - HEADLIGHT BEAM LEVEL CONTROL ACTUATOR) |
Disconnect the B14 and B15 headlight beam level control actuator connectors.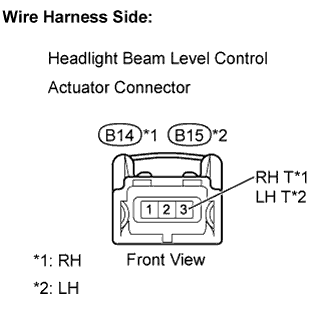
Measure the voltage.
- Standard voltage:
Tester Connection
Condition
Specified Condition
B14-3 (RH T) - Body ground
Ignition switch on (IG)
Light control switch in TAIL or HEAD position
10 to 14 V
B15-3 (LH T) - Body ground
Ignition switch on (IG)
Light control switch in TAIL or HEAD position
10 to 14 V
Reconnect the headlight beam level control actuator connectors.
|
|
||||
| OK | |
|
| 7. CHECK HARNESS AND CONNECTOR (SWITCH - HEADLIGHT BEAM LEVEL CONTROL ACTUATOR) |
Disconnect the D52 headlight leveling switch connector.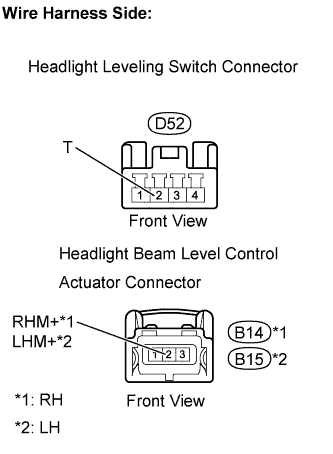
Disconnect the B14 and B15 headlight beam level control actuator connectors.
Measure the resistance.
- Standard resistance:
Tester Connection
Specified Condition
D52-2 (T) - B14-2 (RHM+)
Below 1 Ω
D52-2 (T) - B15-2 (LHM+)
Below 1 Ω
D52-2 (T) or B14-2 (RHM+) - Body ground
10 kΩ or higher
D52-2 (T) or B15-2 (LHM+) - Body ground
10 kΩ or higher
Reconnect the headlight leveling switch connector.
Reconnect the headlight beam level control actuator connectors.
|
|
||||
| OK | |
|
| 8. CHECK HARNESS AND CONNECTOR (HEADLIGHT LEVELING SWITCH - BODY GROUND) |
Disconnect the D52 headlight leveling switch connector.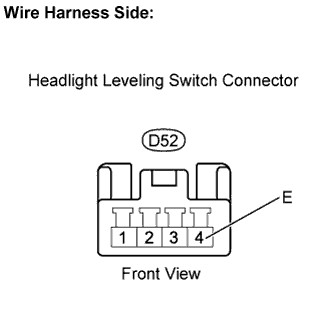
Measure the resistance.
- Standard resistance:
Tester Connection
Specified Condition
D52-4 (E) - Body ground
Below 1 Ω
Reconnect the headlight leveling switch connector.
|
|
||||
| OK | ||
 |
||
| ||
| 9. INSPECT HEADLIGHT LEVELING SWITCH |
Hatchback: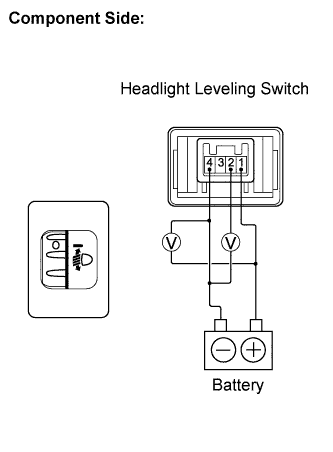
Remove the D52 headlight leveling switch.
Connect the positive (+) battery lead to terminal 1 and the negative (-) battery lead to terminal 4.
Check the ratio which is obtained by dividing the voltage between terminals 2 and 4 by the voltage between 1 and 4. The voltages must be measured using a voltmeter.
- Standard ratio:
Tester Connection
Switch Position
Specified Condition
1 (B) - 4 (E)
2 (T) - 4 (E)
0
0.87 to 0.93
1 (B) - 4 (E)
2 (T) - 4 (E)
1
0.76 to 0.82
1 (B) - 4 (E)
2 (T) - 4 (E)
2
0.66 to 0.72
1 (B) - 4 (E)
2 (T) - 4 (E)
3
0.55 to 0.61
1 (B) - 4 (E)
2 (T) - 4 (E)
4
0.44 to 0.50
1 (B) - 4 (E)
2 (T) - 4 (E)
5
0.34 to 0.40
Reinstall the headlight leveling switch.
Sedan:
Remove the D52 headlight leveling switch.
Connect the positive (+) battery lead to terminal 1 and the negative (-) battery lead to terminal 4.
Check the ratio which is obtained by dividing the voltage between terminals 2 and 4 by the voltage between 1 and 4. The voltages must be measured using a voltmeter.
- Standard ratio:
Tester Connection
Switch Position
Specified Condition
1 (B) - 4 (E)
2 (T) - 4 (E)
0
0.87 to 0.93
1 (B)- 4 (E)
2 (T) - 4 (E)
0.5
0.79 to 0.85
1 (B) - 4 (E)
2 (T) - 4 (E)
1
0.71 to 077
1 (B) - 4 (E)
2 (T) - 4 (E)
1.5
0.63 to 0.69
1 (B) - 4 (E)
2 (T) - 4 (E)
2
0.55 to 0.61
1 (B) - 4 (E)
2 (T) - 4 (E)
2.5
0.47 to 0.533
1 (B) - 4 (E)
2 (T) - 4 (E)
3
0.39 to 0.45
1 (B) - 4 (E)
2 (T) - 4 (E)
3.5
0.31 to 0.37
1 (B) - 4 (E)
2 (T) - 4 (E)
4
0.23 to 0.29
1 (B) - 4 (E)
2 (T) - 4 (E)
4.5
0.15 to 0.21
1 (B) - 4 (E)
2 (T) - 4 (E)
5
0.07 to 0.13
Reinstall the headlight leveling switch.
|
|
||||
| OK | |
|
| 10. CHECK HARNESS AND CONNECTOR (HEADLIGHT DIMMER SWITCH ASSEMBLY - HEADLIGHT LEVELING SWITCH) |
Disconnect the D52 headlight leveling switch connector.
measure the voltage.
- Standard voltage:
Tester Connection
Condition
Specified Condition
D52-1 (B) - Body ground
Ignition switch on (IG)
Light control switch in TAIL or HEAD position
10 to 14 V
Reconnect the headlight leveling switch connector.
|
|
||||
| OK | |
|
| 11. INSPECT HEADLIGHT BEAM LEVEL CONTROL ACTUATOR |
Hatchback:
Disconnect the B14 and B15 headlight beam level control actuator connectors.
Connect the positive (+) battery lead to headlight leveling switch terminal 1 and the negative (-) battery lead to headlight leveling switch terminal 4.
Connect the positive (+) battery lead to headlight beam level control actuator terminal 2 and the negative (-) battery lead to headlight beam level control actuator terminal 1.
Connect headlight leveling switch terminal 2 and headlight beam level control actuator terminal 3 using a lead wire.
Check the headlight beam level control actuator operation when the headlight leveling switch is operated.
- Standard:
- Headlight beam level control actuator operates.
Reconnect the headlight beam level control actuator connectors.
Sedan:
Disconnect the B20 and B21 headlight beam level control actuator connectors.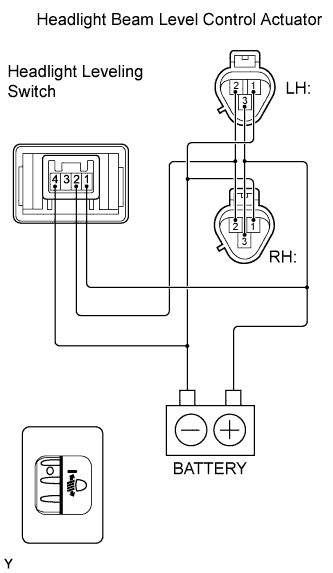
Connect the positive (+) battery lead to headlight leveling switch terminal 1 and the negative (-) battery lead to headlight leveling switch terminal 4.
Connect the positive (+) battery lead to headlight beam level control actuator terminal 3 and the negative (-) battery lead to headlight beam level control actuator terminal 1.
Connect headlight leveling switch terminal 2 and headlight beam level control actuator terminal 2 using a lead wire.
Check the headlight beam level control actuator operation when the headlight leveling switch is operated.
- Standard:
- Headlight beam level control actuator operates.
Reconnect the headlight beam level control actuator connectors.
|
|
||||
| OK | |
|
| 12. CHECK HARNESS AND CONNECTOR (DIMMER SWITCH - HEADLIGHT BEAM LEVEL CONTROL ACTUATOR) |
Hatchback:
Disconnect the B14 and B15 headlight beam level control actuator connectors.
Measure the voltage.
- Standard voltage:
Tester Connection
Condition
Specified Condition
B14-3 (RH T) - Body ground
Ignition switch on (IG)
Light control switch in TAIL or HEAD position
0 V → 10 to 14 V
B15-3 (LH T) - Body ground
Ignition switch on (IG)
Light control switch in TAIL or HEAD position
0 V → 10 to 14 V
Reconnect the headlight beam level control actuator connectors.
Sedan:
Disconnect the B20 and B21 headlight beam level control actuator connectors.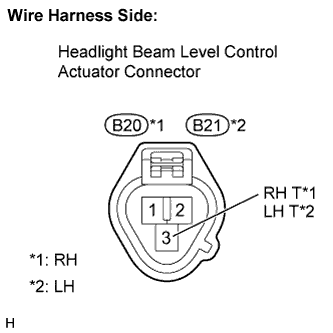
Measure the voltage.
- Standard voltage:
Tester Connection
Condition
Specified Condition
B20-3 (RH T) - Body ground
Ignition switch on (IG)
Light control switch in TAIL or HEAD position
0 V → 10 to 14 V
B21-3 (LH T) - Body ground
Ignition switch on (IG)
Light control switch in TAIL or HEAD position
0 V → 10 to 14 V
Reconnect the headlight beam level control actuator connectors.
|
|
||||
| OK | |
|
| 13. CHECK HARNESS AND CONNECTOR (SWITCH - HEADLIGHT BEAM LEVEL CONTROL ACTUATOR) |
Hatchback:
Disconnect the D52 headlight leveling switch connector.
Disconnect the B14 and B15 headlight beam level control actuator connectors.
Measure the resistance.
- Standard resistance:
Tester Connection
Specified Condition
D52-2 (T) - B14-2 (RHM+)
Below 1 Ω
D52-2 (T) - B15-2 (LHM+)
Below 1 Ω
D52-2 (T) or B14-2 (RHM+) - Body ground
10 kΩ or higher
D52-2 (T) or B15-2 (LHM+) - Body ground
10 kΩ or higher
Reconnect the headlight leveling switch connector.
Reconnect the headlight beam level control actuator connectors.
Sedan:
Disconnect the D52 headlight leveling switch connector.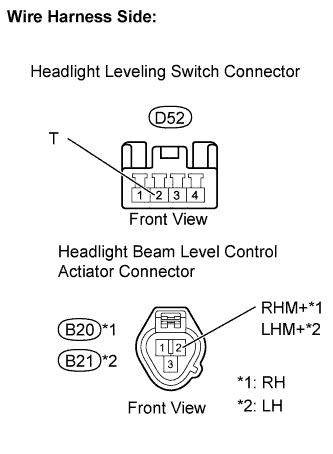
Disconnect the B20 and B21 headlight beam level control actuator connectors.
Measure the resistance.
- Standard resistance:
Tester Connection
Specified Condition
D52-2 (T) - B20-2 (RHM+)
Below 1 Ω
D52-2 (T) - B21-2 (LHM+)
Below 1 Ω
D52-2 (T) or B20-2 (RHM+) - Body ground
10 kΩ or higher
D52-2 (T) or B21-2 (LHM+) - Body ground
10 kΩ or higher
Reconnect the headlight leveling switch connector.
Reconnect the headlight beam level control actuator connectors.
|
|
||||
| OK | |
|
| 14. CHECK HARNESS AND CONNECTOR (HEADLIGHT LEVELING SWITCH - BODY GROUND) |
Disconnect the D52 headlight leveling switch connector.
Measure the resistance.
- Standard resistance:
Tester Connection
Specified Condition
D52-4 (E) - Body ground
Below 1 Ω
Reconnect the headlight leveling switch connector.
|
|
||||
| OK | ||
|
||
| ||