INSTALLATION
Removal / installation · Vehicles built from Nov 2005
| 1. INSTALL FAN AND GENERATOR V BELT |

Temporarily install the fan and generator V belt onto each pulley.
- NOTICE:
- Before installing the V belt, check each pulley for any kind of liquid and chips.
- Before installing the V belt, check each pulley for any kind of liquid and chips.
- Check that the ribs of the V belt are correctly fitted into the grooves of the pulleys.
- Check that the ribs of the V belt are correctly fitted into the grooves of the pulleys.
| 2. ADJUST FAN AND GENERATOR V BELT |
Insert a bar between the generator and the engine. Pull the bar toward the front of the vehicle and adjust the tension.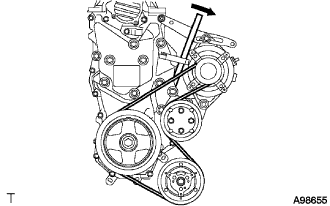

Tighten bolt A, then tighten bolt B.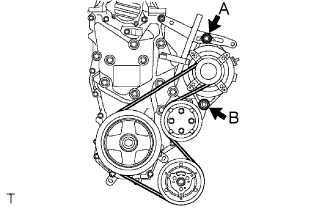
- Torque:
- Bolt A:
- 19 N*m{ 189 kgf*cm , 14 ft.*lbf }
- Bolt B:
- 32 N*m{ 326 kgf*cm , 24 ft.*lbf }
| 3. INSPECT DRIVE BELT DEFLECTION AND TENSION |
Inspect the fan and generator V belt deflection.
- Pressing force:
- 98 N (10kgf, 221 lbf)
New belt
mm (in.)
Used belt
mm (in.)
5.0 to 6.0
(0.197 to 0.236)
7.0 to 8.5
(0.276 to 0.335)
Inspection the fan and generator V belt tension.
New belt
mm (in.)
Used belt
mm (in.)
980 to 1176
(100 to 120, 220 to 264)
490 to 686
(50 to 70, 110 to 154)
- NOTICE:
- Check the V belt deflection at the specified point.
- Check the V belt deflection at the specified point.
- When installing a new belt, set its tension value as specified.
- When installing a new belt, set its tension value as specified.
- When checking a belt used for over 5 minutes, confirm that the deflection value is within the specified range for a used belt.
- When checking a belt used for over 5 minutes, confirm that the deflection value is within the specified range for a used belt.
- When reinstalling a belt used for over 5 minutes, check whether its deflection value is within the specified range for the used belt.
- When reinstalling a belt used for over 5 minutes, check whether its deflection value is within the specified range for the used belt.
- When using a belt tension gauge, confirm its accuracy first by using a master gauge.
- When using a belt tension gauge, confirm its accuracy first by using a master gauge.
| 4. INSTALL WIRE HARNESS |
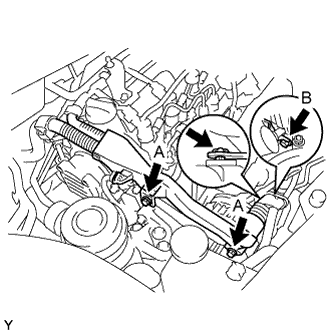 |
Install the wire harness with the 3 bolts and clip.
- Torque:
- Bolt A:
- 13 N*m{ 131 kgf*cm , 14 ft.*lbf }
- Bolt B:
- 11 N*m{ 112 kgf*cm , 8.1 ft.*lbf }
| 5. INSTALL ENGINE UNDER COVER |
Provisionally install the engine under cover with the 5 bolts, 4 screws and 2 clips.
Tighten the 4 screws.
Tighten the 5 bolts.
- Torque:
- 5.0 N*m{ 51 kgf*cm , 44 in.*lbf }
| 6. INSTALL ENGINE COVER SUB-ASSEMBLY NO.1 |
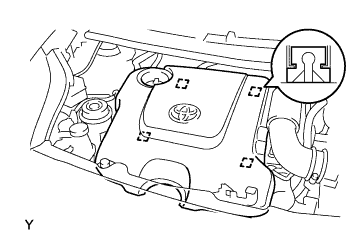 |
Engage the 4 pins and install engine cover No. 1.