INSTALLATION
Removal / installation · Vehicles built from Nov 2005
| 1. INSTALL CAMSHAFT |

  |
Apply engine oil to the camshaft journal portion and cam portion.
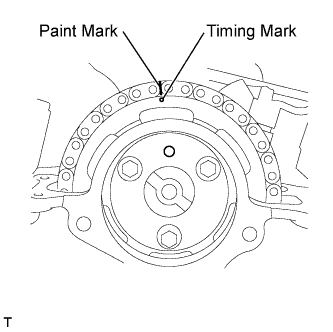
Confirm that the timing mark of the timing sprocket and the paint mark of the timing chain are aligned.
Install the camshaft with the camshaft timing sprocket and camshaft with the 3 bolts.
- NOTICE:
- Do not tilt the valve rocker arm when installing the camshaft onto the cylinder head.
Temporarily install the camshaft timing sprocket and camshaft with the 3 bolts.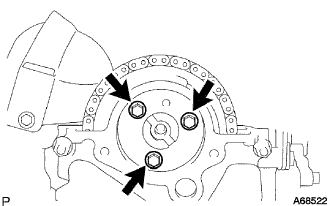
Examine the front marks and numbers and check that the sequence order is as shown in the illustration. Then, temporarily tighten the camshaft with the camshaft bearing caps and bolts.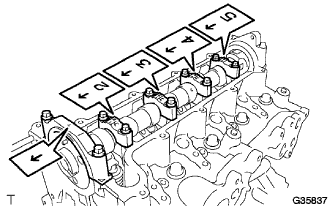
Using several steps, temporarily tighten the bolts in the sequence shown in the illustration and then tighten the bolts to the specified torque.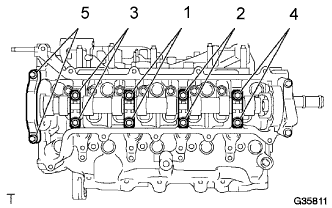
- Torque:
- 19 N*m{ 194 kgf*cm , 14 ft.*lbf }
Holding the hexagonal service portion of the camshaft with a wrench, tighten 3 new bolts to the specified torque.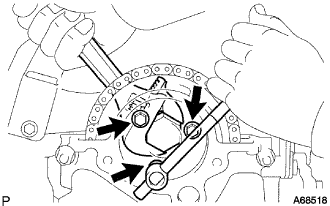
- Torque:
- 20 N*m{ 204 kgf*cm , 15 ft.*lbf }
Remove the 2.5 mm (0.098 in.) diameter bar from the chain tensioner.
Check that the timing mark of the camshaft timing sprocket and the straight pin hole in the camshaft timing sprocket are in the positions shown in the illustration.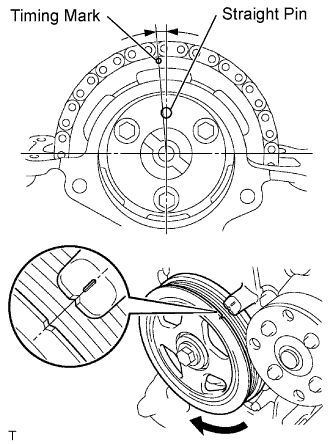
Apply adhesive to 2 or 3 threads of the service hole screw plug bolt end.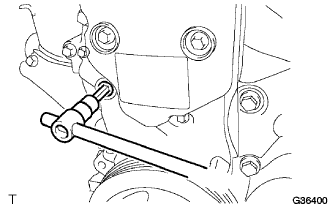
- Adhesive:
- Part No. 08833-00070, THREE BOND 1324, or the equivalent
- NOTICE:
- Remove any oil from the belts and bolt holes.
Using an 8 mm socket hexagon wrench, install the service hole screw plug.
- Torque:
- 15 N*m{ 153 kgf*cm , 11 ft.*lbf }
| 2. INSPECT VALVE CLEARANCE |
Set the No. 1 cylinder to TDC/Compression.
Turn the crankshaft pulley until the grooves of the crankshaft damper and oil pump are aligned.
Check that the timing mark of the camshaft timing sprocket is in the position shown in the illustration.
- HINT:
- If not, turn the crankshaft damper 1 revolution (360°) to align them as above.
Check the valve clearance of the No. 1 cylinder exhaust valve and the No. 2 cylinder intake valve.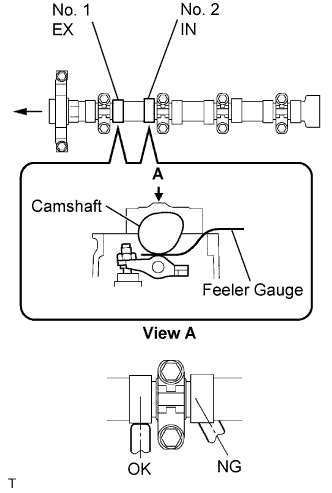
Using a feeler gauge, measure the clearance between the camshaft and valve rocker arm No. 1.
- Valve clearance (cold):
- 0.11 to 0.17 mm (0.004 to 0.007 in.) for intake
- 0.14 to 0.20 mm (0.006 to 0.008 in.) for exhaust
- NOTICE:
- Insert the feeler gauge into the center of the roller surface, parallel to valve rocker arm No. 1.
- Insert the feeler gauge into the center of the roller surface, parallel to valve rocker arm No. 1.
- Do not apply excessive force to the valve adjusting screw when using adjusting tools such as SST and a screwdriver.
- Do not apply excessive force to the valve adjusting screw when using adjusting tools such as SST and a screwdriver.
- HINT:
- If the clearance is not as specified, record the out-of-specification measurement, then adjust the valve clearance.
Check the valve clearance of the No. 1 cylinder intake valve and the No. 3 cylinder exhaust valve.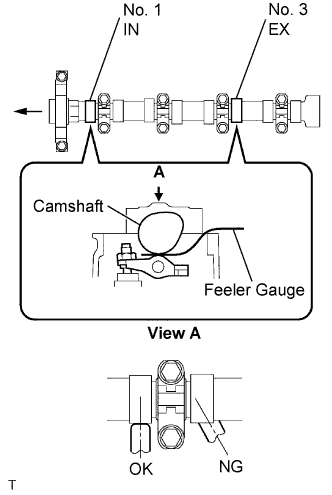
Turn the crankshaft by a further 180° clockwise.
Using a feeler gauge, measure the clearance between the camshaft and valve rocker arm No. 1 as shown in the illustration.
- Valve clearance (cold):
- 0.11 to 0.17 mm (0.004 to 0.007 in.) for intake
- 0.14 to 0.20 mm (0.006 to 0.008 in.) for exhaust
- NOTICE:
- Insert the feeler gauge into the center of the roller surface, parallel to valve rocker arm No. 1.
- Do not apply excessive force to the valve adjusting screw with adjusting tools when measuring or adjusting.
- Insert the feeler gauge into the center of the roller surface, parallel to valve rocker arm No. 1.
- HINT:
- If the clearance is not as specified, record the out-of-specification measurement, then adjust the valve clearance.
Check the valve clearances of the No. 3 cylinder intake valve and No. 4 cylinder exhaust valve.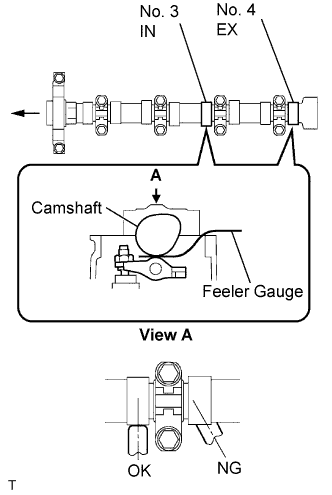
Turn the crankshaft by a further 180° clockwise.
Using a feeler gauge, measure the clearance between the camshaft and valve rocker arm No. 1 as shown in the illustration.
- Valve clearance (cold):
- 0.11 to 0.17 mm (0.004 to 0.007 in.) for intake
- 0.14 to 0.20 mm (0.006 to 0.008 in.) for exhaust
Check the valve clearances of the No. 2 cylinder intake valve and No. 4 cylinder intake valve.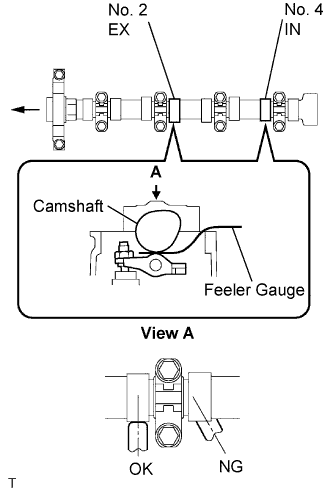
Turn the crankshaft by a further 180° clockwise.
Using a feeler gauge, measure the clearance between the camshaft and valve rocker arm No. 1.
- Valve clearance (cold):
- 0.11 to 0.17 mm (0.004 to 0.007 in.) for intake
- 0.14 to 0.20 mm (0.006 to 0.008 in.) for exhaust
- NOTICE:
- Insert the feeler gauge into the center of the roller surface, parallel to valve rocker arm No. 1.
- Do not apply excessive force to the valve adjusting screw with adjusting tools when measuring or adjusting.
- Insert the feeler gauge into the center of the roller surface, parallel to valve rocker arm No. 1.
- HINT:
- If the clearance is not as specified, record the out-of-specification measurement, then adjust the valve clearance.
| 3. ADJUST ADJUST VALVE CLEARANCE |
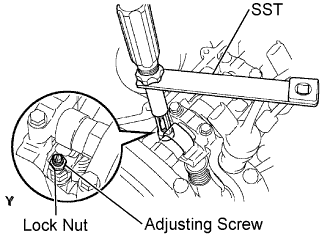 |
Using SST and a screwdriver, loosen the valve adjusting nut while keeping the valve adjusting screw in position.
- SST
- 09248-56010
Adjusting valve clearance (intake side).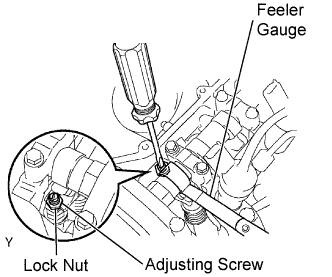
Insert a thickness gauge (0.14mm (0.006 in.)) between the camshaft and valve rocker arm No. 1, and turn the valve adjusting screw to adjust it.
- Valve clearance (cold):
- 0.14mm (0.006 in.)
Using SST and a screwdriver, tighten the valve adjusting nut while keeping the valve adjusting screw in position.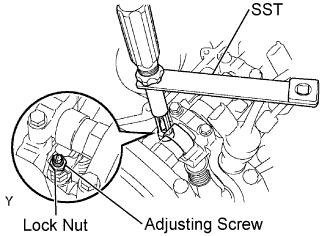
- Torque:
- With SST:
- 13 N*m{ 133 kgf*cm , 9.6 in.*lbf }
- Without SST:
- 20 N*m{ 204 kgf*cm , 15 in.*lbf }
Adjust the valve clearance (exhaust side).
- Valve clearance (cold):
- 0.17mm (0.007 in.)
- HINT:
- Perform the same procedure as for the intake valve clearance adjustment.
| 4. INSTALL INJECTION OR SUPPLY PUMP ASSEMBLY |
- NOTICE:
- When installing, clean the seal surfaces of the fuel inlet pipe, supply pump and common rail.
Apply a light coat of engine oil to a new O-ring.
Install the O-ring onto the supply pump.
Install the supply pump drive coupling onto the supply pump drive shaft.
Temporarily install the supply pump with the 3 bolts.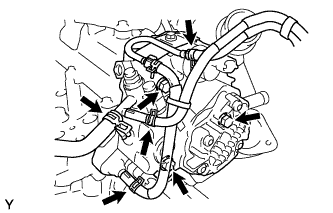
Remove the vinyl bag and rubber band from the supply pump.
Connect the 2 connectors.
Connect the 3 fuel hoses.
| 5. INSTALL FUEL INLET PIPE SUB-ASSEMBLY |
 |
- NOTICE:
- When replacing the supply pump, the fuel inlet pipe must also be replaced.
- Replace the fuel inlet pipe with a new one when the fuel inlet pipe has been removed and reinstalled more than 5 times.
- When replacing the supply pump, the fuel inlet pipe must also be replaced.
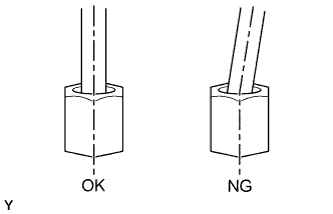
Temporarily install the fuel inlet pipe onto the supply pump and common rail.
- NOTICE:
- Install the pipe and union nut vertically, not at a tilt.
Tighten the supply pump with the 3 bolts.
- Torque:
- 20 N*m{ 204 kgf*cm , 15 ft.*lbf }
Using SST, tighten the fuel inlet pipe union nut of the fuel inlet pipe on the common rail side.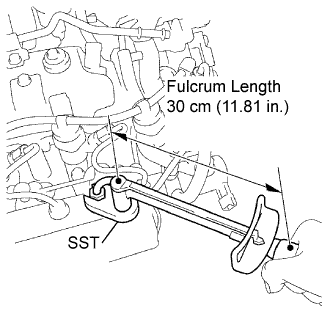
- SST
- 09023-38401
- Torque:
- 23 N*m{ 235 kgf*cm , 17 ft.*lbf } with SST
- 25 N*m{ 255 kgf*cm , 18 ft.*lbf } without SST
- HINT:
- Use a torque wrench with a fulcrum length of 30 cm (11.81 in.).
- After the fuel inlet pipe has been reassembled, check that the used pipe has no deflection and is installed properly.
If it has deflection or could not be installed properly, replace the used pipe with a new one.
- Use a torque wrench with a fulcrum length of 30 cm (11.81 in.).
| 6. INSTALL NOZZLE LEAKAGE PIPE ASSEMBLY |
 |
- NOTICE:
- Never reuse the nozzle leakage pipe once it has been removed from the injectors and supply pump.
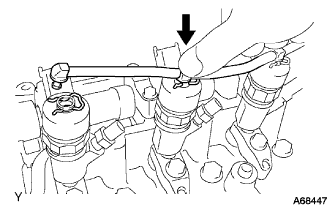
- Push the nozzle leakage pipe until it makes a click sound.
- Never reuse the nozzle leakage pipe once it has been removed from the injectors and supply pump.
Install 5 new retainer springs onto the injectors and supply pump.
Push the new nozzle leakage pipe into each injector and supply pump.
| 7. INSTALL INJECTION PIPE CLAMP NO. 1 |
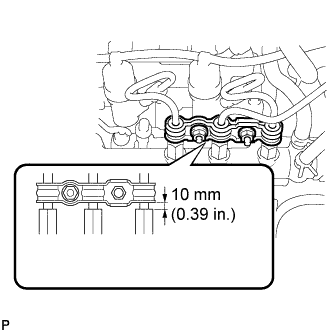 |
Install injection pipe clamp No. 1 with the 2 nuts as shown in the illustration.
- Torque:
- 9.0 N*m{ 92 kgf*cm , 80 in.*lbf }
| 8. INSTALL VACUUM REGULATING VALVE ASSEMBLY |
Install the vacuum regulating valve with the 3 bolts.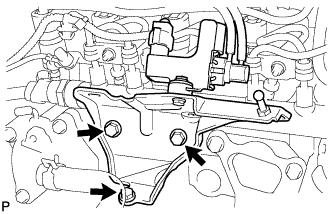
- Torque:
- 20 N*m{ 204 kgf*cm , 15 in.*lbf }
Connect the vacuum regulating valve connector and 2 vacuum hoses.
| 9. INSTALL EGR COOLER ASSEMBLY |
Install 2 new gaskets.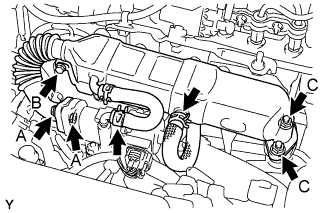
Temporarily install the EGR cooler assembly with the bolt and 4 nuts, in the order described below.
Tighten bolt B.
- Torque:
- 11 N*m{ 112 kgf*cm , 8 ft.*lbf }
Tighten the 2 A nuts.
- Torque:
- 11 N*m{ 112 kgf*cm , 8 ft.*lbf }
Tighten the 2 C nuts.
- Torque:
- 20 N*m{ 204 kgf*cm , 15 ft.*lbf }
Connect the 2 water by-pass hoses.
| 10. INSTALL AIR CLEANER CAP SUB-ASSEMBLY WITH HOSE |
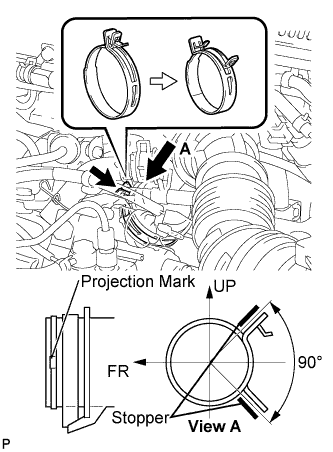 |
Align the matchmarks of air cleaner hose No. 1 and turbocharger, and connect air cleaner hose No. 1 to the turbocharger and fasten air cleaner hose clamp No. 1.
- NOTICE:
- Make sure that the hose clamp is at the correct angle when installing it.
Connect the ventilation hose to the cylinder head cover.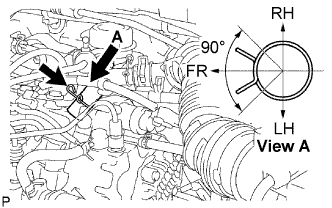
- NOTICE:
- Make sure that the hose clamp is at the correct angle when installing it.
Install the air cleaner cap onto the air cleaner case, then hang the 2 hook clamps.
Fit the wire harness into the air cleaner cap.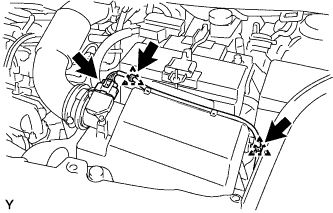
Engage the 2 wire harness clamps.
Connect the mass air flow meter connector.
| 11. INSTALL VACUUM PUMP ASSEMBLY |
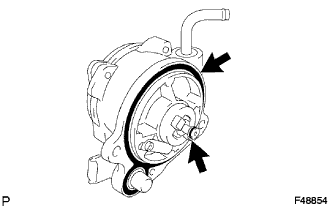 |
Coat 2 new O-rings with engine oil, and place them onto the vacuum pump.
Apply engine oil to the oil pipe at the tip of the vacuum pump.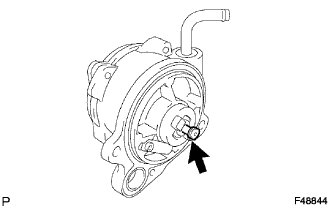
Install the vacuum pump so that the coupling teeth A on the side of the vacuum pump can engage with the tip groove of camshaft B.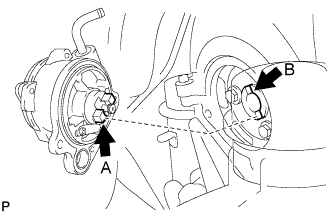
Install 2 new bolts onto the vacuum pump.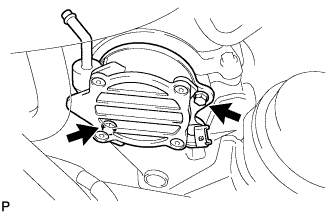
- Torque:
- 21 N*m{ 214 kgf*cm , 16 ft.*lbf }
Connect the vacuum hose with the clip to the vacuum pump.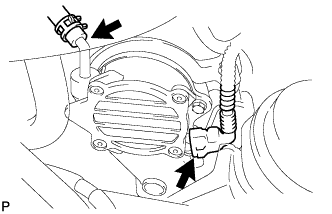
Connect the cam position sensor connector.
| 12. INSTALL CYLINDER HEAD COVER SUB-ASSEMBLY |
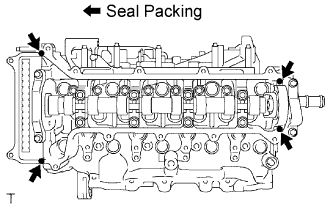 |
Apply seal packing to the 4 locations as shown in the illustration, then install the cylinder head cover.
- Seal packing:
- Part No. 08826-00080 or the equivalent
- NOTICE:
- Remove any oil from the contact surface.
- Remove any oil from the contact surface.
- Install the cylinder head cover within 3 minutes, and tighten the bolts within 15 minutes of applying the seal packing.
- Install the cylinder head cover within 3 minutes, and tighten the bolts within 15 minutes of applying the seal packing.
Temporarily tighten the cylinder head cover with the 12 bolts.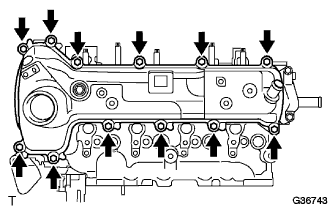
Tighten the 12 bolts to the specified torque as shown in the illustration.
- Torque:
- 13 N*m{ 133 kgf*cm , 10 ft.*lbf }
Install the connector to vacuum reservoir tube with the 2 bolts.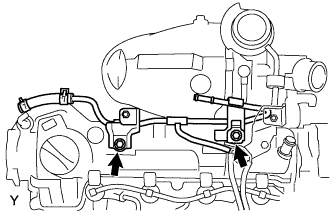
- Torque:
- 11 N*m{ 112 kgf*cm , 8 ft.*lbf }
Connect the ventilation hose to the cylinder head.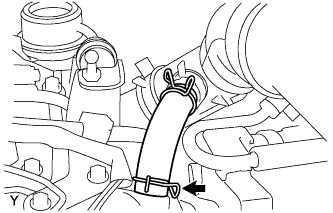
Connect the vacuum hose shown in the illustration.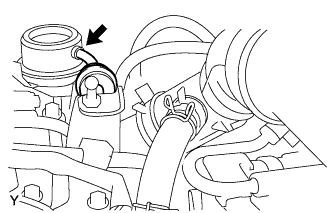
Connect the 3 vacuum hoses shown in the illustration.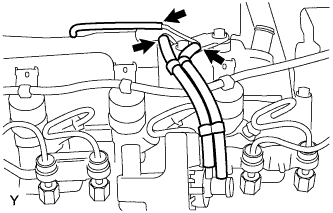
Connect the hose shown in the illustration.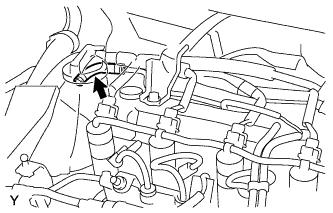
Connect the hose shown in the illustration.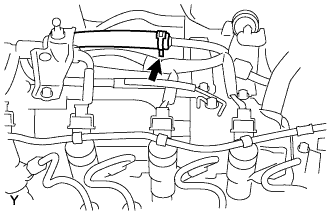
Install the 3 bolts and wire harness clamp shown in the illustration, and connect the engine wire harness.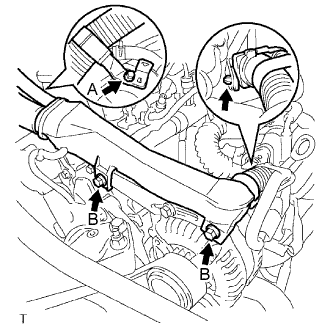
- Torque:
- Bolt A:
- 11 N*m{ 112 kgf*cm , 8.1 ft.*lbf }
- Bolt B:
- 13 N*m{ 131 kgf*cm , 9.5 ft.*lbf }
Connect the common rail connector.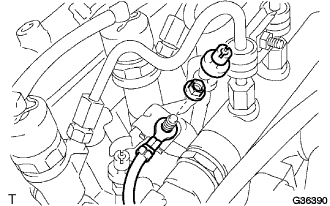
Install the wire harness with the screw grommet and the nut.
- Torque:
- 1.6 N*m{ 16 kgf*cm , 14 in.*lbf }
Connect the VSV connector and wire harness clamp shown in the illustration.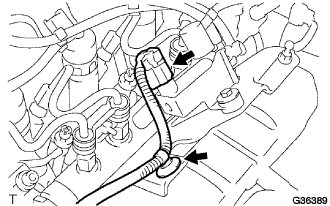
Connect the wire harness clamp shown in the illustration.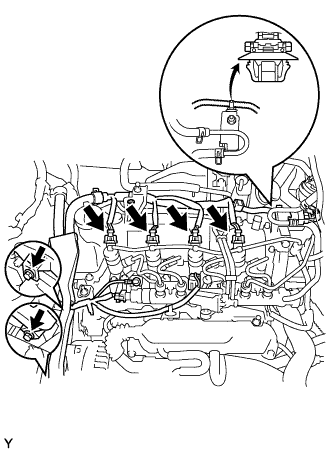
Connect the supply pump connector.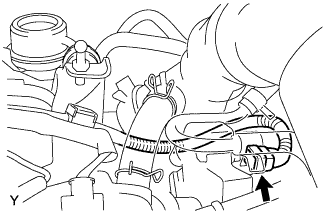
Connect the injector connector.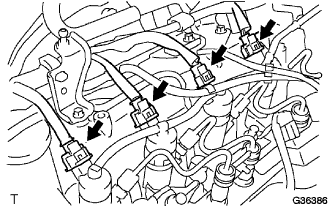
| 13. CONNECT CABLE TO NEGATIVE BATTERY TERMINAL |
- Torque:
- 5.4 N*m{ 55 kgf*cm , 48 ft.*lbf }
| 14. ADD ENGINE COOLANT |
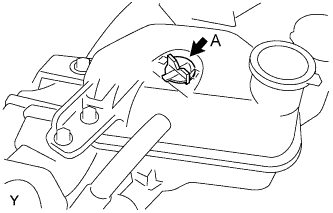 |
Remove air bleed valve A.
Fill the cooling system with coolant up to line B.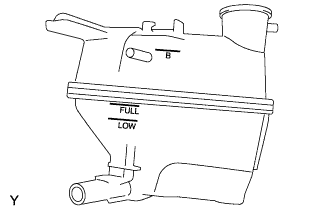
- Capacity:
- 4.7 liters (5.0 US qts, 4.1 lmp. qts)
- HINT:
- Use of improper coolant may damage the engine cooling system.
- Use only Toyota Super Long Life Coolant or similar high quality ethylene glycol based non-silicate, non-amine, non-nitrite, and non-borate engine coolant with long-life hybrid organic acid technology (coolant with long-life hybrid organic acid technology consists of a combination of low phosphates and organic acids).
- Use of improper coolant may damage the engine cooling system.
- NOTICE:
- Do not substitute plain water for engine coolant.
Tighten air bleed valve A.
Install the radiator cap.
Warm up the engine.
Set the air conditioning as follows while warming up the engine.
Item
Manual air conditioning system
Automatic air conditioning system
Set control as follows
Fan speed - Any setting except "OFF"
Temperature - Toward WARM
Air conditioning switch "OFF"
Fan speed - Any setting except "OFF"
Temperature - To the highest temperature
Air conditioning switch "OFF"
"AUTO" switch "OFF"
Run the engine at 3,000 rpm for 5 seconds and idling for 45 seconds alternately.
Do the above operation for 7 minutes or more.
After the engine cools down, check that the coolant level is between LOW and FULL lines.
| 15. CHECK FOR ENGINE COOLANT LEAKAGE |
- CAUTION:
- To avoid the danger of being burned, do not remove the radiator cap sub-assembly while the engine and radiator assembly are still hot. Thermal expansion will cause hot engine coolant and steam to blow out from the radiator assembly.
Fill the radiator assembly with engine coolant, then attach a radiator cap tester.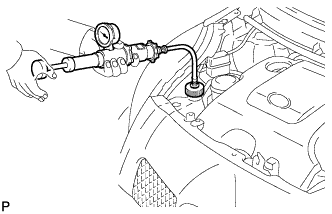
Pump it to 137 kPa (1.4 kgf/cm2, 19.9 psi), then check that the pressure does not drop.
If the pressure drops, check the hoses, radiator assembly and water pump assembly for leakage. If there are no signs or traces of external engine coolant leakage, check the heater core, cylinder block and head.
| 16. CHECK FOR FUEL LEAKAGE |
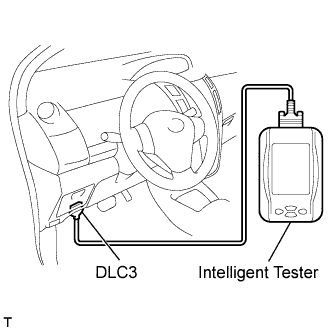 |
Connect an intelligent tester to the DLC3.
Turn the ignition switch on (IG).
Turn the tester on.
Select the following menu items: Powertrain / Engine and ECT / Active Test.
- HINT:
- Fuel pressure inside common rail pressurized to 135 MPa and engine speed increased to 2,000 rpm when ON selected.
- Above conditions preserved while test ON.
- Fuel pressure inside common rail pressurized to 135 MPa and engine speed increased to 2,000 rpm when ON selected.
| 17. CHECK FOR ENGINE OIL LEAKAGE |
| 18. INSTALL ENGINE COVER SUB-ASSEMBLY NO. 1 |
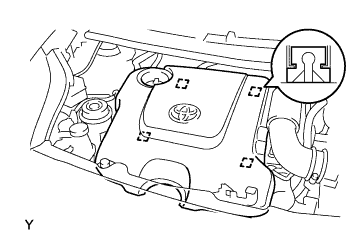 |
Engage the 4 pins and install engine cover No. 1.
| 19. INSTALL ENGINE UNDER COVER |
Provisionally install the engine under cover with the 5 bolts, 4 screws and 2 clips.
Tighten the 4 screws.
Tighten the 5 bolts.
- Torque:
- 5.0 N*m{ 51 kgf*cm , 44 in.*lbf }
| 20. INSTALL FRONT WHEEL RH |
- Torque:
- 103 N*m{ 1,050 kgf*cm , 76 ft.*lbf }