REPAIR
Removal / installation · Vehicles built from Nov 2005
| 1. INSPECT VALVE SEATS |

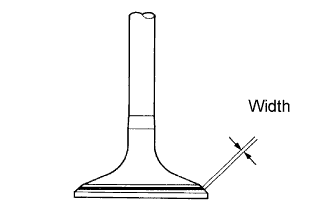  |
Apply a light coat of prussian blue to each valve face.
Gently push the valve seat, with the valve installed onto the cylinder head.
- NOTICE:
- Do not rotate the valve.
Remove the valve from the cylinder head.
If blue appears 360° around the face, the valve is concentric. If not, replace the valve.
If blue appears 360° around the valve seat, the guide and face are concentric. If not, resurface the seat.
Check that the seat contact is in the middle of the valve face with the following width.
| 2. REPAIR INTAKE VALVE SEATS |
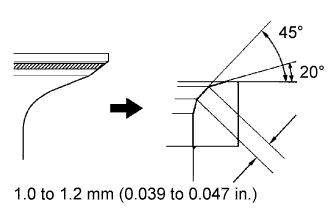 |
- NOTICE:
- Releasing the seat cutter pressure gradually helps to make the valve seat faces smoother.
If the seating is too high on the valve face, use 20° and 45° cutters to correct the seat.
If the seating is too low on the valve face, use 60° and 45° cutters to correct the seat.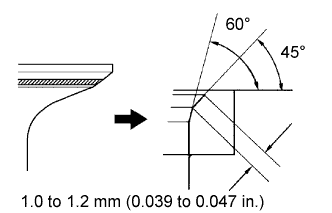
Lap the valve and valve seat with an abrasive compound by hand.
Recheck the valve seating position.
| 3. REPAIR EXHAUST VALVE SEATS |
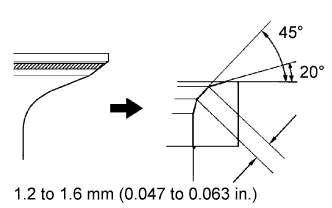 |
- NOTICE:
- Releasing the seat cutter pressure gradually helps to make the valve seat faces smoother.
If the seating is too high on the valve face, use 20° and 45° cutters to correct the seat.
If the seating is too low on the valve face, use 60° and 45° cutters to correct the seat.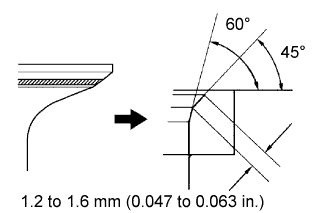
Lap the valve and valve seat with an abrasive compound by hand.
Recheck the valve seating position.